
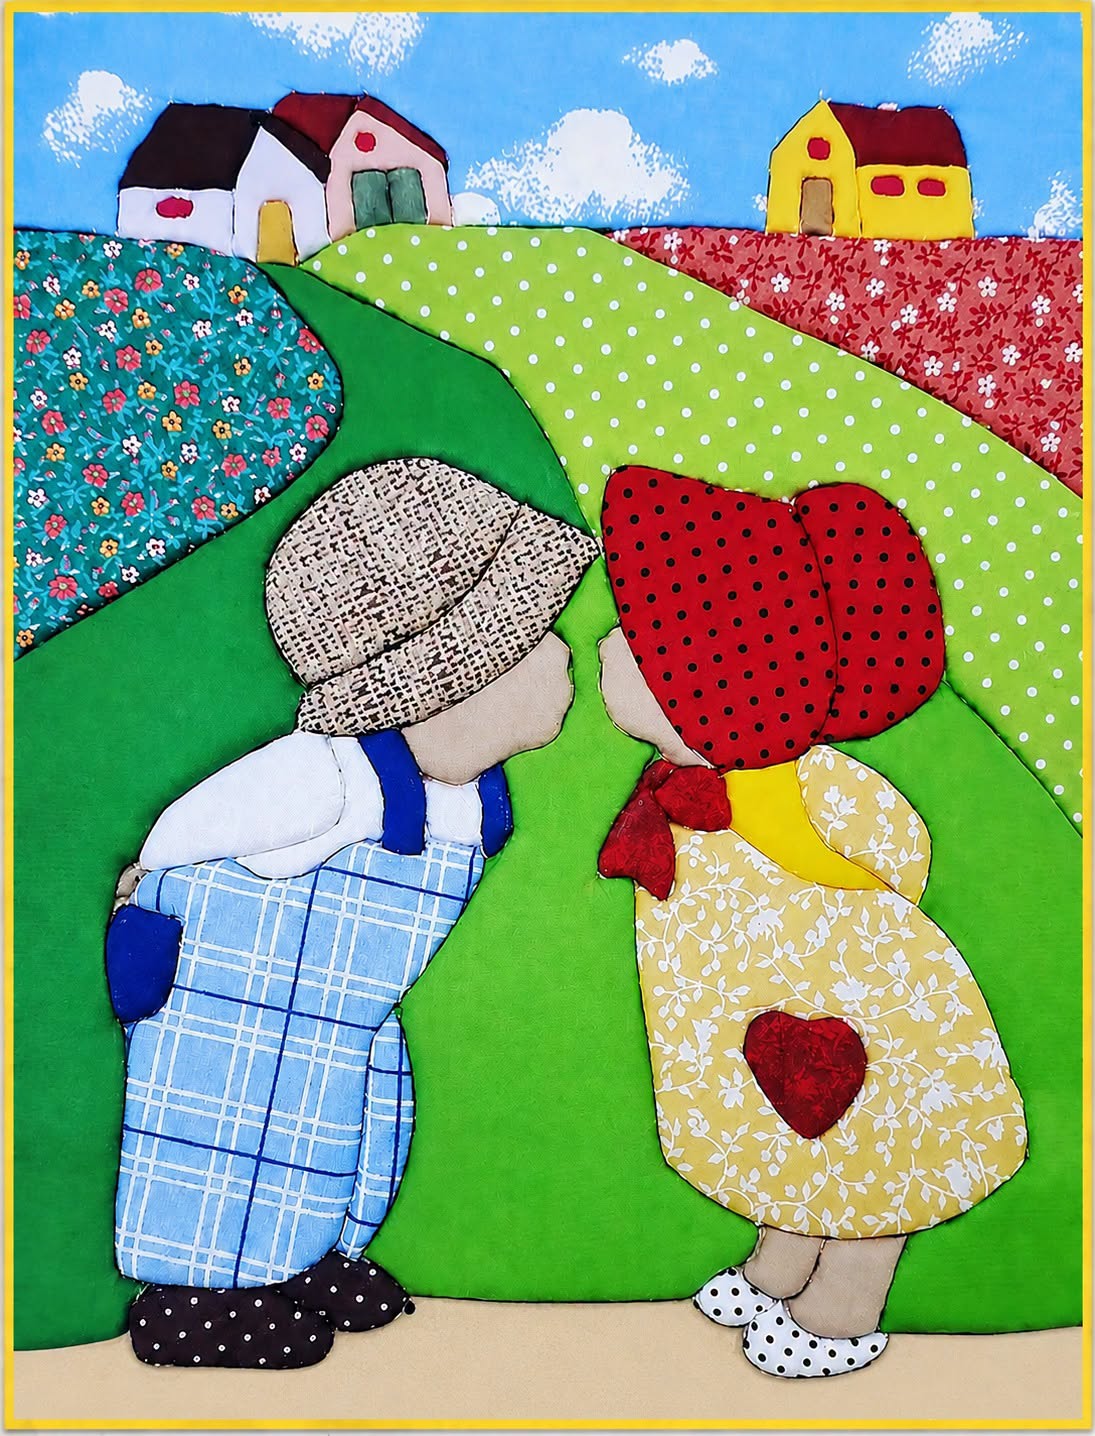
Sunbonnet Double Bedspread Panel with Applique Quilt Pattern is a charming sewing project that combines traditional appliqué, colorful fabric selection, gentle storytelling, and practical quilting techniques. Inspired by the nostalgic scene shown in the reference image, this design features two sweet Sunbonnet-style figures meeting in a peaceful countryside setting. Their oversized bonnets, patterned clothing, simple body shapes, rolling green hills, and small houses create a warm composition that looks especially beautiful as the central panel of a handmade bedspread. The project is suitable for quilters who enjoy decorative fabric pictures and want to create something personal without relying on overly complicated piecing. With careful preparation, even a confident beginner can complete the panel by working slowly and assembling one section at a time.
The name Sunbonnet Double Bedspread Panel with Applique Quilt Pattern describes the main characteristics of the project. “Sunbonnet” refers to the recognizable figures wearing large fabric bonnets that partially or completely hide their faces. A “double bedspread panel” is a decorative fabric section designed to become part of a bed covering sized for a double bed. The phrase “appliqué quilt pattern” means that individual fabric shapes are cut and attached to a larger background rather than being created entirely from traditional patchwork blocks. These appliqué pieces form the people, clothes, landscape, houses, and other details. Once attached, the completed picture can be quilted and incorporated into a larger bedspread layout.
One of the best qualities of this appliqué quilt pattern is the freedom it gives you to personalize every detail. You may use floral fabric for the dresses, plaid material for the overalls, polka dots for the bonnets, and bright solids for the hills. Scraps from previous sewing projects are perfect for many of the smaller shapes. The finished panel can be enlarged for the center of a bedspread, repeated as several decorative blocks, or combined with borders and coordinating quilt blocks. The instructions below explain how to study the design, prepare the pattern pieces, assemble the appliqué scene, quilt the panel, and finish it as part of a comfortable double bedspread.
Planning the Sunbonnet Appliqué Design and Choosing Materials
Begin by deciding how large you want the central panel to be. For a double bedspread, a panel measuring approximately 28 by 36 inches can create a strong focal point, although you may enlarge or reduce the dimensions according to your bed and preferred layout. Remember that the completed panel will usually be surrounded by additional fabric strips, patchwork blocks, or wide borders. Add at least half an inch around every side of the background so you can trim and square the piece after completing the appliqué.
DISCOVER MORE FREE PATTERNS HERE!
The most important material is a stable cotton background. Choose a smooth quilting cotton in green, cream, light blue, or another shade that supports the countryside theme. In the reference design, several green fabrics form curved hills and pathways, while blue fabric creates the sky. You can construct the background from separate sections or use one large piece of fabric and appliqué the landscape shapes over it. Prewash your fabrics when possible to reduce the risk of uneven shrinking or color bleeding later.
Collect a variety of cotton scraps for the figures and scenery. The Sunbonnet appliqué looks especially attractive when prints and solids are mixed. Useful choices include tiny florals, gingham, plaid, polka dots, subtle textures, and small geometric prints. Avoid extremely large motifs on small pieces because the pattern may disappear when the shape is cut. Select fabrics with enough contrast so that the bonnets, clothing, arms, shoes, and background remain visually separate.
You will also need lightweight fusible web, sharp fabric scissors, paper scissors, an iron, an ironing surface, matching sewing thread, pins, a fabric marking tool, and a sewing machine. Fusible web temporarily secures the appliqué pieces and helps prevent them from shifting during stitching. Choose a product intended for lightweight fabric because heavy adhesives may make the finished quilt panel stiff. Follow the manufacturer’s temperature instructions when pressing.
Prepare basic quilting supplies for the final stage, including batting, backing fabric, safety pins or basting spray, and quilting thread. Cotton or an 80/20 cotton-polyester blend batting works well for a bedspread because it provides softness without excessive bulk. The backing should be large enough to cover the entire finished bedspread, including several extra inches around all sides for quilting and trimming.
Before cutting your chosen fabrics, make a paper version of the complete Sunbonnet Double Bedspread Panel with Applique Quilt Pattern. Trace each major shape separately and label it clearly. Typical pattern pieces include the bonnet, head or neck, torso, sleeves, dress, apron, overalls, shoes, hills, houses, roofs, doors, windows, scarf, heart-shaped pocket, and pathway. Number pieces that overlap so you can remember the correct assembly order.
Preparing and Cutting the Appliqué Pattern Pieces
Print or draw the pattern at the desired size. When using fusible appliqué, trace each shape onto the paper side of the fusible web. Remember that fusible appliqué usually reverses the final image. If the direction of the figures is important, trace the shapes in reverse. For this scene, the two Sunbonnet figures should face one another, so check the orientation of the pattern carefully before cutting.
Leave a small space between the traced shapes on the fusible web. Rough-cut around each piece without cutting directly on the drawn line. Place the adhesive side against the wrong side of the selected fabric and press according to the fusible web instructions. Avoid sliding the iron because movement can distort the fabric. Instead, lift and lower the iron until the adhesive has bonded evenly.
After the fused fabric has cooled, cut each appliqué piece precisely along the traced line. Use small, sharp scissors for curved areas such as the bonnet, shoulders, hills, and shoes. Smooth curves will make the finished project look more polished. Keep all cut pieces organized in labeled envelopes or small trays. This is especially useful when several pieces are made from similar fabrics.
Prepare the landscape before arranging the figures. Cut large curved sections for the foreground, middle hill, distant fields, and sky. The reference image uses several green shades to create depth, along with floral red and turquoise sections near the upper corners. You can reproduce that colorful arrangement or simplify it by using two green hills and one blue sky. The goal is to build a cheerful setting without distracting from the Sunbonnet characters.
Create the two small houses using simple geometric pieces. Each house can be made from a square or rectangular body, a triangular roof, a narrow door, and one or two small windows. Slightly irregular shapes can make the scene feel handmade and whimsical. Place the houses near the top of the panel so they appear to sit in the distance behind the hills.
Lay every prepared shape on the background without removing the fusible paper. This is called a dry layout. Step back and check the overall balance. The figures should be the main focus, while the houses and fields should frame them. Take a clear photograph of the layout before fusing. The photograph will serve as a useful guide if the pieces become mixed or shifted during construction.
Assembling and Stitching the Sunbonnet Quilt Panel
Begin fusing the pieces that appear farthest in the background. Attach the sky first if it is an appliqué section, followed by the distant fields, hills, houses, and pathway. Remove the paper backing from one piece at a time, place it carefully, and press it into position. Allow the fabric to cool before moving the panel so the adhesive can set properly.
Stitch around the landscape pieces using a narrow zigzag, blanket stitch, or straight appliqué stitch. A blanket stitch provides a traditional decorative finish, while a narrow zigzag gives stronger edge coverage. A straight stitch placed close to the raw edge creates a softer, slightly frayed appearance after washing. Test your stitch settings on a fabric scrap before sewing the actual panel.
Assemble the first figure by working from the pieces that sit underneath to those that overlap on top. Attach the body shape, clothing, sleeves, exposed skin, shoes, and bonnet in sequence. For the figure wearing blue overalls, place the shirt or body section first, followed by the overalls, straps, pocket, shoes, head area, and bonnet. Small accents such as straps can be appliquéd, embroidered, or created with narrow fabric strips.
Construct the second figure using the same layered method. The yellow floral dress forms the largest shape, while the bonnet, neck, scarf, shoes, and decorative pocket are positioned above it. A heart-shaped pocket adds a meaningful handmade detail. You can replace the heart with a flower, star, initial, or small patch made from a favorite fabric. Ensure that the two figures remain close enough to suggest interaction but do not overlap awkwardly.
Stitch around each figure carefully, changing thread colors when necessary. Matching thread blends with the fabric and creates a subtle finish. Darker contrasting thread emphasizes the outlines and gives the appliqué a storybook appearance. When sewing tight curves, reduce the machine speed and stop with the needle down before slightly rotating the panel. This technique helps produce smooth outlines.
Add final details with hand embroidery or machine stitching. Simple lines can suggest arms, bonnet folds, clothing seams, shoe soles, grass, or house features. The Sunbonnet style generally avoids detailed facial features because the bonnet hides most of the face. This makes the pattern approachable and preserves its traditional character. Press the finished panel from the wrong side using a pressing cloth to protect the appliqué.
Turning the Finished Panel into a Double Bedspread
Measure your mattress before planning the final bedspread dimensions. Double or full-size mattresses can vary, and the amount of drop needed depends on the bed frame. Measure the mattress width, length, and desired overhang on both sides and at the foot. Add these measurements together to determine the target size. A bedspread that reaches farther down the sides will require wider borders than a standard quilt.
Place the finished Sunbonnet Double Bedspread Panel in the center of your layout. Surround it with one or more fabric borders to reach the required size. A narrow solid border can frame the appliqué, while a wider floral or patchwork border can add scale and visual interest. Repeating fabrics from the figures in the surrounding borders helps connect the entire design.
For a more elaborate bedspread, add coordinating quilt blocks around the central panel. Nine-patch blocks, squares, pinwheels, simple stars, or alternating solid rectangles can complement the appliqué without competing with it. Keep the block designs relatively simple because the central Sunbonnet scene should remain the main attraction. Arrange all sections on a clean surface before sewing them together.
Once the bedspread top is complete, press all seams flat and check that the surface is square. Layer the backing fabric with the wrong side facing upward, place the batting on top, and position the quilt top right side upward. Smooth each layer from the center toward the edges. Baste the layers with safety pins, long hand stitches, or a temporary basting spray.
Quilt around the appliqué shapes to emphasize the figures and landscape. This method, often called outline quilting or echo quilting, adds definition and keeps the layered fabrics secure. Fill larger background areas with gentle curves, wavy lines, loops, or simple crosshatching. Avoid quilting too densely unless you prefer a firmer bedspread. Even quilting throughout the project will help prevent shifting and uneven wear.
Finish by trimming the edges and attaching binding. Cut binding strips on the straight grain or bias, join them into one continuous length, and sew them around the perimeter. Fold the binding over the raw edge and secure it by hand or machine. Wash the bedspread gently after confirming that all fabrics are colorfast. The first wash often softens the appliqué and gives the quilt a comfortable handmade texture.
Frequently Asked Questions
What does Sunbonnet mean in quilting?
Sunbonnet refers to a traditional appliqué figure wearing a large bonnet that hides most of the face. These figures often appear in scenes involving friendship, gardening, children, family life, or countryside activities. Their simple shapes make them ideal for fabric appliqué.
Is this Sunbonnet appliqué project suitable for beginners?
Yes. A beginner with basic sewing-machine skills can complete this project. The easiest method is fusible web appliqué combined with a blanket stitch or narrow zigzag. Beginners should practice curves and stitch settings on scrap fabric before working on the main panel.
What is a double bedspread panel?
A double bedspread panel is a decorative fabric section intended to become the central or featured portion of a covering for a double or full-size bed. The panel itself may not cover the entire bed. Borders, blocks, and additional fabric sections are normally added until the desired dimensions are reached.
Can I sew the appliqué without fusible web?
Yes. Traditional needle-turn appliqué, freezer-paper appliqué, or turned-edge machine appliqué may be used instead. These methods create smoother finished edges but usually require more time and precision. Fusible web is often the most accessible option for newer quilters.
Which fabric is best for this appliqué quilt pattern?
Quilting cotton is the best general choice because it is stable, easy to cut, widely available, and comfortable in a bedspread. Small-scale floral, plaid, gingham, polka-dot, and tone-on-tone prints are particularly effective for the clothing and bonnets.
How can I prevent the appliqué edges from fraying?
Cover the raw edges with a narrow zigzag or blanket stitch. Make sure the stitch catches both the appliqué piece and the background fabric. A lightweight fusible web also helps stabilize the edges. For additional durability, use a slightly shorter stitch around frequently handled areas.
Should the appliqué be completed before adding batting?
In most cases, yes. Fuse and stitch the appliqué pieces to the background before assembling the quilt sandwich. After adding backing and batting, quilt around the shapes to secure all layers and enhance the design.
Can I make the pattern larger for a central bedspread panel?
Yes. Enlarge every pattern piece by the same percentage so the proportions remain consistent. Large pieces may need to be divided across several printed pages and joined with tape. Always test the complete layout on the background before cutting expensive fabric.
How should I quilt around the Sunbonnet figures?
Outline quilting is an excellent choice. Stitch approximately one-eighth to one-quarter inch outside the appliqué edges. You may also echo the outline with a second row of stitching. Use simple free-motion quilting or straight lines in open background areas.
Can I customize the clothing and landscape?
Absolutely. Personalization is one of the main advantages of the Sunbonnet Double Bedspread Panel with Applique Quilt Pattern. You can change the clothing colors, add initials, use meaningful fabric scraps, replace the houses, create seasonal scenery, or adjust the figures to represent family members or friends.
How do I care for the finished bedspread?
Wash it gently in cool water with mild detergent and avoid harsh bleach. Use a color-catching sheet during the first wash if the project contains strong reds, blues, or greens. Dry on a low setting or lay the quilt flat when possible. Store it folded loosely in a clean, dry location.
Conclusion
The Sunbonnet Double Bedspread Panel with Applique Quilt Pattern offers a creative way to transform colorful cotton fabrics into a warm and memorable quilted scene. Throughout this tutorial, you learned how to interpret the Sunbonnet design, choose suitable materials, trace and cut the appliqué shapes, build the countryside background, assemble the figures in the correct order, stitch the raw edges, and turn the completed panel into a full double bedspread.
EASILY FIND THE PDF FOR THIS PATTERN HERE!
By using simple shapes, contrasting fabrics, careful pressing, and steady stitching, you can create a decorative panel that looks detailed without becoming unnecessarily difficult. The project can remain close to the original countryside composition or be personalized with different clothing, houses, colors, borders, and meaningful fabric scraps. Please leave your sincere opinion about this project and share any suggestions that could make the pattern, instructions, or finished design even more useful for other quilting enthusiasts.