
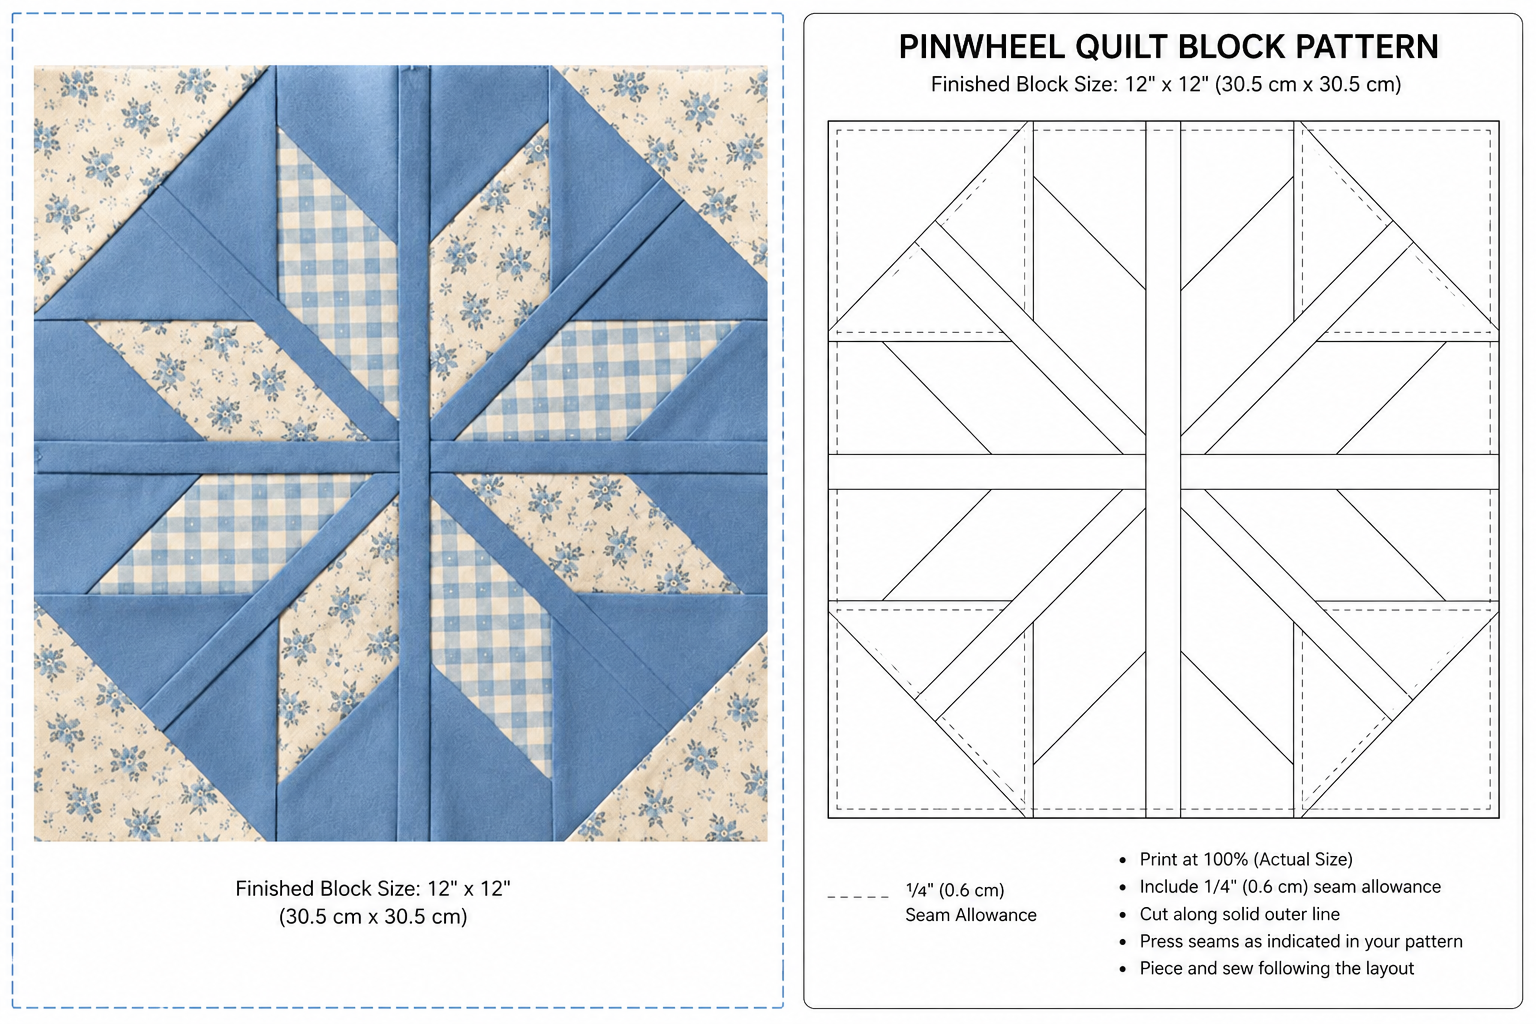
The Fan Star Quilt Block Quilt Pattern is a striking patchwork design that combines the movement of traditional fan shapes with the balanced symmetry of a star. In the photographed project, four coordinated units meet at the center to create a rotating geometric composition. Mustard-gold solid fabric forms the strong structural lines, while cream, beige, gingham, and small geometric prints add warmth and contrast. The block may look complicated at first, but it becomes much easier to understand when it is divided into four equal quadrants. Each quadrant contains angled fabric sections that resemble folded fans or elongated leaves. Once the four sections are joined, the repeated angles naturally produce the central star effect.
This Fan Star Quilt Block Quilt Pattern is an excellent project for confident beginners who want to improve their precision piecing skills. It introduces useful quilting techniques such as cutting triangles, joining diagonal seams, pressing seam allowances, matching center points, and maintaining an accurate quarter-inch seam. The design is also flexible because the finished block can be used alone as a decorative panel, repeated across a full quilt, or adapted for pillows, table runners, wall hangings, and tote bags. A two-color version creates a bold modern appearance, while several coordinating prints produce a softer scrappy style. The earthy palette shown in the photograph is especially suitable for farmhouse, rustic, autumn, and traditional home décor.
Accuracy is more important than speed when sewing a Fan Star quilt block. Small differences in cutting or seam width can affect the way the four quadrants meet in the center. Before beginning, it is helpful to test the quarter-inch setting on your sewing machine and press all fabrics so they lie completely flat. A rotary cutter, acrylic ruler, and cutting mat will provide cleaner results than ordinary scissors. You should also arrange every cut piece on a table before sewing, using the photograph as a placement reference. Careful preparation will help preserve the graceful fan shapes and create a finished block that looks balanced, crisp, and professionally assembled.
Materials, Fabric Choices, and Quilt Block Planning
For one Fan Star Quilt Block Quilt Pattern, choose one solid fabric for the framework and two coordinating printed fabrics for the interior fan sections and outer corners. The photographed block uses mustard-gold as the dominant fabric, cream gingham for contrast, and a subtle beige print for visual texture. Select quilting cottons of similar weight so the seams behave consistently. Avoid combining very lightweight fabric with heavy upholstery material because the different thicknesses can distort the block.
DISCOVER MORE FREE PATTERNS HERE!
A practical starting size is a finished 12-inch block, although the design can be enlarged or reduced. For this version, prepare approximately one fat quarter of solid fabric and one fat eighth of each print. These amounts provide enough material for the block and leave extra fabric for test pieces or trimming. Because angled units sometimes require adjustments, having a little additional fabric is always useful. Prewashing is optional, but all fabrics should be treated in the same way.
The solid quilting fabric is the visual foundation of this project. It creates the narrow diagonal bands, the center cross, and the larger triangular shapes that frame the printed sections. A medium or dark solid usually provides the clearest definition. Mustard, navy, forest green, burgundy, charcoal, and deep teal are all effective choices. Lighter solid fabrics can also work when paired with darker or more colorful prints.
The term fan quilt block describes a patchwork design in which wedge-shaped or angled pieces spread outward like the ribs of a hand fan. In this project, the fan effect is more geometric than curved. Each printed section is surrounded by solid fabric, making it appear as though it opens from the center. Repeating the shape four times creates movement without requiring curved piecing. This makes the pattern more approachable than many traditional fan designs.
The term star quilt pattern refers to the secondary image created when all four quadrants are assembled. The points do not come from one large star-shaped template. Instead, the star emerges from the placement of the diagonal seams and contrasting fabrics. This is known as a secondary design in quilting. Secondary designs add depth because the eye can see both the individual fan units and the complete star.
In addition to fabric, gather a sewing machine, neutral cotton thread, rotary cutter, cutting mat, quilting ruler, fine pins or sewing clips, iron, and ironing surface. A square ruler at least as large as the unfinished block will make final trimming easier. A removable fabric marker may also help with diagonal seam placement. Use a fresh rotary blade because clean edges are essential when working with multiple angles.
Cutting and Preparing the Fan Star Pieces
Begin by dividing the block mentally into four equal quadrants. Each quadrant in the photograph is a rotated version of the same basic unit. Working with identical units reduces confusion and helps the final design remain symmetrical. Create one test quadrant before cutting every piece for the full block. When the sample fits correctly, use it as a reference for the remaining three sections.
For a 12-inch finished block, each quadrant should measure approximately 6½ inches unfinished before the four units are joined. The extra half inch provides seam allowance. Cut four background squares slightly larger than 6½ inches so the units can be trimmed accurately after piecing. Oversizing is especially helpful for angled patchwork. It gives you room to correct small shifts that occur while sewing.
From the printed fabrics, cut elongated triangles or wedge-shaped pieces that will become the visible fan blades. You will need two main printed wedges in each quadrant, for a total of eight printed sections. Alternate the gingham and small-scale print to imitate the arrangement in the photograph. The wedges should point toward the inner corner of each quadrant. Their wider ends should face the outer edges of the block.
Next, cut solid fabric strips approximately 1½ inches wide for the narrow bands that separate and frame the printed wedges. These strips create the clean folded appearance seen throughout the Fan Star Quilt Block Quilt Pattern. Leave the strips longer than necessary during construction. After they are stitched and pressed, the excess can be trimmed away. Longer strips are easier to align than pieces cut to an exact diagonal length.
Cut additional solid triangles for the larger gold sections surrounding the printed wedges. You will also need printed corner triangles for the four outer corners of the complete block. The corner pieces in the example use the subtle geometric print, helping the star stand out from the background. Keep all pieces organized in four labeled groups. A small tray or paper plate for each quadrant can prevent accidental mixing.
Before sewing, lay the pieces into their approximate finished positions. Check that the printed wedges alternate consistently and that every quadrant rotates in the same direction around the center. Take a quick reference photograph of the layout before moving to the machine. This simple step is useful because angled pieces can look surprisingly similar once they are separated. Proper preparation will prevent reversed units and mismatched fan blades.
Sewing, Pressing, and Assembling the Complete Block
Start each quadrant by joining one solid strip to the long diagonal edge of a printed wedge. Place the fabrics right sides together and allow the strip to extend beyond both ends. Sew with an accurate quarter-inch seam allowance. Press the seam first as sewn to set the stitches, then open the fabrics and press the allowance toward the darker solid strip. Do not pull the diagonal edge while pressing because bias edges can stretch.
Attach the next solid or printed section according to the planned layout. Continue building outward from the central pointed area, adding one piece at a time. This construction method is similar to foundation-style assembly, but it can be completed without sewing through paper. After each seam, press the unit flat before adding another piece. Frequent pressing keeps the quadrant smooth and prevents hidden folds along the seam lines.
Add the large solid triangles around the completed fan blades. These pieces should fill the remaining space and create the strong gold shape visible in the photograph. Match the raw edges carefully, but focus primarily on preserving the intended angles. Sew slowly as you approach the narrow inner points. A shorter stitch length can help secure small pointed sections and reduce the chance of seams opening during trimming.
Once a quadrant is complete, place a square ruler over it and trim it to 6½ inches. Position the inner point precisely at one corner of the ruler. Check that the main diagonal lines travel consistently across the unit. Repeat the same process for the other three quadrants. All four sections must have identical dimensions before assembly, even when their internal seam placement varies slightly.
Arrange the four trimmed quadrants so their pointed corners meet in the middle. Sew the two upper quadrants together and then join the two lower quadrants. Press these seams in opposite directions so they will nest when the rows are connected. Place the upper and lower rows right sides together, pinning carefully at the center and at every major diagonal intersection. Sew the final horizontal seam and press it without stretching the block.
Square the completed Fan Star quilt block to 12½ inches unfinished, preserving a quarter-inch seam allowance beyond important points whenever possible. The center may contain several layers of fabric, so pressing it open can reduce bulk. A tailor’s clapper or flat wooden pressing tool can help the seam cool in a flatter position. The block is now ready to finish at 12 inches when sewn into a quilt, border, pillow, or decorative panel.
Frequently Asked Questions About the Fan Star Quilt Block Quilt Pattern
Is the Fan Star Quilt Block Quilt Pattern suitable for beginners? It is suitable for beginners who already understand straight seams and basic rotary cutting. The angled pieces require patience, but no advanced curved sewing is needed. Making a practice quadrant from scrap fabric is strongly recommended. This allows the maker to learn the construction order before using the chosen project fabrics.
What seam allowance should be used for this quilt block? A consistent quarter-inch seam allowance is the standard choice. Even a small difference can change the finished size when many seams are combined. Test the machine setting by sewing two measured fabric pieces together and checking their total width after pressing. A quarter-inch presser foot can make accurate piecing much easier.
Why do the points not meet perfectly in the center? Center mismatches usually happen because the quadrants were not trimmed to exactly the same size or because the final row seam shifted during sewing. Nesting opposite seam allowances can improve alignment. Pin directly through the matching points before stitching. Minor imperfections are normal in handmade quilting and are often less noticeable after the block is quilted.
Can scraps be used for this Fan Star quilt block? Yes, this is an attractive scrap quilt pattern, especially when the solid framework remains consistent. Small gingham, floral, geometric, and tone-on-tone scraps can be used for the fan blades. For a controlled appearance, choose scraps from one color family. For a playful version, use different colors while repeating one background fabric throughout the design.
How can this block be enlarged for a pillow or wall hanging? The easiest method is to enlarge every measurement by the same percentage. Another option is to keep the 12-inch finished block and add borders around it. A narrow inner border followed by a wider outer border can turn one block into a generously sized pillow front. Borders are also helpful when the finished block needs slight size correction.
How should the completed block be quilted? Straight-line quilting complements the geometric construction beautifully. Stitching in the ditch along the solid bands emphasizes the fan structure, while diagonal echo lines can highlight the star. Free-motion curves provide an interesting contrast to the sharp angles. Always layer the quilt top with batting and backing, baste securely, and begin quilting near the center.
Conclusion
The Fan Star Quilt Block Quilt Pattern transforms simple triangles, wedges, strips, and squares into an elegant design filled with movement. The most important steps are choosing fabrics with clear contrast, preparing four matching quadrants, maintaining a precise quarter-inch seam, pressing after every stage, and trimming each unit before final assembly. By building the pattern one section at a time, even the complex-looking center becomes manageable.
EASILY FIND THE PDF FOR THIS PATTERN HERE!
This project also offers many opportunities for personalization. You can recreate the warm mustard and beige palette from the photograph, explore modern high-contrast colors, or use favorite scraps for a more playful result. The completed Fan Star quilt block can become part of a full quilt or serve as a beautiful feature on a pillow, runner, bag, or wall hanging. Please leave your sincere opinion about this pattern and share any suggestions that could make the project even more useful for other quilting enthusiasts.