
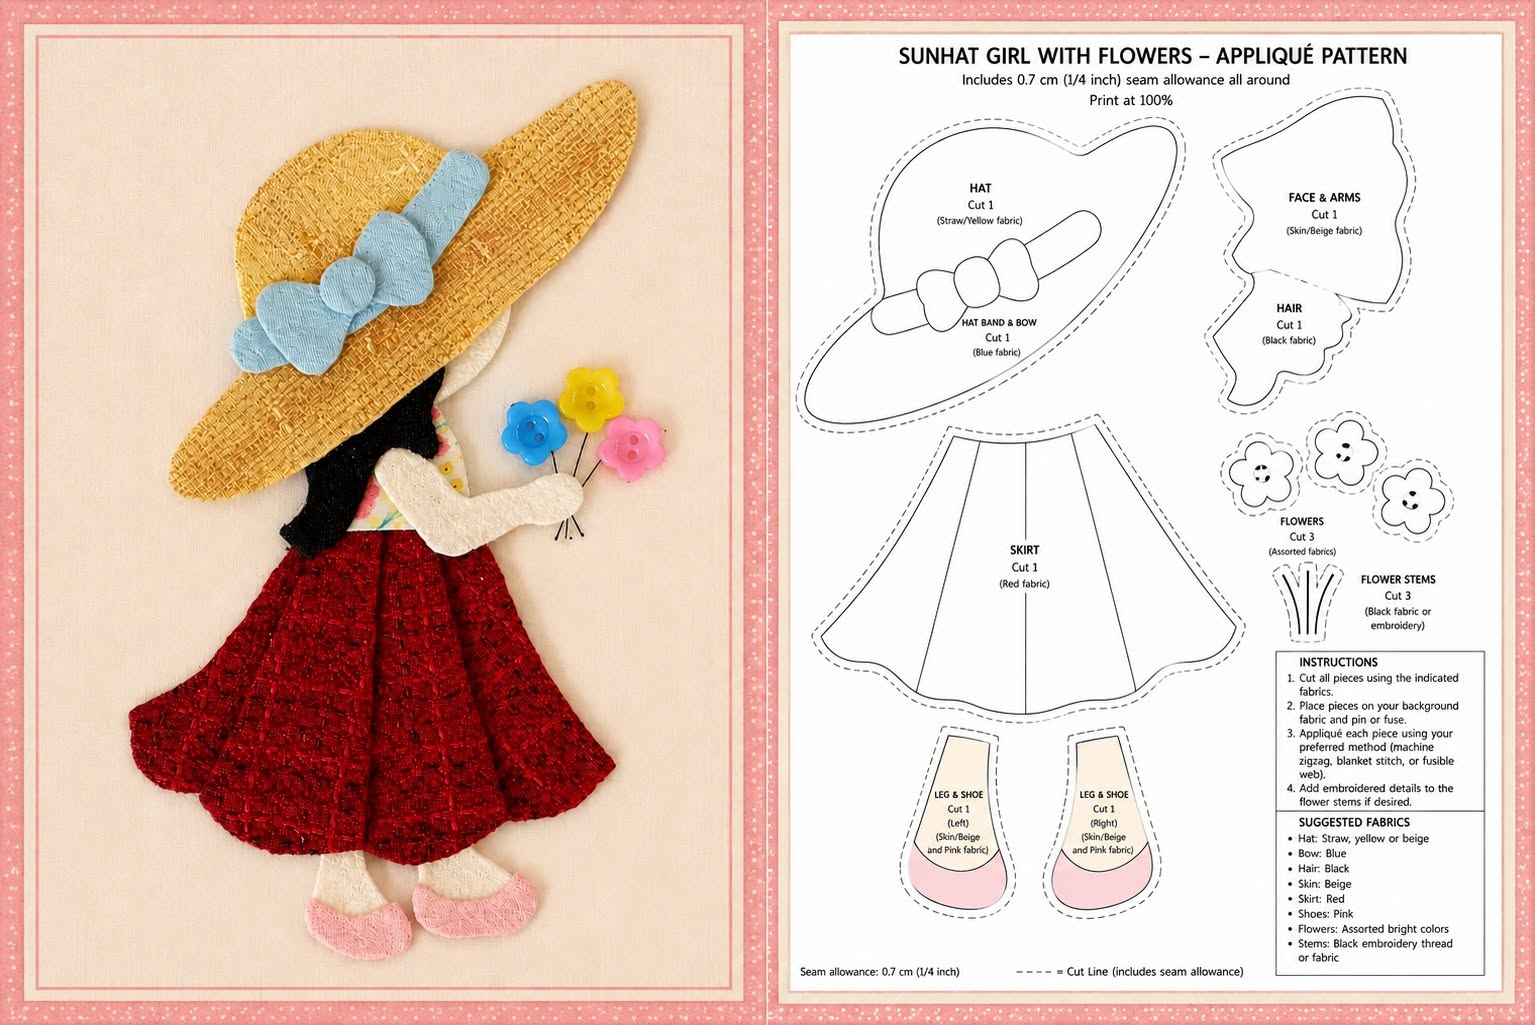
Girl with Sun Hat Appliqué Quilt Pattern is a charming sewing project that combines traditional appliqué, simple quilting techniques, and carefully layered fabric shapes. Inspired by the handmade design shown in the reference image, this decorative pattern features a graceful girl wearing a wide sun hat, a full red dress, soft pink shoes, and a delicate blue bow. She also holds a small bouquet of colorful flowers, giving the finished block a cheerful, nostalgic personality. The design can become the centerpiece of a wall hanging, decorative cushion, tote bag, nursery quilt, table runner, or handmade fabric picture.
Creating a Girl with Sun Hat Appliqué Quilt Pattern is also an excellent way to use small fabric scraps left over from previous sewing projects. The hat, dress, arms, hair, shoes, bow, and flowers can all be cut from relatively small pieces of material. This makes the pattern economical while providing plenty of opportunities to experiment with colors, textures, and prints. Beginners can simplify the shapes and use fusible web appliqué, while experienced quilters may prefer traditional needle-turn appliqué or decorative hand stitching around each piece.
The term appliqué quilt pattern describes a design made by attaching smaller fabric shapes to a larger background fabric. Instead of building the entire image from square or rectangular quilt blocks, appliqué allows the maker to create recognizable objects, clothing, flowers, animals, and people. In this project, the girl is created one section at a time, with the pieces overlapping in a planned order. Careful preparation is important because the final result depends on accurate templates, balanced proportions, secure edges, and thoughtful fabric placement.
Materials and Fabric Choices for the Appliqué Design
Begin by selecting a firm but smooth cotton fabric for the background. A light cream, pale gray, white, or pastel fabric will help the silhouette of the girl stand out clearly. Cut the background several centimeters larger than your desired finished block because appliqué stitching can sometimes cause slight distortion. The extra fabric can be trimmed after the entire design has been completed and pressed.
DISCOVER MORE FREE PATTERNS HERE!
For the sun hat, choose a golden yellow, mustard, straw-colored, or warm beige fabric. A subtle woven texture or small tonal print can imitate the natural appearance of a traditional straw hat. You will need one large elongated piece for the brim and one rounded piece for the crown. The wide brim is one of the most recognizable details in the Girl with Sun Hat Appliqué Quilt Pattern, so select a fabric that contrasts well with the hair and background.
Choose a deep red fabric for the dress. Burgundy, brick red, cranberry, or dark cherry tones create a classic appearance, although any color can be used. A small floral print, textured solid, or lightly mottled quilting cotton will add visual depth. The skirt can be made as one flat appliqué shape, but adding small folds or overlapping panels will make it look fuller and more dimensional.
For the hair, use dark brown, black, chestnut, or another natural shade. The reference design shows a simple section of long dark hair falling below the hat. Because the face is mostly hidden, the hair helps define the direction of the head and body. A fabric with a fine texture works well, but avoid prints that are too large because they can make the narrow hair shape difficult to recognize.
Prepare pale cream, ivory, peach, or light beige fabric for the visible skin areas. These pieces include the face or neck area, the arms, and the lower legs. You will also need pink fabric for the shoes, light blue fabric for the bow, and three small colorful pieces or decorative buttons for the bouquet. If buttons are used, remember that the finished item may not be appropriate for an unsupervised baby or very young child.
Other useful supplies include paper for templates, a pencil, fabric scissors, small embroidery scissors, pins, matching thread, a sewing needle, fusible web, an iron, and a pressing cloth. For the quilting stage, prepare batting and backing fabric. Optional materials include embroidery floss, fabric-safe marking tools, tear-away stabilizer, a light box, and decorative thread for outlining the completed appliqué quilt pattern.
Preparing the Girl with Sun Hat Appliqué Quilt Pattern
Start by deciding the finished size of the appliqué block. A practical size for a cushion or small wall hanging is approximately 30 by 40 centimeters, although the design can be enlarged or reduced. Sketch a simple outline of the girl on paper, or trace the main shapes separately from the reference image. Focus on the overall silhouette rather than trying to reproduce every tiny detail.
Divide the drawing into individual template pieces. You will need templates for the hat brim, hat crown, bow loops, bow center, hair, upper body, dress bodice, skirt, arms, hands, legs, shoes, flower heads, and stems. Number every template and write the fabric color on it. Adding alignment marks can also help you position overlapping pieces accurately during assembly.
When using fusible web, remember that the templates must usually be traced in reverse on the paper side of the adhesive. This is particularly important for the bent arms and the direction of the girl’s body. Trace each template with a little space between the pieces. Rough-cut around the shapes, leaving a small margin outside the traced lines before fusing them to the wrong side of the chosen fabrics.
Follow the fusible web manufacturer’s instructions for temperature and pressing time. Place the adhesive side against the wrong side of the fabric and press without sliding the iron. Sliding may stretch the fabric or move the template. Allow the fused pieces to cool completely, and then cut directly on the traced lines using sharp scissors.
For traditional turned-edge appliqué, add approximately 3 to 6 millimeters of seam allowance around each template. Clip carefully around inward curves and trim bulky corners before turning the edges under. A small amount of starch and a mini iron can help shape the pieces. This method takes longer, but it produces soft edges and a beautiful handmade finish.
Before removing any fusible paper, arrange all pieces on the background fabric. Check the proportions of the girl, the direction of the hat, the width of the skirt, and the position of the bouquet. Photograph the arrangement or make light registration marks on the background. This preview stage prevents mistakes and gives you a chance to change colors before the pieces are permanently attached.
Layering and Stitching the Appliqué Pieces
Place the pieces that belong farthest in the background first. In this design, the back section of the hat, the hair, the lower legs, and any hidden portions of the arms should be positioned before the dress and front hat brim. Work slowly and compare the placement with your full-size drawing. The center of the girl should remain balanced on the background, with enough open space around the hat and skirt.
Attach the legs and shoes near the lower part of the design. The shoes can overlap the ends of the legs slightly so there are no visible gaps. Use two rounded pink pieces to create the soft slipper-like shape shown in the image. A small line of embroidery can separate the shoe from the leg and add definition without requiring another fabric piece.
Position the hair and upper body next. The hair should extend from beneath the hat and end near the upper edge of the dress. Add the neck or face section before covering part of it with the hat brim. Since the face is intentionally turned away, facial details are not necessary. This makes the Girl with Sun Hat Appliqué Quilt Pattern approachable for beginners who may find detailed portrait appliqué difficult.
Build the dress by adding the bodice first and the skirt afterward. For a flat project, use a single skirt silhouette with a gently curved hem. For more dimension, divide the skirt into three or four slightly overlapping panels. Small folds can be secured near the waist, but avoid excessive bulk if the block will be quilted by machine.
Add the arms so that they appear to reach forward and hold the bouquet. One arm may be placed over the upper dress area, while the second can overlap it slightly near the hands. Use narrow fabric pieces, but do not make them so thin that the edges become difficult to stitch. Black embroidery stitches can form the flower stems and small finger details.
Finish the main figure with the large hat brim, rounded crown, and blue bow. The brim should overlap part of the head, hair, and upper body to create the correct layered effect. Add two bow loops and a small center knot. Stitch three colorful flower heads or sew decorative buttons above the embroidered stems, making sure every embellishment is firmly secured.
Quilting, Finishing, and Creative Customization
After all appliqué pieces are fused or pinned in place, stitch around their edges. A narrow zigzag stitch is a secure option for machine appliqué, while a blanket stitch creates a more decorative outline. Straight stitching close to the raw edge gives a casual handmade appearance, although some gentle fraying may occur after washing. Test the stitch on scrap fabric before working on the final block.
For hand appliqué, use small, nearly invisible stitches with thread that matches each fabric. Bring the needle through the folded edge and take only a tiny bite of the background fabric. Continue around curves gradually rather than pulling the thread too tightly. Smooth, relaxed stitches will help the appliqué remain flat and prevent puckering.
Once the appliqué is complete, press the block carefully from the wrong side. Place it face down on a clean towel to protect raised details such as buttons or folded fabric. Trim the block to the required dimensions, making sure the figure remains centered. Then create a quilt sandwich with the backing fabric, batting, and appliqué top.
Quilt around the silhouette of the girl to make the design stand out. This technique is sometimes called echo quilting because the stitched lines follow the outline of the appliqué. You can also add gentle background quilting, such as loops, leaves, small flowers, diagonal lines, or simple meandering stitches. Avoid quilting heavily over dimensional areas unless you want to flatten them.
The design can be customized in many ways. Change the red dress to blue, green, purple, or a floral print. Add lace at the hem, a tiny ribbon at the waist, or embroidered details on the hat. The bouquet may be replaced with a basket, butterfly, watering can, or small fabric heart. These variations allow every Girl with Sun Hat Appliqué Quilt Pattern to feel personal and original.
To complete a wall hanging, add borders around the appliqué block, layer it with batting and backing, quilt it, and finish the edges with binding. For a cushion, add a coordinating envelope or zippered back. If using the design on a tote bag, apply lightweight stabilizer behind the background fabric before stitching so the appliqué remains smooth during regular use.
Frequently Asked Questions About the Girl with Sun Hat Appliqué Quilt Pattern
Is this appliqué pattern suitable for beginners?
Yes. The design is suitable for confident beginners because most pieces are made from simple curves and recognizable silhouettes. Fusible web appliqué is generally the easiest method. Beginners may simplify the skirt, bow, and bouquet instead of using dimensional details.
What is the best fabric for appliqué quilting?
Quilting cotton is one of the best choices because it is easy to cut, press, and stitch. Linen blends and lightweight textured fabrics may also be used, but they can fray more easily. Avoid very thick material when several pieces must overlap.
Do I need a sewing machine to make this project?
No. The entire Girl with Sun Hat Appliqué Quilt Pattern can be stitched by hand. A sewing machine makes edge finishing and quilting faster, but hand appliqué gives the project a soft traditional look.
Should I wash the fabric before cutting the templates?
Prewashing is recommended when the finished item will be washed regularly. It helps remove excess dye and reduces uneven shrinkage. After washing, press the fabric before tracing or cutting any pattern pieces.
How can I stop the appliqué edges from fraying?
Fusible web, zigzag stitching, blanket stitching, or turned-edge appliqué can prevent excessive fraying. Raw-edge appliqué may develop a slightly soft edge over time, which many quilters consider part of its handmade charm.
Can I enlarge the pattern for a full-size quilt?
Yes. Enlarge all templates by the same percentage so the proportions remain consistent. Very large appliqué pieces may need lightweight stabilizer, additional pins, or divided sections to prevent stretching and bubbling.
Can decorative buttons be used for the flowers?
Yes, colorful buttons create attractive three-dimensional flowers. Sew them securely with strong thread. For quilts intended for babies or young children, fabric flower appliqués or embroidery may be a safer alternative because loose buttons can become small detachable parts.
What type of batting works best for this project?
A low-loft cotton or cotton-blend batting works well for wall hangings, cushions, and quilt blocks. It provides gentle structure without making the detailed appliqué too bulky. Polyester batting can be used when a puffier appearance is desired.
How should the completed appliqué be washed?
Hand washing or a gentle machine cycle with cold water is usually appropriate, depending on the fabrics and embellishments used. Place delicate pieces in a laundry bag and avoid harsh bleach. Air drying flat will help protect the appliqué shapes and dimensional details.
How can I make the skirt look fuller?
Use several overlapping skirt panels, add two or three shallow pleats at the waist, or place a thin layer of batting beneath the central skirt section. Keep the additional fabric controlled so the piece remains easy to quilt and finish.
Conclusion
The Girl with Sun Hat Appliqué Quilt Pattern brings together fabric selection, template preparation, careful layering, appliqué stitching, and simple quilting in one delightful handmade project. By assembling the girl from individual shapes, you can create the wide golden hat, blue bow, flowing red dress, pink shoes, dark hair, delicate arms, and colorful bouquet seen in the inspiring design. The project can be completed with fusible raw-edge appliqué, traditional turned edges, machine stitching, or patient hand sewing.
EASILY FIND THE PDF FOR THIS PATTERN HERE!
You can use the finished pattern to decorate a cushion, tote bag, wall hanging, nursery quilt, table runner, or larger patchwork project. Colors and details may be adapted to suit your fabrics and personal style, making every version unique. Please leave your sincere opinion about this tutorial and share suggestions for colors, accessories, or creative details that could make the design even more special.