
The Mushroom House Appliqué Quilt Pattern is a charming sewing project inspired by a tiny fantasy home surrounded by flowers, grass, colorful details, and a bright red mushroom cap.<br>This design is ideal for anyone who enjoys fabric appliqué, decorative quilting, handmade wall art, nursery decorations, and whimsical woodland themes.<br>The project combines simple shapes with carefully placed embroidery, allowing beginners to practice essential sewing techniques without needing complicated equipment.<br>Although the finished design looks detailed, it can be created gradually by preparing one fabric piece at a time and assembling the scene in organized layers.<br>The mushroom house can become the central block of a quilt, a decorative cushion panel, a framed textile picture, a tote bag pocket, or a beautiful handmade gift.<br>By following this complete guide, you will learn how to select fabrics, prepare templates, attach the appliqué pieces, add decorative stitching, and finish the project neatly.
The term Mushroom House Appliqué Quilt Pattern describes a reusable set of templates and instructions for building a mushroom-shaped cottage with fabric pieces attached to a background.<br>A “mushroom house” is the main decorative subject, usually featuring a rounded stem as the house, a large cap as the roof, small windows, a door, flowers, leaves, and garden details.<br>“Appliqué” is a sewing method in which smaller fabric shapes are positioned on top of a larger background fabric and secured with stitches or fusible adhesive.<br>A “quilt pattern” provides the measurements, cutting shapes, placement guidance, construction order, and finishing methods needed to reproduce the design successfully.<br>When these ideas are combined, the result is a playful textile illustration that offers many opportunities for personalization through color, texture, embroidery, and fabric selection.<br>The pattern can be enlarged or reduced depending on whether you want to make a quilt block, wall hanging, pillow cover, table decoration, or smaller craft project.
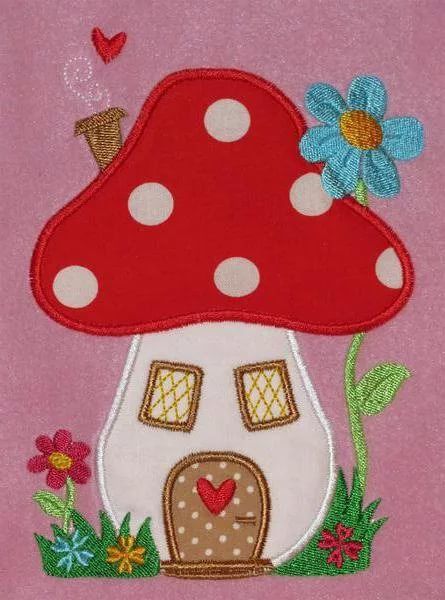
One of the best qualities of the Mushroom House Appliqué Quilt Pattern is that it does not require perfect realism because the design is intentionally imaginative and cheerful.<br>Slightly curved windows, hand-cut flowers, uneven blades of grass, and decorative stitches can make the finished piece feel more expressive and handmade.<br>The project shown in the reference image uses a pink background, a red mushroom roof with white spots, a light-colored house body, a brown door, golden window frames, and colorful garden elements.<br>You can remain faithful to this color arrangement or adapt the project to match a seasonal theme, a child’s bedroom, a favorite fabric collection, or your home décor.<br>Careful preparation will make the sewing stage easier, especially when the smaller pieces are labeled and arranged before they are permanently attached.<br>The following instructions explain the complete creative process so that even a beginner can confidently produce a polished and durable appliqué design.
Materials, Fabrics, and Template Preparation
Begin by collecting the basic materials needed for your Mushroom House Appliqué Quilt Pattern. You will need background fabric, red fabric for the mushroom cap, cream or white fabric for the house, brown fabric for the door and chimney, small pieces of colorful fabric for the flowers, green fabric for the leaves and grass, and white fabric for the roof spots. Choose tightly woven cotton because it is easy to cut, press, fuse, and stitch.
DISCOVER MORE FREE PATTERNS HERE!
You will also need lightweight fusible web, fabric scissors, paper scissors, an iron, a pressing cloth, sewing pins, an erasable fabric marker, coordinating sewing thread, embroidery thread, and a sewing machine. A small pair of sharp embroidery scissors is especially useful for cutting narrow stems, petals, leaves, and window details. Stabilizer can also be placed behind the background fabric to reduce puckering while decorative stitches are added.
Prepare a paper template for every major shape in the design. The main pieces should include the mushroom roof, house body, chimney, door, two windows, round roof spots, flower petals, flower centers, stems, leaves, grass sections, and small decorative hearts. Draw the templates by hand or trace the shapes from a printed pattern, keeping the curves smooth and clearly defined.
When drawing the templates, remember that fusible appliqué pieces are usually traced on the paper side of the fusible web. This process reverses the final shape when it is fused to the fabric. Reversal is not important for circles or symmetrical flowers, but it matters for the chimney, curved leaves, angled stems, and any directional decoration. Label every template before cutting so the pieces remain easy to identify.
The finished dimensions can be adapted to your preferred project. For a medium wall hanging, a background measuring approximately 35 cm by 45 cm provides enough space for the house and garden. A mushroom cap around 26 cm wide and a house body around 17 cm tall will create proportions similar to the reference design. Leave at least 4 cm of background space around the complete scene for trimming, quilting, and binding.
Before cutting the final fabrics, press every piece to remove wrinkles. Place the fusible web on the wrong side of each selected fabric and follow the manufacturer’s temperature instructions. Avoid sliding the iron because this can distort the fabric or move the adhesive. Press the iron in place for several seconds, lift it, and move to the next area until the fusible web is securely attached.
Cutting and Arranging the Mushroom House Appliqué
Cut each traced shape along the drawn outline using sharp scissors. Keep the paper backing attached while cutting because it helps stabilize the fabric and creates cleaner edges. Place the completed shapes into labeled groups, such as roof pieces, house pieces, flower pieces, and garden pieces. Organizing the materials now will prevent confusion when the smaller elements are arranged.
Start the layout with the main body of the mushroom house. Position the cream house shape near the center of the background, leaving room above it for the oversized roof and below it for grass and flowers. The house body should have gently curved sides and a rounded lower edge. Its upper section will be partially covered by the mushroom cap, creating the appearance of a roof resting over the cottage.
Place the large red cap above the house body. The lower edge of the cap should overlap the upper portion of the house by approximately 1 to 1.5 cm. A broad, curved cap creates the recognizable fantasy mushroom silhouette. Add five or six white circular spots in different sizes, distributing them across the red surface without placing them too close to the stitched edge.
Position the small brown chimney behind the upper-left side of the mushroom cap. Only the top portion needs to remain visible because the lower section will be covered by the red roof. A slightly angled chimney adds personality to the design. The chimney may be made from textured brown fabric, golden fabric, faux suede, or a small scrap with a subtle woven pattern.
Arrange the windows and door on the cream house body. Place two small rectangular windows above the door, angling them slightly for a whimsical appearance. Position the rounded brown door near the lower center of the house. Add a small red heart to the door and tiny cream dots if you want to reproduce the decorative style shown in the original project.
Complete a dry arrangement of all the pieces before removing any paper backing. Add the large blue flower beside the upper-right side of the roof, small flowers near the lower corners, tall green stems, leaves, grass, and a floating red heart above the chimney. Step back and examine the composition. Adjust the spacing until the house feels centered and the decorative elements appear balanced.
Fusing, Stitching, and Adding Decorative Details
Once you are satisfied with the arrangement, begin fusing the appliqué pieces from the back layers to the front layers. Remove the paper backing from the house body and position it on the background. Cover it with a pressing cloth and press according to the fusible web instructions. Continue with the chimney, mushroom roof, white spots, windows, door, stems, leaves, flowers, and grass.
Do not attempt to fuse every piece at the same time. Working in sections gives you more control and helps prevent small shapes from shifting. Fuse the large pieces first because they establish the structure of the Mushroom House Appliqué Quilt Pattern. Add the smallest details only after the main house, roof, door, and windows are securely attached.
Stitch around the red roof using a narrow satin stitch, blanket stitch, or small zigzag stitch. A satin stitch provides a dense embroidered appearance similar to the reference image, while a blanket stitch creates a more traditional handmade appliqué effect. Test the stitch on a scrap before sewing the project so you can adjust the stitch width, length, and thread tension.
Sew around the house body with white or light gray thread. Use brown or golden thread around the windows, chimney, and door. If the window frames contain a lattice pattern, mark diagonal guidelines lightly with an erasable pen and sew over the lines with a narrow straight stitch. These crossing lines create the appearance of decorative cottage windowpanes.
The flowers can be secured with satin stitching, small zigzag stitching, or free-motion embroidery. Use contrasting thread around the petals to make their shapes more visible. Add stitched lines to the leaves and flower centers for texture. The grass can be made from individual green fabric triangles, narrow curved strips, or embroidered blades sewn directly onto the background.
Add the final decorative accents after all raw edges have been covered. Sew small dots around the brown door, add a doorknob with a French knot or tiny button, and embroider curved lines near the floating heart to suggest movement. Decorative details should enhance the design without making it crowded. Secure all thread ends neatly on the back so the front remains clean.
Quilting, Finishing, and Creative Variations
To transform the appliqué panel into a quilted piece, prepare a quilt sandwich with the completed top, batting, and backing fabric. Cut the batting and backing slightly larger than the appliqué background. Smooth the three layers on a flat surface and secure them with curved safety pins, temporary spray adhesive, or long basting stitches.
Quilt around the outer silhouette of the mushroom house to make the design stand out. This method is often called outline quilting or echo quilting. Sew approximately 3 to 6 mm away from the appliqué edges, following the curves of the roof, house, flowers, and garden. Additional background quilting can be added using gentle swirls, loops, small leaves, or simple straight lines.
When quilting over a design with many small appliqué pieces, work slowly and stop with the needle lowered whenever you need to turn the fabric. Avoid pulling the project because this can stretch the background or create uneven stitches. A walking foot works well for straight or gently curved quilting, while a free-motion foot offers more flexibility around detailed flowers and leaves.
After quilting, trim the project to the desired dimensions and check that all corners are square. Finish the edges with traditional double-fold quilt binding, a fabric facing, or a simple envelope-style pillow construction. For a wall hanging, sew a hanging sleeve to the back before attaching the final section of binding. This allows the piece to hang neatly from a small rod.
The Mushroom House Appliqué Quilt Pattern can be customized in countless ways. Replace the red roof with orange, purple, turquoise, or patchwork fabric. Create a nighttime version with a navy background, golden windows, embroidered stars, and a silver moon. A Christmas variation can feature snow, holly leaves, red berries, and a tiny wreath on the door.
You can also turn the mushroom cottage into part of a larger woodland quilt. Surround it with appliqué rabbits, butterflies, snails, birds, trees, acorns, and additional flowers. Multiple mushroom houses can be created in different sizes to form a fantasy village. Repeating the same basic pattern with different fabrics is an excellent way to use small scraps from previous sewing projects.
Frequently Asked Questions About the Mushroom House Appliqué Quilt Pattern
What skill level is needed for this project?
The Mushroom House Appliqué Quilt Pattern is suitable for confident beginners and intermediate sewists. Beginners can simplify the flowers, leaves, and grass or use a basic zigzag stitch around the pieces. More experienced makers can add satin stitching, free-motion embroidery, detailed quilting, beads, buttons, and dimensional fabric accents.
What is the best fabric for appliqué quilting?
Quilting cotton is usually the easiest fabric to use because it is stable, widely available, and simple to press. Felt can be used for smaller decorative elements because its edges do not fray, although it creates a thicker result. Very stretchy, slippery, or loosely woven fabrics may require additional stabilizer.
Do I need fusible web to make this pattern?
Fusible web is highly recommended, especially for beginners, because it holds the shapes in position while they are stitched. However, the design can also be made with needle-turn appliqué, freezer-paper appliqué, glue-basted appliqué, or raw-edge machine appliqué. The best technique depends on the desired finish and your preferred sewing method.
Should seam allowance be added to the appliqué pieces?
For raw-edge fusible appliqué, no seam allowance is necessary because the shapes are cut to their finished size and the edges are covered with stitching. For traditional needle-turn appliqué, add approximately 6 mm around each shape. This extra fabric is folded under while the piece is hand-sewn to the background.
How can I prevent the background fabric from puckering?
Use a lightweight stabilizer behind the background before adding dense satin stitching or decorative embroidery. Choose the correct needle, reduce excessive upper-thread tension, and allow the machine to move the fabric without pulling it. Press the finished block gently from the wrong side to avoid flattening dimensional stitches.
Can the pattern be resized?
Yes. The entire pattern can be enlarged for a wall quilt or reduced for a small ornament, mug rug, bag pocket, or greeting card. When resizing, keep all pieces at the same percentage so the proportions remain consistent. Very small designs may need simplified windows, flowers, and grass to make cutting and stitching easier.
Can the project be sewn entirely by hand?
The complete project can be created by hand using blanket stitch, whipstitch, running stitch, backstitch, and decorative embroidery. Hand sewing produces a soft, traditional appearance and makes the project portable. It may take longer than machine stitching, but many makers enjoy the slower and more relaxing process.
What thread should be used around the appliqué pieces?
Cotton, polyester, rayon, and embroidery threads can all be used. Cotton thread creates a traditional matte finish, polyester provides durability, and rayon adds shine to satin stitching. Match the thread to each appliqué piece for subtle edges or choose contrasting thread to emphasize the outlines and create a more illustrated appearance.
How can the mushroom house be used after it is finished?
The completed panel can become a wall hanging, cushion cover, quilt block, tote bag panel, nursery decoration, table mat, fabric book page, or framed textile artwork. It can also be personalized with a child’s name, a family surname, a date, or a short embroidered message.
How should the finished quilt be washed?
Wash the project gently in cool water using mild detergent. Avoid harsh bleach and aggressive machine cycles, especially when the design contains buttons, beads, or hand embroidery. Air-dry the piece flat whenever possible. If pressing is necessary, iron it from the back with a protective cloth over the appliqué area.
Conclusion
The Mushroom House Appliqué Quilt Pattern is a delightful project that combines fabric selection, template preparation, fusible appliqué, decorative stitching, embroidery, and basic quilting techniques. By constructing the design in layers, you can recreate the red spotted roof, cream cottage, charming windows, heart-shaped door detail, colorful flowers, green leaves, and playful garden shown in the reference image.
This pattern can be kept simple for a beginner or enriched with advanced embroidery and quilting details. The colors, dimensions, background, flowers, and finishing style can all be changed, allowing every maker to produce a unique version of the mushroom cottage. Most importantly, the project encourages creativity while teaching practical skills that can be applied to many future appliqué quilts. After completing your own Mushroom House Appliqué Quilt Pattern, share your sincere opinion about the process and the final result. Leave suggestions about the colors, stitches, decorative details, or creative variations you would add to make this whimsical mushroom home even more special.