
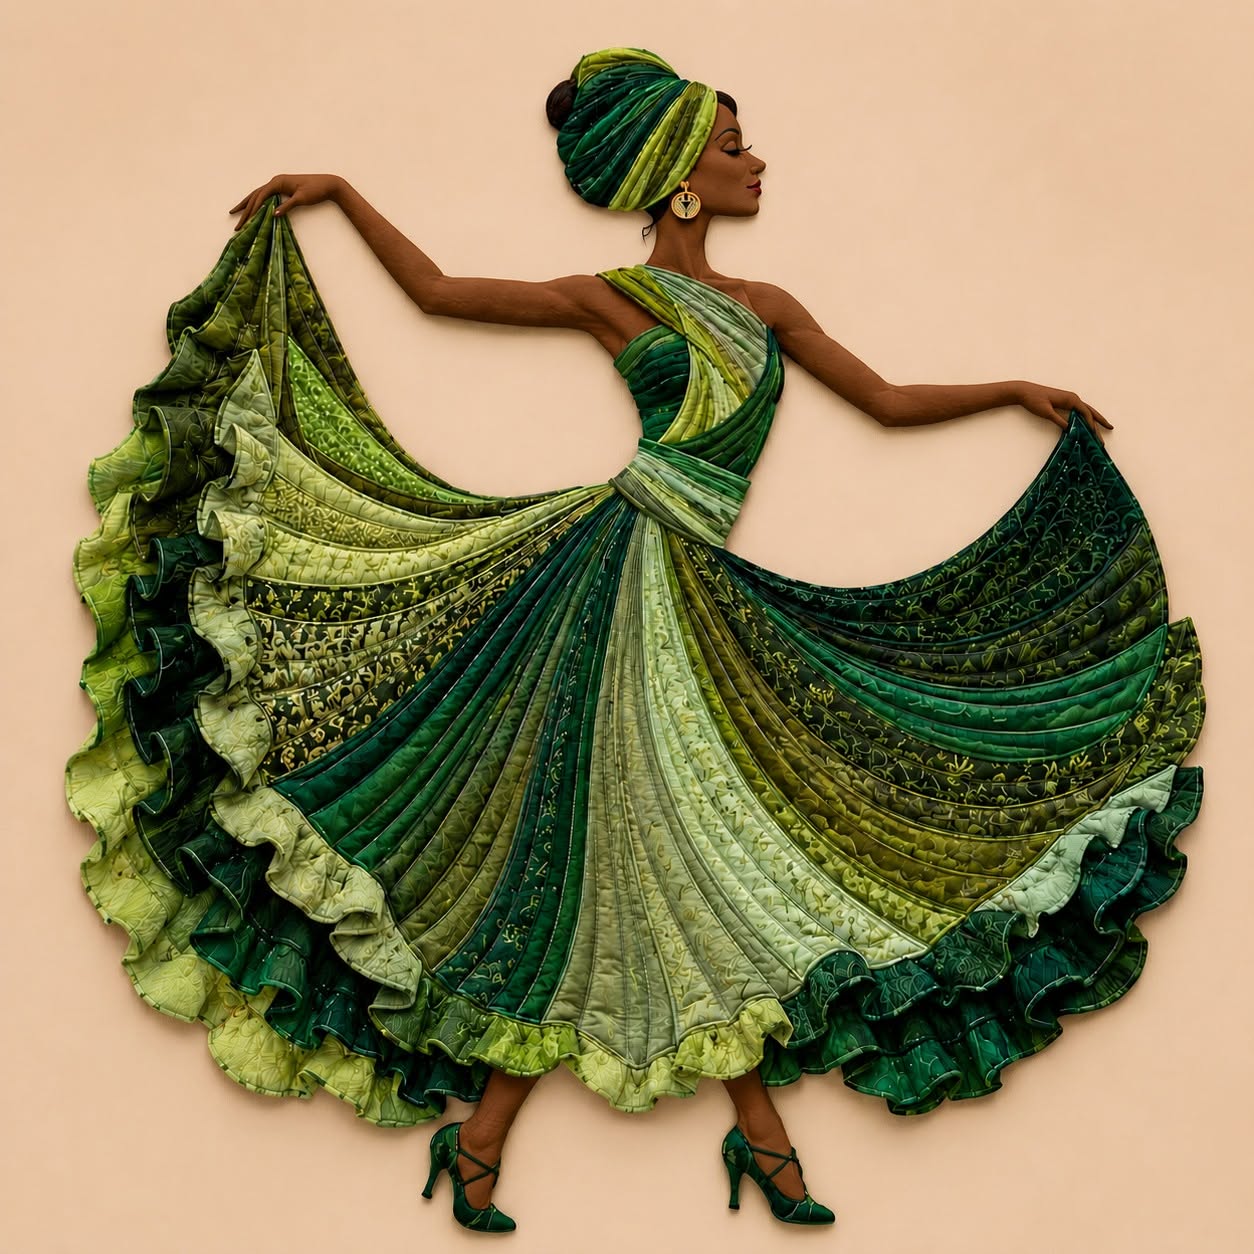
The Dancing Lady Patchwork Art Picture Fabric Pattern is a striking textile project that transforms fabric scraps into an elegant decorative portrait filled with movement, texture, and personality. Inspired by the image, the design features a graceful dancing woman wearing a dramatic green patchwork dress against a warm golden background. The flowing skirt is the main visual attraction because it combines curved fabric strips, layered ruffles, printed cotton pieces, and carefully stitched details. Although the finished artwork looks complex, it can be created gradually by dividing the project into manageable sections. You will first prepare the background, then construct the body silhouette, assemble the dress, add the hair and accessories, and finish the composition with decorative stitching. This project is ideal for quilters, fabric artists, and sewing enthusiasts who want to turn small pieces of material into an impressive piece of wall art.
A patchwork art picture differs from a traditional quilt because its primary purpose is to create an image rather than a repeated block arrangement. In this project, fabrics are treated almost like paint, with each shade of green representing light, shadow, folds, and movement within the dancer’s clothing. Dark emerald fabrics can be used in recessed areas, medium olive shades can define the central folds, and pale green pieces can highlight the front of the skirt. Printed fabrics add visual interest, while solid fabrics help balance the design and prevent it from appearing too busy. The golden-yellow background provides a strong contrast, allowing the green dress and light-colored figure to stand out immediately. By choosing materials carefully, the Dancing Lady Patchwork Art Picture Fabric Pattern can become a unique artwork that reflects your personal style.
Before beginning, remember that handmade textile art does not need to look identical to the reference image. The beauty of fabric collage, appliqué, and patchwork sewing comes from small variations in shape, color, stitching, and texture. Your dancer may have a slightly different pose, a simpler hairstyle, a wider skirt, or another selection of green fabrics. Beginners can reduce the number of skirt panels, while experienced makers can include additional ruffles, embroidery, beads, metallic thread, and intricate quilting. The most important goal is to maintain a clear silhouette and create a sense of graceful motion. With careful preparation and patient construction, the project can be completed as a beautiful framed textile picture, decorative wall hanging, quilted panel, or handmade gift.
Materials and Preparation for the Fabric Art Project
Begin by gathering a firm piece of cotton, linen, canvas, or quilted fabric for the background. A golden-yellow material similar to the reference picture creates a cheerful contrast with the green dress, but mustard, cream, terracotta, or pale blue can also work beautifully. The background should be larger than the planned finished artwork so that there is enough fabric for trimming, framing, or binding.
DISCOVER MORE FREE PATTERNS HERE!
Choose a varied collection of green fabrics for the dress and hair. Look for emerald green fabric, olive cotton, sage fabric, dark forest green prints, lime accents, and muted botanical patterns. A combination of approximately ten to twenty different fabrics will create depth, although the project can also be made with fewer coordinated colors.
For the dancer’s skin, select a light beige, ivory, tan, brown, or another tone that suits your preferred interpretation. You will also need small scraps for the lips, eyes, shoes, earrings, and hair details. These tiny elements may be created with fabric, felt, embroidery thread, fabric paint, or appliqué pieces.
Prepare essential sewing supplies, including sharp fabric scissors, small detail scissors, pins, appliqué needles, sewing thread, an iron, a pressing cloth, tracing paper, and a removable fabric marker. Fusible web is especially helpful because it temporarily holds the appliqué shapes in place before stitching. A sewing machine is useful, but much of the project can also be completed by hand.
Create or print a full-size drawing of the dancing woman before cutting the fabric. The outline should include the head, neck, arms, torso, waist, skirt, legs, shoes, hair, and extended pieces of fabric held by the hands. This drawing becomes the foundation of the Dancing Lady Patchwork Art Picture Fabric Pattern and helps maintain balanced proportions.
Separate the drawing into individual pattern pieces and label every section clearly. Add small overlap allowances where one fabric shape will sit beneath another. For example, the upper arm should extend slightly beneath the shoulder, and the dress bodice should overlap the torso so that no background fabric appears between the pieces.
Creating the Dancing Lady Silhouette and Bodice
Place the body pattern sections onto the chosen skin-tone fabric and trace them carefully. Cut the face, neck, arms, hands, visible legs, and other exposed areas separately. Avoid adding a traditional seam allowance unless you plan to turn the edges under, because raw-edge appliqué pieces are normally cut directly on the traced line.
Arrange the body pieces on the background before attaching anything permanently. The dancer should be centered, with enough open space around her hands, skirt, hair, and shoes. Step away from the layout and examine it from a distance, as this makes proportion problems easier to notice.
Fuse or baste the body pieces to the background one section at a time. Start with the pieces that must sit behind other elements, such as the legs, lower arms, and neck. Add the face, hands, and visible parts of the torso only after confirming that the placement matches your original sketch.
Stitch around the body shapes using a narrow zigzag, blanket stitch, straight stitch, or small hand appliqué stitches. A thread color close to the skin fabric creates a smooth appearance, while a slightly darker thread produces a more illustrated outline. Keep the stitches even, especially around the fingers and facial profile.
Construct the bodice from several curved green pieces rather than using one flat section. Layer dark and light strips diagonally across the chest to imitate folded fabric. This method connects the bodice visually to the patchwork skirt and gives the upper part of the dress a sculptural appearance.
Add facial features sparingly so the portrait remains elegant. A curved stitched line can form the closed eye, a small dark shape can define the eyebrow, and a tiny red or pink appliqué can create the lips. Decorative earrings, eyelashes, and subtle cheek shading may be added after the main construction is finished.
Building the Flowing Patchwork Dress Step by Step
The skirt is the most recognizable feature of the Dancing Lady Patchwork Art Picture Fabric Pattern, so begin with a complete foundation shape. Cut a large semicircular or fan-shaped piece of lightweight cotton that matches the overall silhouette of the skirt. This base will support the individual fabric panels and make the finished section easier to position.
Divide the foundation into curved segments radiating outward from the waist. Each segment should become gradually wider as it approaches the hem. These sections imitate pleats and allow you to arrange the colors from dark to light, creating the impression of fabric folding under natural light.
Cut long tapered strips from your green fabrics and place them over the foundation. Alternate solids, small prints, botanical motifs, and textured materials. Allow neighboring strips to overlap slightly so that the foundation is fully covered and the edges remain secure during sewing.
Stitch each strip to the foundation using narrow seams, decorative topstitching, or raw-edge appliqué. Begin at the waist and work toward the outer hem so the fabrics remain smooth. Press carefully after adding several pieces, but avoid stretching the curved edges because this can distort the shape of the skirt.
To create the dramatic outer movement, add wider curved fabric sections extending from the dancer’s hands toward the lower skirt. Dark green pieces work well along the right side, while mixed olive and light green fabrics can form the lifted fabric on the left. Quilt curved lines across these sections to suggest flowing folds.
Finish the hem with gathered or pleated ruffles made from several coordinating fabrics. Cut curved or straight strips, gather one edge, and attach them around selected areas of the skirt. Layering dark and pale ruffles creates dimension and gives the patchwork dancing lady the lively movement seen in the inspiration image.
Finishing, Quilting, Displaying, and Personalizing the Artwork
Create the hairstyle using narrow curved strips of green fabric arranged around a simple hair foundation. Twist, fold, or pleat the strips before stitching them down to imitate wrapped fabric or a decorative head covering. Small dark brown or black pieces can be added for the bun and deeper shadows.
Make the shoes from dark green fabric and position them over the lower ends of the legs. Thin stitched or appliquéd straps will create an elegant high-heeled appearance. Reinforce these tiny pieces with close stitching because narrow points and straps can lift more easily than larger appliqué shapes.
Once all appliqué pieces are secure, place batting and backing fabric behind the artwork. Baste the three layers together and quilt around the silhouette to separate the dancer visually from the background. Close echo quilting can make the figure appear slightly raised and give the golden background a refined texture.
Add quilting inside the dress to emphasize every fabric panel. Follow the direction of each curved section, using lines that begin near the waist and flow outward. Decorative stitches, free-motion quilting, or hand embroidery can be used to highlight printed motifs and strengthen the sense of movement.
Personalize the artwork with beads, sequins, metallic thread, small buttons, lace, or embroidered details. Use embellishments selectively so they support the design instead of overwhelming it. Earrings, hair ornaments, bodice highlights, and a few sections of the skirt are ideal places for subtle decoration.
Trim the finished panel only after the quilting is complete. You can add a fabric binding, stretch the piece over a covered board, mount it inside a deep frame, or sew a hanging sleeve to the back. Keep the artwork away from excessive moisture and prolonged direct sunlight to help protect the fabric colors.
Frequently Asked Questions About Dancing Lady Patchwork Art
What is a Dancing Lady Patchwork Art Picture Fabric Pattern?
A Dancing Lady Patchwork Art Picture Fabric Pattern is a textile-art design used to create the image of a dancing woman from fabric pieces. It combines techniques such as patchwork, fabric collage, quilting, embroidery, and appliqué. The finished project is usually displayed as wall art rather than used as a traditional bed quilt.
Is this project suitable for beginners?
The complete design is best suited to confident beginners or intermediate sewists because it includes small appliqué pieces and many curved skirt panels. However, a beginner can simplify the pattern by using fewer fabrics, enlarging the body pieces, removing very small details, and replacing layered ruffles with a single finished hem.
What are the best fabrics for patchwork picture art?
Quilting cotton is one of the easiest choices because it is stable, widely available, and simple to cut. Batik, linen blends, felt, silk scraps, and lightweight upholstery fabrics may also be used. Very stretchy or slippery materials should be stabilized before cutting.
Do I need a sewing machine to complete the pattern?
A sewing machine makes the project faster, especially when attaching the large skirt panels and quilting the background. Nevertheless, the entire artwork can be sewn by hand with small appliqué stitches, running stitches, blanket stitches, and embroidery. Hand sewing may take longer but can create a beautiful handcrafted finish.
Should I use fusible web for the appliqué pieces?
Fusible web is recommended for complicated shapes because it keeps the pieces from shifting while they are stitched. Use a lightweight product so the artwork does not become excessively stiff. Always test the fusible material on a fabric scrap and follow the manufacturer’s heat instructions.
How can I make the skirt look full and dimensional?
Use a combination of tapered fabric panels, overlapping curves, gathered ruffles, directional quilting, and contrasting shades. Dark colors create visual depth, while pale colors bring selected areas forward. Slightly lifting or pleating a few fabric sections before stitching can also produce controlled three-dimensional texture.
Can I use fabric scraps from other sewing projects?
Yes. This type of fabric scrap art is an excellent way to reuse leftover quilting cotton, dressmaking fabric, and coordinated remnants. Sort the scraps by color and value before beginning. Even very small pieces can be used for facial details, jewelry, shoes, patterned dress accents, and decorative stitching tests.
How large should the finished artwork be?
The design can be adapted to almost any size, but larger dimensions are easier when the pattern contains detailed hands, facial features, and narrow strips. A medium wall panel offers enough space for the skirt to flow naturally without making the project difficult to handle. Choose the final size according to your display location.
How do I prevent raw appliqué edges from fraying?
Apply fusible web, use a close zigzag or blanket stitch, and avoid handling the cut pieces excessively before sewing. You can also use a small amount of fabric sealant on very delicate points. Another option is turned-edge appliqué, where the raw edges are folded underneath before stitching.
Can the color palette be changed?
Absolutely. Although the reference artwork uses green and golden yellow, the design would also work in red and cream, blue and silver, purple and pale pink, or a multicolored scrap palette. Maintain enough contrast between the background, body, and dress so that the dancer remains clearly visible.
How should the completed textile artwork be cleaned?
Gentle dusting with a clean, soft brush is usually sufficient for framed or hanging textile art. Avoid harsh washing, strong cleaning products, and excessive rubbing. When washable fabrics and colorfast threads have been used, careful hand washing may be possible, but decorative beads and dimensional sections require extra caution.
Conclusion
The Dancing Lady Patchwork Art Picture Fabric Pattern is a creative project that combines illustration, appliqué, quilting, fabric collage, and decorative sewing in one expressive composition. Throughout this guide, you learned how to choose the background and fabrics, prepare the dancer pattern, assemble the body silhouette, construct the layered bodice, build the flowing patchwork skirt, add dimensional ruffles, and complete the artwork with quilting and embellishments.
EASILY FIND THE PDF FOR THIS PATTERN HERE!
The design may appear detailed at first, but working section by section makes the process organized and enjoyable. Use the reference picture as inspiration while allowing your own colors, materials, and sewing style to shape the final result. Please leave your sincere opinion about this project and share suggestions for other fabric patterns, color combinations, or textile-art tutorials you would like to see.