
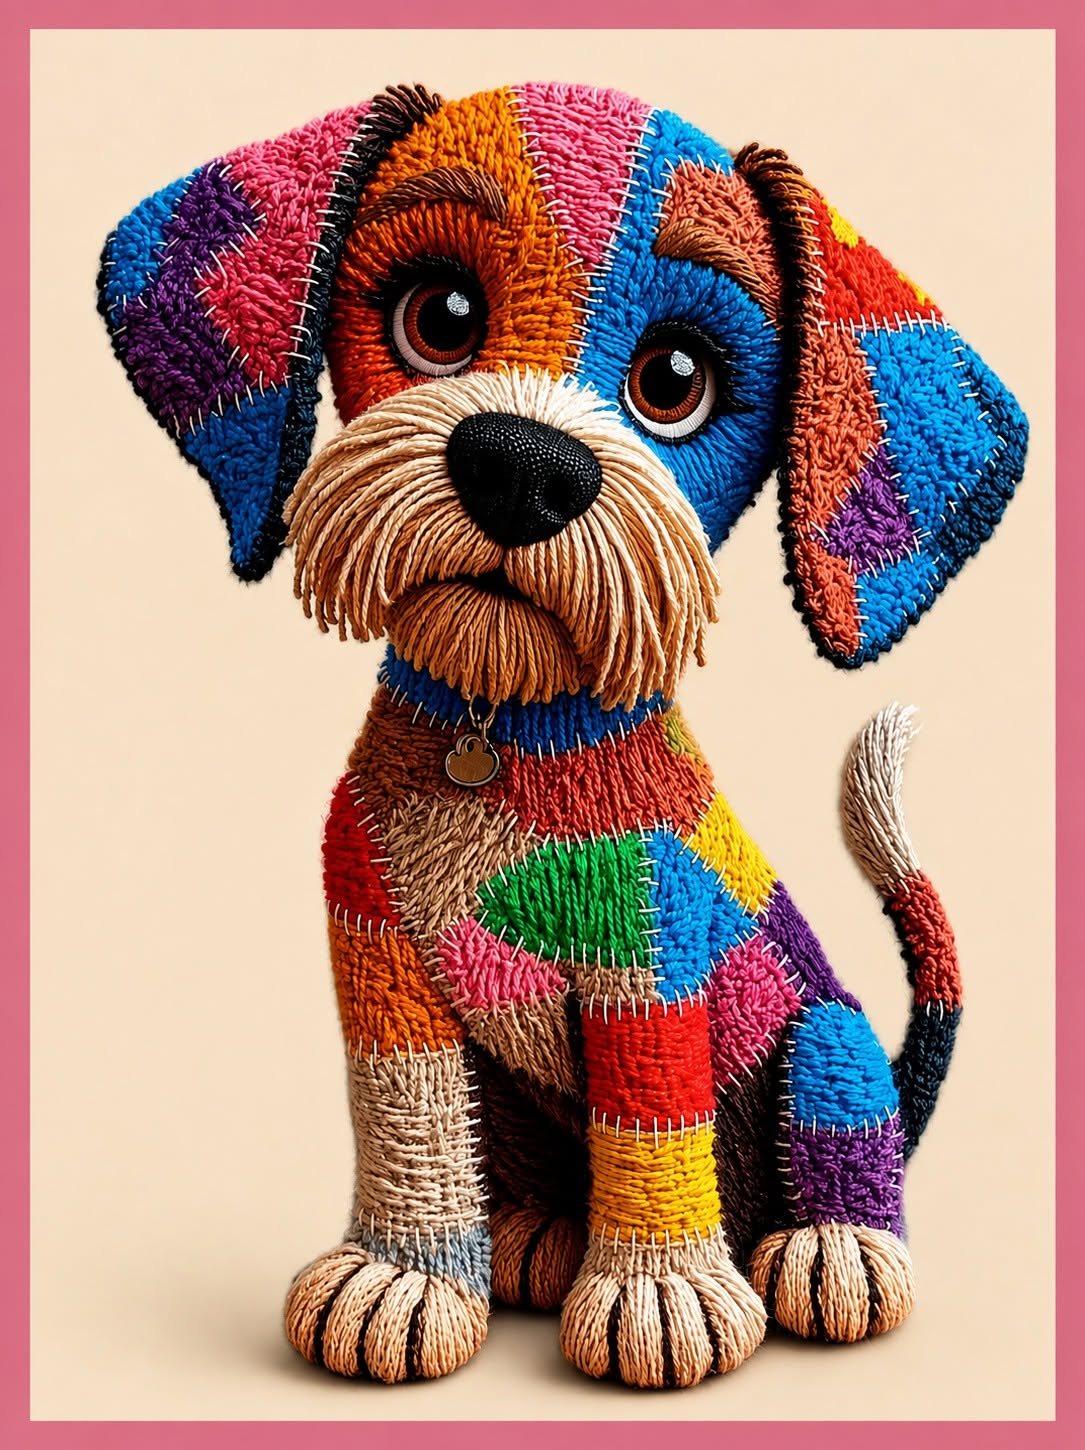
Patchwork Puppy Sewing and Quilting Tutorial Pattern is a creative fabric project that combines sewing, quilting, appliqué, embroidery, and soft-sculpture techniques to produce a colorful puppy inspired by the handmade design shown in the photo. The finished piece stands out because every section of the dog is formed with different colors, textures, and fabric shapes, creating a cheerful patchwork appearance. Although the photographed puppy has the visual depth of embroidery, the same artistic effect can be recreated with cotton fabric, quilted sections, decorative stitches, yarn details, and carefully shaped stuffing. This project can be used to make a decorative fabric panel, a nursery decoration, a framed textile artwork, or even a three-dimensional stuffed puppy. The process requires patience, but each part can be completed separately, which makes the construction easier to organize. By following a clear sequence, even an intermediate beginner can gradually build a beautiful and expressive handmade dog.
The term patchwork puppy refers to a dog-shaped craft made from many small fabric pieces joined together to form a complete design. Sewing is the process of assembling those pieces with hand stitches or a sewing machine, while quilting adds structure by joining a fabric top, a layer of batting, and a backing fabric. A tutorial pattern provides the shapes, measurements, placement guidance, and construction order required to reproduce the project. In this design, the head, ears, body, legs, paws, muzzle, and tail are divided into individual pattern pieces. Each part can be cut from a different fabric color to imitate the bright mosaic effect visible in the reference image. Decorative stitching around the pieces helps define the sections and gives the puppy the charming handmade character associated with textile art.
Before beginning the Patchwork Puppy Sewing and Quilting Tutorial Pattern, decide whether you want to create a flat quilted wall hanging or a lightly stuffed decorative figure. A flat design is usually simpler because all the puppy pieces are appliquéd onto one background panel. A dimensional version requires front and back body pieces, additional seam allowances, careful turning, and balanced stuffing. The photographed project also includes embroidered flowers and leaves around the puppy, so the background can become an important part of the finished composition. Choose a warm neutral fabric if you want the colorful dog to remain the main focal point. Preparing all tools, fabrics, templates, and threads before sewing will make the project more enjoyable and reduce mistakes during assembly.
Materials, Fabric Selection, and Pattern Preparation
Begin by collecting several small pieces of quilting cotton in bright colors such as blue, red, orange, pink, purple, yellow, turquoise, brown, cream, and green. Fabric scraps are ideal for this patchwork sewing project, making it a practical way to reuse leftover materials. Try to combine solids, subtle prints, and textured fabrics without using designs that are too large. Small prints are easier to see on narrow puppy sections. Prewash and press the fabrics before cutting so they remain stable after the project is completed.
DISCOVER MORE FREE PATTERNS HERE!
You will also need lightweight batting, backing fabric, coordinating sewing thread, embroidery floss, fabric scissors, pins, a hand-sewing needle, and a sewing machine. Fusible web is helpful when creating a flat appliqué version because it holds each patch in place before stitching. For a stuffed puppy, prepare polyester fiberfill and a blunt turning tool. Safety eyes may be used for a decorative item intended for adults, but embroidered eyes are a safer choice for children’s room decorations. A black fabric scrap or embroidered satin stitches can be used to create the nose.
Create the puppy sewing pattern by drawing the project in separate sections rather than as one complicated shape. Prepare templates for the head, two ears, central face patches, muzzle, nose, body, front legs, back legs, paws, chest, and tail. The head should be slightly wider than the body to preserve the friendly expression seen in the photo. Draw gentle curves instead of sharp corners because curved pieces are easier to stuff and create a softer appearance. Label every template clearly before cutting it out.
Add a seam allowance of approximately ¼ inch around each template when making the dimensional version. For raw-edge appliqué, the shapes can be cut at their finished size because the edges will remain visible and will be secured with decorative stitching. If you prefer turned-edge appliqué, add a narrow allowance that can be folded underneath. Mark the direction of each piece so that the right and left ears are not accidentally reversed. It is also useful to number the pieces according to the order in which they will be attached.
Arrange the paper templates on a table before cutting the fabric. This planning stage allows you to distribute the colors evenly across the colorful patchwork puppy. Avoid placing too many similar colors next to one another unless you want a specific blended effect. Use darker colors around the eyes and ears to create depth, while brighter fabrics can be placed on the chest, legs, and body. Cream or beige works well for the muzzle because it contrasts with the black nose and colorful face.
Trace each template onto the wrong side of the selected fabric and cut carefully along the marked lines. Keep the pieces grouped by body area in labeled envelopes or small containers. Accuracy is important because uneven pieces can change the puppy’s expression or make the final assembly more difficult. Press every piece after cutting, but avoid stretching curved edges. Once all the fabric sections are prepared, place them together temporarily to check the overall balance before sewing.
Creating the Patchwork Puppy Face and Body
Start the construction with the puppy’s face because the expression is the most important feature of the entire design. Position the central head piece on your work surface and place the smaller colored patches over it. The patches can overlap slightly if you are using raw-edge appliqué. Secure them with fusible web or a small amount of fabric-safe temporary adhesive. Make sure the color changes follow the natural curves of the forehead, cheeks, and eye area.
Stitch around every facial patch using a narrow zigzag, blanket stitch, or decorative machine stitch. Contrasting thread can emphasize the separate sections and imitate the visible stitched outlines in the reference image. For a more traditional quilting tutorial pattern, use matching thread so the construction looks softer and more blended. Sew slowly around the curves and stop with the needle down whenever you need to turn the fabric. Do not pull the pieces while sewing because this can distort the head.
Create the eyes with layered circles of fabric or embroidery. Begin with a white oval, add a brown or dark amber iris, and finish with a smaller black pupil. A tiny white embroidered highlight can make the puppy look bright and expressive. Position both eyes before permanently attaching them, checking that they are symmetrical but not unnaturally identical. Slight variations often give handmade animal designs more personality.
The muzzle can be made from cream, beige, or light brown fabric. Cut two rounded sections for the sides and a smaller central section beneath the nose. Decorative straight stitches or strands of yarn can be added vertically to reproduce the textured appearance of the photographed puppy. Place the black nose above the muzzle and secure it firmly with dense satin stitches or appliqué stitching. Add a short curved mouth line below the nose using dark embroidery floss.
Construct each ear separately by joining several colored fabric sections. The ears should have enough contrast to remain visible beside the head, so include dark blue, purple, brown, red, or turquoise pieces. Add a thin layer of batting behind the ear front and quilt through selected areas. If you are making a three-dimensional project, sew each ear front to a backing piece, turn it right side out, and press it gently. Attach the ears to the sides of the head only after confirming their position.
Assemble the body with the same patchwork technique used for the face. Join irregular fabric pieces until they cover the chest, back, and shoulder areas. Each patch can have a different shape, but the seams should remain smooth enough for the final body outline to lie flat. Add narrow decorative stitching across the patch boundaries to reinforce them. When the body is completed, position the head above it and check the proportions before joining the two main sections.
Sewing, Quilting, Stuffing, and Final Assembly
For a wall hanging, place the completed puppy pieces on a background fabric large enough to include flowers and leaves around the dog. Arrange the body first, followed by the back legs, front legs, head, ears, and tail. Step away from the layout and look at it from a distance before fusing or pinning anything permanently. The puppy should be centered without appearing rigid. A slight tilt of the head can make the composition feel more playful.
Appliqué the body pieces onto the background using a blanket stitch or narrow zigzag stitch. Begin with the elements that should appear behind the others, such as the tail and back legs. Continue with the torso, front legs, chest, head, ears, muzzle, and facial features. This layering order creates visual depth and prevents important edges from becoming hidden. Smooth each piece as you sew so no bubbles or wrinkles form beneath the fabric.
After the appliqué is complete, make the quilt sandwich by placing the backing fabric wrong side up, the batting in the middle, and the decorated top facing upward. Baste the layers together with safety pins or temporary spray adhesive. Quilt around the puppy’s outline to separate it visually from the background. Additional quilting can be added inside larger body patches to create texture and stability. Keep the quilting lines simple so they do not compete with the colorful design.
For a stuffed patchwork puppy sewing pattern, sew the front and back sections with the right sides facing each other. Leave an opening along a straight part of the body for turning. Clip the seam allowance around inward curves and trim bulky corners without cutting through the stitching. Turn the puppy right side out slowly, using a blunt tool to shape the paws, ears, and narrow sections. Press only when necessary and use low heat to protect decorative threads.
Add fiberfill in small amounts, beginning with the legs, paws, muzzle, and head. Small portions produce a smoother result than pushing a large amount of stuffing into the project at once. Keep the body firm enough to hold its shape but soft enough to preserve the quilted texture. Check both sides regularly to make sure the stuffing is evenly distributed. Close the opening with a neat ladder stitch that remains nearly invisible.
Finish the assembly by adding a small fabric collar and a decorative tag if desired. The collar can be made from a folded fabric strip, narrow ribbon, or a miniature quilted band. Secure every embellishment carefully, especially when the finished item will be displayed in a family environment. Avoid loose beads, buttons, or small detachable parts on items made for babies or young children. A fully embroidered finish is attractive, durable, and appropriate for many decorative uses.
Embroidered Flowers, Finishing Details, and Care
The floral background is one of the most striking features of the reference image. To recreate this look, draw several simple flower shapes around the finished puppy. Use large flowers near the corners and smaller blossoms to fill open spaces. Keep the central area around the face relatively clear so the puppy remains the focus. Varying the flower sizes creates movement and makes the textile composition look more natural.
Flowers can be created with fabric appliqué, hand embroidery, yarn couching, or a combination of techniques. Cut rounded petals from bright fabric and attach them around a circular center. Blanket stitching can secure the petal edges while adding a decorative outline. For a highly textured result, fill the petals with long embroidery stitches. Use contrasting centers in yellow, orange, brown, or pink to strengthen the colorful handmade style.
Add leaves and stems between the flowers using green fabric scraps or embroidery floss. A simple backstitch works well for narrow stems, while satin stitch or fishbone stitch can create full leaves. Direct some leaves toward the puppy so the entire background feels connected. Avoid covering the ears, paws, or tail with large floral elements. The flowers should frame the dog rather than compete with it.
Review all seams and decorative stitches before completing the project. Reinforce any areas that appear loose, particularly around the eyes, nose, muzzle, paws, and collar. Remove visible basting threads and trim stray fibers carefully. If the project will be framed, square the quilted panel using a ruler and rotary cutter. Add binding around the edges for a professional and durable finish.
To bind the wall hanging, sew folded binding strips around the front edge and wrap them toward the back. Miter the corners neatly and close the final side with hand stitches or machine stitching. A hanging sleeve can be attached to the back if the artwork will be displayed on a rod. For a cushion front, join the finished puppy panel to an envelope-style or zippered backing. Always measure the completed panel before cutting the final backing pieces.
Clean the finished Patchwork Puppy Sewing and Quilting Tutorial Pattern gently. Hand washing in cool water is usually the safest choice when the project contains embroidery, appliqué, or dimensional decorations. Avoid aggressive twisting because it can damage the batting and distort the patchwork pieces. Dry the item flat and reshape it while damp. Store the project away from prolonged direct sunlight to help preserve the bright fabric and thread colors.
Frequently Asked Questions
Is the Patchwork Puppy Sewing and Quilting Tutorial Pattern suitable for beginners?
The project is most suitable for confident beginners or intermediate sewists because it combines several techniques. A beginner can simplify the design by using larger patches, fewer colors, embroidered facial features, and a flat appliqué construction. Practicing the blanket stitch on scrap fabric before beginning the puppy can also improve the final result.
What is the best fabric for a patchwork puppy?
Quilting cotton is one of the easiest materials to cut, press, and sew. It is stable, available in many colors, and works well with both machine stitching and hand embroidery. Felt may also be used for small facial details because its edges do not fray, although an entire felt project will have a different texture.
Can this pattern be sewn by hand?
Yes. Every section can be assembled with hand sewing, especially when using small pieces. A blanket stitch is useful for appliqué edges, a backstitch provides strong construction seams, and a ladder stitch closes stuffed openings neatly. Hand sewing takes longer, but it can enhance the artistic and traditional character of the project.
How can I resize the puppy pattern?
Print or draw the templates at the desired percentage. When enlarging or reducing the project, keep every piece at the same scale so the head, body, legs, and facial details remain proportional. Very small versions may require simplified patches because narrow fabric pieces can be difficult to turn or stitch accurately.
Do I need a quilting machine to complete the project?
No. A standard domestic sewing machine is sufficient. Straight stitch, narrow zigzag stitch, and blanket stitch are the most useful settings. Free-motion quilting is optional and should only be added when you feel comfortable controlling the fabric beneath the needle.
How many fabric colors should I use?
There is no fixed number, but eight to twelve colors can create a rich patchwork appearance without making the layout confusing. Repeating a few colors in different areas helps unify the design. Neutral fabrics around the muzzle and paws can balance the stronger shades used on the face and body.
Can fabric scraps be used for this tutorial?
Yes. This is an excellent fabric scrap project because most sections are small. Sort scraps by color and press them before cutting. Avoid weak, stretched, or heavily frayed fabric because damaged pieces may not remain secure after stitching and quilting.
Should the fabric edges be turned under?
Turned edges create a polished traditional appliqué finish, while raw edges produce a more relaxed handmade appearance. Raw-edge appliqué is usually faster and works particularly well when the edges are covered with a dense blanket stitch or zigzag stitch. Both methods can produce a beautiful result.
How do I make the puppy’s face look expressive?
Focus on eye placement, pupil direction, muzzle shape, and ear position. Eyes placed too far apart or too high can change the character dramatically. Test all facial pieces before sewing them permanently. Adding tiny white highlights to the pupils can give the puppy a lively and friendly expression.
Can the finished puppy be used as a child’s toy?
A three-dimensional version may be used as a decorative soft item, but construction choices must be made carefully. Use embroidered eyes and noses instead of beads, plastic eyes, buttons, or removable decorations. Reinforce all seams and supervise young children. A wall hanging is the simplest option when the project is intended primarily as room decoration.
How long does the project take to complete?
The time depends on the size, number of patches, and level of embroidery. A simplified appliqué panel may take one or two days, while a highly detailed quilted and embroidered version may require several sewing sessions. Dividing the work into cutting, facial construction, body assembly, quilting, and finishing stages makes the process easier to manage.
Can I replace the embroidered flowers with fabric flowers?
Yes. Fabric appliqué flowers are quicker to create and can coordinate with the scraps used in the puppy. Combine several petal shapes, add contrasting centers, and finish the edges with decorative stitching. Embroidered stems and leaves can still be added to connect the flowers visually.
Conclusion
The Patchwork Puppy Sewing and Quilting Tutorial Pattern brings together fabric selection, accurate cutting, appliqué, decorative stitching, quilting, stuffing, embroidery, and careful finishing. The project begins with individual paper templates and gradually becomes a colorful puppy filled with personality and handmade detail. By constructing the face first, assembling the body in sections, layering the pieces correctly, and adding floral elements around the design, you can create a decorative textile artwork inspired by the photo.
EASILY FIND THE PDF FOR THIS PATTERN HERE!
The pattern can be adapted into a wall hanging, cushion panel, framed quilt, or lightly stuffed puppy, making it a versatile project for using colorful fabric scraps. Leave your sincere opinion about this tutorial and share suggestions about colors, stitches, backgrounds, or other details that could make the next patchwork puppy even more creative.