
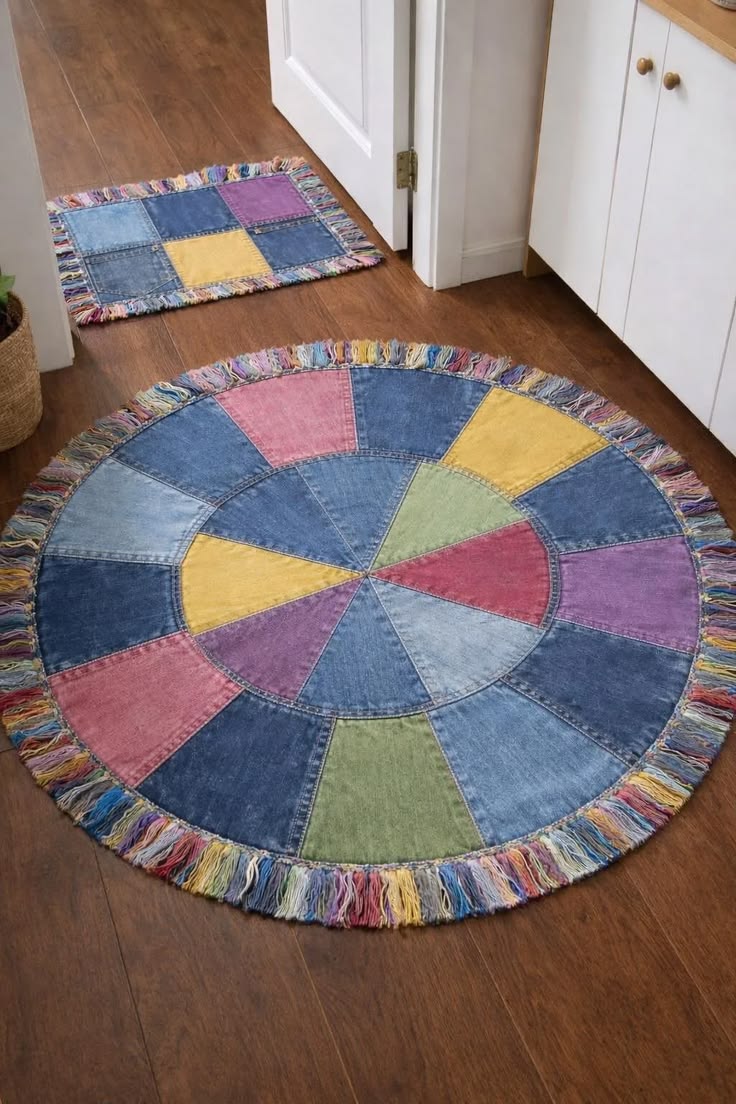
The Round Patchwork Rug Fabric Pattern is a creative sewing project that transforms fabric remnants, old denim, and colorful cotton pieces into a practical decorative rug. Inspired by the rug shown in the photo, this design combines a circular shape, wedge-shaped fabric sections, visible topstitching, and a soft fringed border. The arrangement resembles a colorful wheel, with an inner circle surrounded by a larger patchwork ring. Although the finished piece looks detailed, the construction becomes manageable when the project is divided into clear stages. It is also an excellent opportunity to reuse materials that might otherwise be discarded. By adjusting the diameter and fabric selection, you can create a rug for a bedroom, sewing room, entryway, kitchen, or cozy reading corner.
A handmade round fabric rug offers more than an attractive way to decorate a room. It allows you to choose colors that coordinate with your furniture, curtains, cushions, and existing handmade accessories. Denim is especially suitable because it is durable, stable, washable, and visually appealing when combined in different shades. Colored cotton, canvas, twill, or lightweight upholstery fabric can be added to create contrast between the blue sections. The project can be made with new yardage, but using old jeans gives the surface a relaxed and slightly rustic appearance. Small variations in color and texture make every rug unique. For the best result, choose fabrics with similar weights or stabilize thinner pieces before assembling them.
This tutorial explains how to create a Round Patchwork Rug Fabric Pattern from beginning to end, including planning, measuring, cutting, piecing, quilting, backing, and finishing the outer edge. The measurements can be adapted because the exact size of the photographed rug cannot be confirmed from the image alone. A finished diameter of approximately 40 to 48 inches works well for a medium floor rug, while a smaller version can be used beside a bed or in front of a cabinet. Seam allowances, sturdy thread, careful pressing, and accurate templates are essential for keeping the circle flat. The instructions below use practical sewing techniques that can be completed on a regular domestic sewing machine. Read through every step before cutting so that the colors, segments, and finished dimensions remain balanced.
Materials, Measurements, and Fabric Preparation
Begin by deciding the finished diameter of your round patchwork rug. A practical example is a 42-inch finished circle, not including the fringe. Draw a smaller central circle with a diameter of approximately 20 inches, then divide the remaining area into an outer ring. These proportions do not have to be identical to the inspiration photo, but the central circle should be large enough to show the first set of wedges clearly. Add a ½-inch seam allowance around every pattern piece. A slightly wider allowance is helpful because denim can fray during handling.
DISCOVER MORE FREE PATTERNS HERE!
For the top of the rug, gather several shades of denim and a selection of coordinating fabrics in yellow, pink, purple, green, light blue, and other preferred colors. Medium-weight denim is easier to sew than very thick jeans fabric. Avoid using areas with bulky pockets, metal rivets, heavy seams, or stretched knees. Wash and dry all materials before cutting to reduce the possibility of shrinking later. Press each piece thoroughly so the templates can be positioned accurately.
You will also need strong polyester thread, fabric scissors or a rotary cutter, a large cutting mat, pins or sewing clips, tailor’s chalk, a measuring tape, and a sewing machine fitted with a denim needle. A walking foot is helpful when quilting through several layers. For the interior, choose cotton batting, felt, or a thin rug pad that provides body without making the project too difficult to stitch. The backing may be canvas, denim, cotton duck, or another durable woven fabric. Select a washable material whenever possible.
To reproduce the wheel-like layout, prepare two paper templates. The first template forms one wedge of the inner circle, and the second forms one section of the outer ring. Divide the full circle into eight equal sections for a simple layout, or use ten or twelve sections for a more detailed result. The photographed design appears to use several wedge sections of different visual widths, but equal divisions will be easier for most home sewers. A protractor, ruler, string compass, or large circular household object can help you draw the pattern.
Create the inner wedge by drawing a circle on large paper and marking lines from the center to the outer edge. Cut one section and add the seam allowance around it. To create an outer-ring template, draw a second, larger circle around the first one. Mark the same dividing lines through both circles, then cut out one ring section. Label each template with the grain direction, cutting quantity, inner edge, outer edge, and ½-inch seam allowance.
Plan the color placement before cutting the final fabric. Arrange dark denim, light denim, and colorful pieces so similar colors are not concentrated in one area. Taking a quick photo of the arrangement can help you remember the order while sewing. Cut the required number of inner wedges and outer-ring sections. For a rug divided into eight parts, cut eight inner wedges and eight outer sections. Keep the pieces stacked in their planned sequence and label them with removable notes if necessary.
Cutting and Sewing the Patchwork Rug Top
Lay the inner wedges on a flat surface with their pointed ends meeting at the center. Rotate individual pieces until the colors feel balanced. The tips should come together neatly, but a tiny opening at the center is acceptable because it can later be reinforced with stitching or covered with a small fabric circle. Place the first two wedges right sides together and align one long edge. Pin or clip the seam carefully from the wide outer edge toward the point.
Sew the first pair using the selected ½-inch seam allowance. Use a stitch length of approximately 2.8 to 3 millimeters when working with denim. Backstitch at the beginning and end, then press the seam allowance open to reduce bulk. Topstitch on both sides of the seam for the visible handcrafted appearance seen in the inspiration image. Continue joining the wedges in pairs before connecting the pairs into half circles. This method provides more control than sewing every wedge consecutively into one long unit.
Join the two completed halves along the final straight seams. Match the center intersection carefully and secure it with several pins. Sew slowly as the needle approaches the middle because multiple seam allowances meet in this area. Press the finished inner circle from both the front and back. If the center feels bulky, trim only the excess seam allowance without cutting through the stitching. Add a second row of topstitching around each seam if you want a stronger decorative outline.
Next, arrange the outer-ring pieces around the completed inner circle. Each outer section must correspond with one inner wedge so the radial seam lines continue outward. Sew the outer sections together along their straight side edges, using the same process of stitching, pressing, and topstitching. Join them first into manageable groups, then form a complete ring. Before attaching the ring to the center, place it around the inner circle to confirm that both circumferences match.
Pin the inner curved edge of the outer ring to the edge of the central patchwork circle with right sides together. Match every radial seam before pinning the spaces between them. Curved edges can stretch, so avoid pulling either layer. Sew slowly around the entire circle, stopping occasionally to reposition the fabric. Clip small notches into the seam allowance without cutting the stitches. These clips allow the curved seam to spread and lie flat when pressed.
Press the seam allowance toward the outer ring and topstitch around the circular join. This curved line of stitching strengthens the connection and highlights the two-part design. Place the completed patchwork top on a clean floor or large table and inspect the shape. Minor irregularities can be trimmed using a paper circle, a string compass, or a measuring tape held from the center. Do not remove too much fabric. The final outer edge should be smooth enough to attach the backing and fringe evenly.
Adding Batting, Backing, and Quilting
Spread the backing fabric with its wrong side facing upward. Place the batting over it, followed by the patchwork rug top with its right side facing upward. Smooth all three layers from the center toward the outer edge. The backing and batting should extend at least 1 or 2 inches beyond the patchwork top. This extra space prevents the lower layers from shifting inside the seam area. Secure the sandwich with safety pins, temporary fabric adhesive, or long hand-basting stitches.
Begin quilting near the center and work outward. Stitch along the existing radial seams to hold the layers securely. A walking foot helps the machine move the thick fabric sandwich evenly. Sew slowly over areas where denim seam allowances intersect. Never pull the project from behind the presser foot because this can bend or break the needle. Instead, support the weight of the rug on a table so it does not drag while you stitch.
After quilting the radial lines, sew around the circular seam that joins the central wedges to the outer ring. This row is both functional and decorative. Additional quilting can be added approximately 1 to 2 inches from the outer edge. The goal is to prevent the backing and batting from moving during use or washing. Excessive quilting is not necessary, especially when the upper fabric is heavy denim. Evenly distributed stitching will give the rug a smooth, stable surface.
Inspect the back after completing several rows. Remove puckers before continuing, since small folds become difficult to correct later. If necessary, unpick a short area and smooth the backing again. Continue until all the main patchwork seams have been quilted through the layers. Use matching thread for a subtle finish or contrasting topstitching thread for a stronger handmade appearance. A golden-brown thread works especially well with blue denim.
Trim the batting and backing so they are even with the circular patchwork top. Use sharp fabric scissors and work slowly around the perimeter. Check the circle from several angles while trimming. A slightly uneven edge may become more noticeable after the fringe or binding is attached. Mark a consistent distance from the center at several points around the rug. Connect the marks with a smooth chalk line before making the final cut.
For safer use on smooth floors, add a non-slip rug backing after the quilting is finished. This may be a washable gripper fabric cut slightly smaller than the finished rug or a removable non-slip mat placed underneath it. Follow the product instructions when using any specialty backing material. Avoid applying random household coatings that were not designed for textiles. A properly fitted rug pad improves stability while also reducing wear on the handmade backing.
Creating the Fringed Border and Finishing the Rug
The multicolored fringe is one of the most distinctive features of this Round Patchwork Rug Fabric Pattern. It can be created with yarn, narrow fabric strips, cotton cord, or a purchased fringe trim. For an appearance similar to the photo, combine yarn in colors already used in the patchwork, including blue, pink, purple, green, and yellow. Cut the strands to equal lengths. Remember that each strand will be folded, so cut it approximately twice the desired finished fringe length.
One method is to sew the yarn strands onto a narrow fabric tape before attaching the trim to the rug. Fold each group of strands in half and place the folds side by side along the tape. Stitch over the folds several times with strong thread. Continue until the trim is long enough to surround the entire circumference. Make extra length rather than stopping at the exact measurement. The ends can be overlapped neatly when the trim is attached.
Another option is to use a durable ready-made fringe. Place the heading of the trim along the raw outer edge with the fringe pointing toward the center of the rug. Baste it in place around the entire circle. The trim may need to be slightly eased along the curved edge. Avoid stretching it, as stretched trim can cause the finished rug to curl. Overlap the two ends by approximately 1 inch and secure them with extra stitching.
Cover the raw edge with double-fold bias binding or a custom fabric facing. Bias binding bends more easily around a circle than straight-grain strips. Open one folded edge and align it with the perimeter over the fringe heading. Stitch slowly around the circle, then fold the binding to the back and secure it with machine stitching or small hand stitches. Make certain that the fringe remains outside the binding and does not become trapped under the needle.
After the border is complete, place the rug flat and gently arrange the fringe. Trim any noticeably long strands, but avoid cutting everything into a rigid, perfectly straight line. Slight variation contributes to the relaxed handmade style. Check the entire project for loose threads, skipped stitches, or unsecured seam intersections. Reinforce any vulnerable sections. Press the fabric surface with steam if the materials allow it, keeping the iron away from yarn that could melt or flatten.
Allow the finished round denim patchwork rug to rest flat for several hours before placing it in the intended room. Wash it only according to the requirements of the most delicate material used. A gentle cycle, cold water, and air drying are usually safer for a layered handmade project. Large rugs may become very heavy when wet, so hand washing or professional cleaning may be more appropriate. Shake or vacuum the rug carefully to remove everyday dust without damaging the fringe.
Frequently Asked Questions About the Round Patchwork Rug Fabric Pattern
What is a Round Patchwork Rug Fabric Pattern?
A Round Patchwork Rug Fabric Pattern is a sewing guide used to create a circular rug from multiple fabric sections. The pieces are usually shaped like wedges, triangles, or curved ring segments. When sewn together, they form a wheel-like design with repeated lines radiating from the center. The pattern may include seam allowances, grain lines, cutting quantities, and assembly markings.
Can I make this project from old jeans?
Yes. Old jeans are an excellent material for a denim patchwork rug because the fabric is strong and available in many natural shades of blue. Remove pockets, zippers, rivets, thick hems, and worn areas before cutting. Wash the jeans first and choose sections with similar stretch. Mixing very soft denim with extremely rigid denim may make the circular seams harder to align.
How much fabric is needed for a round patchwork rug?
The quantity depends on the diameter, number of sections, width of the fabric, and direction of the templates. A medium rug may require approximately 3 to 5 yards of total fabric when the top, seam allowances, and possible cutting mistakes are considered. Using fabric remnants makes exact yardage difficult to calculate. Create the full-size templates first and arrange them on the available material before purchasing additional fabric.
Why does my circular rug refuse to lie flat?
A rug may ripple when the curved edges stretch during sewing, when the outer-ring circumference does not match the central circle, or when the seams are not pressed correctly. It may cup upward if the outer ring is too small. It may wave around the perimeter if the ring is too large. Accurate templates, careful pinning, clipped seam allowances, and gentle handling help keep the project flat.
Is batting necessary inside the rug?
Batting is not mandatory, but it gives the rug body, softness, and a more finished appearance. Thin cotton batting or felt is usually easier to handle than high-loft polyester batting. Very thick batting can make the rug unstable and difficult to quilt. For a flatter utility rug, use canvas backing with a thin felt layer. For a softer decorative mat, select lightweight quilt batting.
Can a regular sewing machine sew through denim layers?
Most well-maintained domestic sewing machines can handle moderate layers of denim when fitted with the correct needle. Use a new denim or jeans needle, strong polyester thread, and a longer stitch length. Sew slowly over bulky intersections and use a hump jumper or folded scrap of fabric to keep the presser foot level. Do not force the machine through excessively thick seams.
How can I enlarge or reduce the pattern?
To resize the Round Patchwork Rug Fabric Pattern, decide the new finished diameter and redraw the inner and outer circles proportionally. Keep the same number of wedge divisions, then add the chosen seam allowance after resizing. When printing a digital pattern, all pages must be enlarged by the same percentage. Always test the revised templates with inexpensive fabric before cutting valuable denim.
What is the best backing for a fabric rug?
Cotton duck, canvas, denim, and heavy twill are reliable backing choices. The backing should be durable, washable, and compatible with the weight of the patchwork top. A separate non-slip pad is recommended for polished wood, tile, or laminate flooring. The safest option depends on the room, flooring material, rug size, and frequency of use.
Can the rug be made without fringe?
Yes. Replace the fringe with bias binding, piping, a folded denim border, or a clean turned edge. A bound edge creates a more streamlined appearance and may be easier to maintain in a busy household. Fringe adds color and texture, but it can collect dust or become tangled. Choose the finish that best suits the intended location.
How should a handmade patchwork rug be cleaned?
Regularly shake out loose debris or vacuum it using low suction and a suitable attachment. Spot-clean small marks with a mild textile-safe product. When washing is necessary, use cold water and a gentle method unless all materials are known to tolerate stronger cleaning. Dry the rug flat to help preserve its circular shape. Never use high heat unless every fabric, thread, batting, and trim has been tested for it.
Conclusion
The Round Patchwork Rug Fabric Pattern combines practical sewing, thoughtful color placement, and creative fabric reuse in one rewarding project. You learned how to plan the diameter, prepare wedge and ring templates, cut denim and colored fabric, assemble the circular top, add batting and backing, quilt the layers, and finish the perimeter with a multicolored fringe.
EASILY FIND THE PDF FOR THIS PATTERN HERE!
Accurate cutting and careful curved seams are the keys to achieving a rug that lies flat and looks balanced. The design can be customized with different dimensions, fabrics, colors, and edge finishes, making it suitable for many decorating styles. Leave your sincere opinion about this project and share any suggestions that could make the pattern or sewing process even more helpful for other craft lovers.