
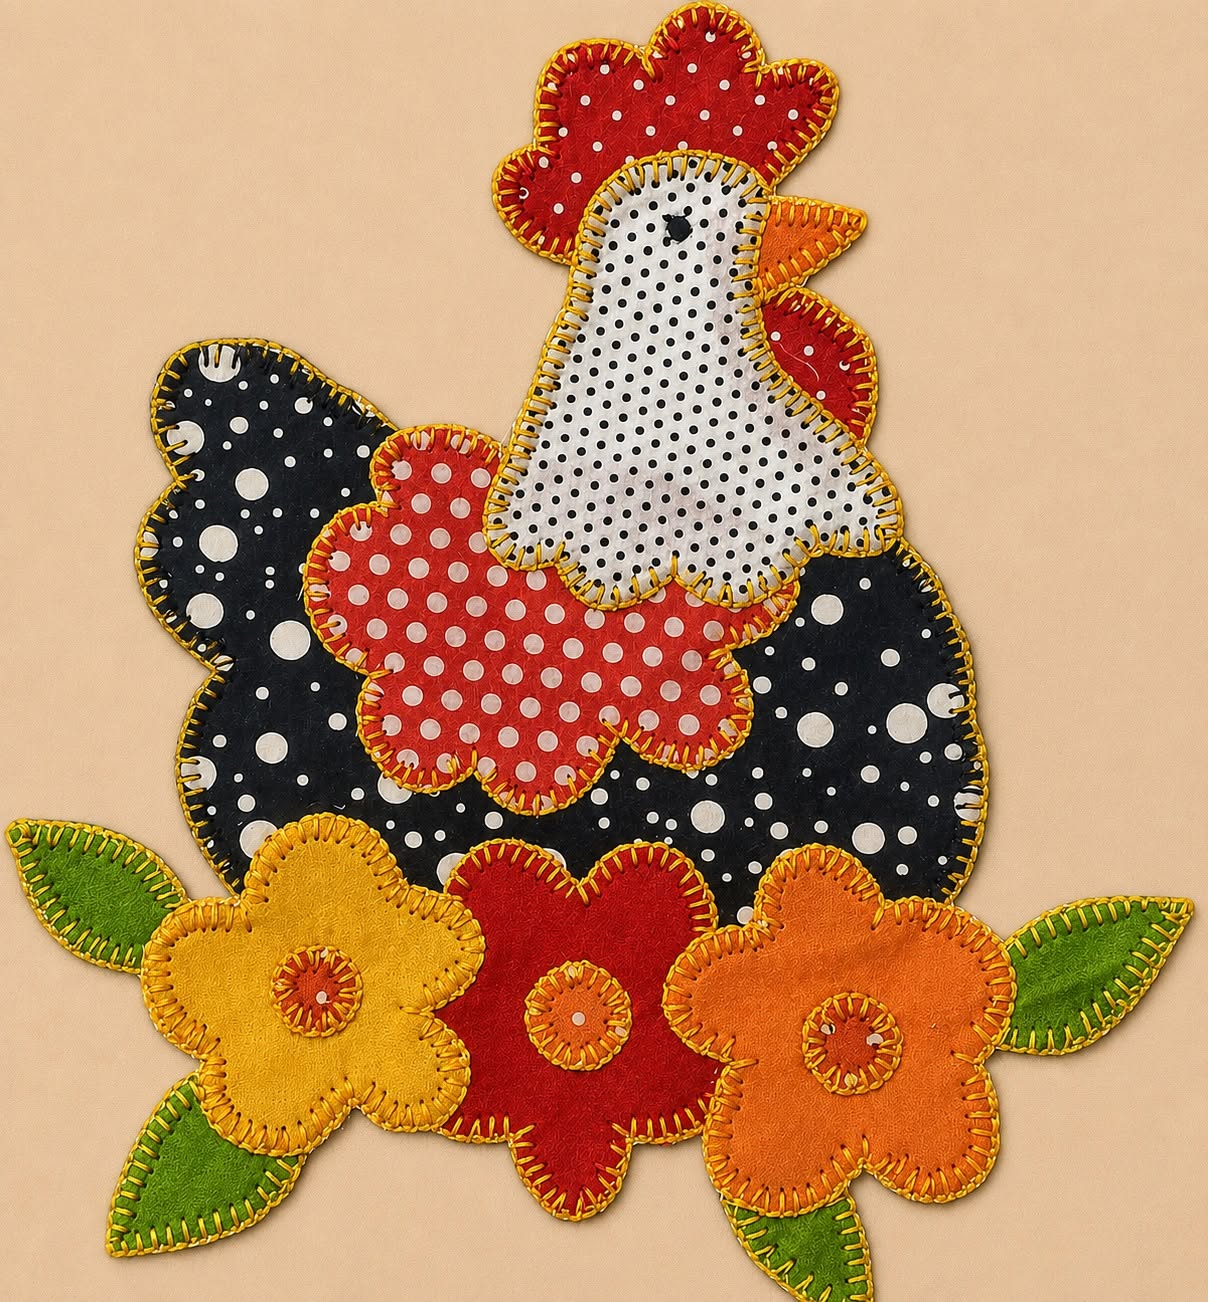
The Farmhouse Style Chicken Appliqué Quilt Pattern is a charming sewing project that combines traditional country décor with colorful fabric appliqué. Inspired by the handmade chicken shown in the reference image, this design features a cheerful hen decorated with layered wings, a contrasting body, a bright comb, and a floral arrangement beneath it. The finished appliqué can be used on a quilt block, wall hanging, pillow cover, table runner, kitchen towel, tote bag, or fabric panel. Because the shapes are simple and organic, this project is approachable for confident beginners while still offering enough creative detail to interest experienced quilters. The combination of polka-dot fabrics, blanket stitching, and rustic floral elements gives the piece its unmistakable farmhouse personality.
Creating a chicken appliqué quilt pattern is also an excellent way to use small fabric scraps left over from previous quilting and sewing projects. You do not need large pieces of material, and every part of the chicken can be cut from a different print. Black fabric with white dots works beautifully for the body, while red, orange, yellow, green, and cream fabrics add warmth and contrast. The visible hand-style stitches around the pieces are an important feature because they create texture and emphasize the handcrafted appearance. You may sew the appliqué by hand, use a sewing machine with a blanket stitch, or combine both techniques according to your experience and the final look you want to achieve.
Before beginning the Farmhouse Style Chicken Appliqué Quilt Pattern, study the main shapes in the design and decide where the finished piece will be displayed. A small wall hanging may require a compact chicken, while a quilt center block can support a larger and more detailed motif. Choose fabrics that contrast clearly with one another so that the head, body, wing, comb, flowers, and leaves remain easy to see. Prewash the fabrics when possible, press them carefully, and prepare a clean workspace with good lighting. Planning the placement before stitching will help prevent uneven spacing and allow the chicken and floral arrangement to remain balanced within the background block.
Materials and Fabric Preparation for the Chicken Appliqué
For this farmhouse chicken appliqué, gather cotton quilting fabric for the background and several coordinating scraps for the decorative pieces. Suggested colors include black for the main body, cream for the neck and head, red for the comb and wing, orange for the beak, green for the leaves, and yellow, red, and orange for the flowers. Polka dots are especially suitable because they recreate the playful country style of the reference project, but gingham, calico, plaid, and small floral prints are equally attractive choices.
DISCOVER MORE FREE PATTERNS HERE!
You will also need lightweight fusible web, paper-backed adhesive, sharp fabric scissors, an iron, an ironing surface, matching or contrasting thread, pins, and a fabric marking pencil. If you plan to add the pieces with a sewing machine, prepare an appliqué foot and select a blanket stitch, zigzag stitch, or narrow satin stitch. For hand appliqué, use embroidery floss or strong cotton thread and a comfortable hand-sewing needle.
Cut a background square large enough to hold the complete design with additional space around the edges. A square measuring approximately 14 to 16 inches works well for a decorative quilt block, although the size can be adjusted. Press the background fabric until it is smooth and free from folds. A neutral background, such as white, cream, beige, light gray, or pale blue, will make the colorful chicken quilt block stand out clearly.
Trace each pattern component separately onto the paper side of the fusible web. The required pieces include the main chicken body, neck and head, comb, wattle, beak, tail section, wing, three large flowers, three flower centers, and several leaves. Reverse the pattern pieces before tracing when direction matters because the fused pieces will be flipped when attached to the fabric.
Cut roughly around each traced shape, leaving a small margin outside the drawn line. Fuse the pieces onto the wrong side of the selected fabrics according to the fusible web manufacturer’s temperature recommendations. Avoid holding the iron in one place for too long, as excessive heat can discolor the fabric or make the adhesive stiff. Allow all fused pieces to cool completely before cutting them precisely on the traced lines.
After cutting, arrange every piece on the background without removing the protective paper immediately. This dry arrangement allows you to test different combinations and correct the proportions. Keep the chicken centered, with enough room underneath for the flowers and leaves. Take a photograph of the arrangement before fusing so you have a visual guide when assembling the final appliqué quilt pattern.
Building and Positioning the Farmhouse Chicken Design
Begin with the main black body because it forms the foundation of the chicken. The body should be rounded at the bottom and slightly narrower toward the neck. Position it in the upper-middle portion of the background block, leaving sufficient space for the floral base. Remove the paper backing, place the adhesive side against the background, and lightly press it in place without completing the final fusion.
Position the tail behind the body so that its decorative curves extend to one side. The reference design uses a black tail that blends with the body, but you may select a contrasting fabric for a more defined shape. If the tail is composed of several curved feather pieces, overlap them slightly to avoid visible gaps between the appliqué sections.
Next, place the cream neck and head over the upper portion of the body. The neck should taper upward and finish in a gently rounded head. Add the red comb to the top of the head, making sure its lower edge is hidden beneath the cream section. Position the orange triangular beak near the front of the face and place the red wattle just below it.
Add the wing to the center of the body. A red or coral polka-dot fabric creates a strong contrast against a dark chicken body. The wing can have a scalloped shape that resembles overlapping feathers. Place it at a slight angle rather than perfectly horizontal, as this gives the farmhouse chicken design a more natural and lively appearance.
When all chicken pieces are correctly positioned, check the overall silhouette. The design should appear balanced, with the head upright, the wing centered, and the tail clearly visible. Adjust any piece that looks crowded or disconnected. Once satisfied, follow the fusible web instructions to press the chicken permanently onto the background.
Allow the fused block to cool before moving it. Heat-softened adhesive can shift if the fabric is handled too quickly. After cooling, inspect all edges and press again briefly if any corners have lifted. Do not begin stitching until every piece is firmly attached, because loose edges can catch under the presser foot or create uneven blanket stitches.
Adding the Flowers, Leaves, and Decorative Stitching
The floral arrangement gives the Farmhouse Style Chicken Appliqué Quilt Pattern its colorful and welcoming character. Position three large flowers along the lower edge of the chicken body. The center flower may be red, while the flowers on either side can be yellow and orange. Slightly overlap the flowers with the body so the chicken appears to be standing behind them.
Add a small circular center to each flower. Choose fabrics that contrast with the petals so the centers remain visible. Orange works well inside yellow and red flowers, while a darker red or brown-orange fabric can be used inside the orange flower. The circles do not need to be mathematically perfect; slight irregularities enhance the handmade farmhouse look.
Arrange green leaves around the flowers, extending some toward the sides and others downward. Use two or three shades of green if available to create depth. Place a few leaves partially behind the flowers before fusing them. This layering makes the floral base look more dimensional and prevents the pieces from appearing disconnected.
Fuse the leaves first, followed by the flowers and then the flower centers. Use a pressing cloth to protect the fabric if the project contains several overlapping layers. Press from the front and, when recommended for your fusible product, from the back of the block. Let the fabric cool flat to prevent warping.
Stitch around every appliqué piece using a blanket stitch appliqué technique. Contrasting black thread around light fabrics creates a bold folk-art effect similar to the reference image. For darker fabrics, use cream, white, red, or coordinating thread. Keep the stitches evenly spaced, and slow down when sewing around tight curves, flower petals, and the points of the leaves.
Complete the chicken’s face by adding a small eye with black embroidery thread, a French knot, a tiny button, or a fabric-safe marker. You may also embroider a short line near the beak to suggest facial detail. Avoid adding heavy embellishments when the block will be used in a washable quilt, especially if the quilt is intended for a child or frequent household use.
Finishing the Quilt Block and Using the Appliqué
After all appliqué edges have been stitched, press the completed block gently from the back. Place a soft towel beneath the front of the design so that the decorative stitches are not flattened. Avoid dragging the iron across the appliqué. Instead, lift and press it carefully in sections until the block lies smooth.
Trim the background block to the required size, keeping the chicken centered. Use a quilting ruler and rotary cutter to create straight, accurate edges. Remember to leave the necessary seam allowance if the block will be joined to other quilt blocks. A standard quarter-inch seam allowance is suitable for most patchwork construction.
To create a small wall hanging, add borders around the appliqué block, layer it with batting and backing fabric, and quilt around the chicken and flowers. Echo quilting approximately one-quarter inch outside the appliqué shapes can make the motif appear raised. Straight-line quilting, crosshatching, or simple free-motion loops can be used in the background.
For a farmhouse pillow, trim the block to match the desired cushion size and add an envelope-style or zipper closure. A narrow gingham border can frame the chicken and reinforce the country aesthetic. Use durable cotton fabric for the pillow back and consider adding lightweight interfacing if the appliqué block feels too soft.
The chicken appliqué quilt pattern can also decorate a table runner or kitchen textile. Repeat the chicken motif at both ends of a runner, reversing the direction of one chicken so the designs face inward. For a tea towel, reduce the pattern size and attach it to the lower portion of the towel, keeping the appliqué away from areas exposed to high heat.
Finish the project by checking all stitches, trimming loose threads, and securing thread ends on the back. Add a hanging sleeve if creating a wall quilt, or attach a fabric label with the project date and maker’s name. Proper finishing protects the appliqué and transforms the individual block into a polished piece of farmhouse quilt décor.
Frequently Asked Questions About the Farmhouse Style Chicken Appliqué Quilt Pattern
What is a Farmhouse Style Chicken Appliqué Quilt Pattern?
A Farmhouse Style Chicken Appliqué Quilt Pattern is a decorative sewing design featuring a fabric chicken attached to a background block. It often uses country-inspired materials such as polka dots, gingham, plaid, calico, and floral prints. Blanket stitching and rustic colors help create the traditional farmhouse appearance.
Is this chicken appliqué suitable for beginners?
Yes. The project is suitable for beginners who are comfortable cutting fabric and using an iron. Fusible appliqué holds the shapes in place before sewing, making the construction easier. Beginners should practice blanket stitching on scrap fabric before working on the finished block.
What is the best fabric for a chicken appliqué quilt block?
Quilting cotton is the most practical choice because it is stable, easy to cut, widely available, and suitable for both hand and machine stitching. Avoid extremely stretchy, slippery, or loosely woven fabrics unless they are stabilized with interfacing.
Do I need fusible web to make the appliqué?
Fusible web is not mandatory, but it makes the process more manageable. It keeps the pieces from shifting and reduces fraying while the edges are stitched. Traditional needle-turn appliqué can be used instead, although it requires additional seam allowance and more hand-sewing experience.
Can I sew the appliqué entirely by hand?
Yes. Hand blanket stitching is perfect for achieving an authentic folk-art appearance. Use embroidery floss, pearl cotton, or strong sewing thread. Keep the tension relaxed so that the background does not pucker around the appliqué shapes.
Which stitch is best for machine appliqué?
A machine blanket stitch is one of the best options for this farmhouse chicken quilt pattern because it imitates hand stitching. A narrow zigzag stitch also works well. A satin stitch provides complete edge coverage but produces a more polished, less rustic finish.
How can I resize the chicken pattern?
Scan or photograph the individual pattern pieces and adjust the scale using a printer or copy machine. Enlarge or reduce every piece by the same percentage so the proportions remain consistent. Remember that very small pieces, such as the beak and eye, may become difficult to stitch after significant reduction.
Should the appliqué edges be turned under?
With raw-edge fusible appliqué, the edges do not need to be turned under. The fusible adhesive and blanket stitching help control fraying. For needle-turn appliqué, add approximately one-quarter inch around each template so the fabric edges can be folded beneath the shape.
Can this design be washed?
Yes, provided that washable cotton fabrics, permanent fusible web, and colorfast thread are used. Wash the finished item gently in cool water and avoid harsh bleach. Air drying or tumble drying on a low setting can help preserve the stitching and appliqué edges.
What can I make with the completed chicken appliqué?
The completed motif can become a quilt block, wall hanging, pillow, table runner, placemat, tote bag, apron pocket, fabric basket panel, or framed textile artwork. The design is especially suitable for kitchens, breakfast rooms, craft spaces, and farmhouse-style interiors.
How do I prevent the background from puckering?
Use lightweight stabilizer behind the block while stitching, especially when working with dense machine stitches. Do not pull the fabric, and avoid setting the thread tension too tightly. Press the block carefully after sewing, using an up-and-down motion rather than sliding the iron.
Can I change the colors in the original design?
Absolutely. The colors can be adapted to match your home décor or available fabric scraps. Neutral browns and creams create a primitive country look, while turquoise, pink, yellow, and lavender produce a brighter modern farmhouse version. Maintain good contrast between neighboring pieces so every shape remains visible.
Conclusion
The Farmhouse Style Chicken Appliqué Quilt Pattern offers a creative way to transform small fabric scraps into a warm and decorative country-inspired project. Throughout this tutorial, you learned how to choose and prepare fabrics, trace the appliqué pieces, build the chicken in layers, add flowers and leaves, secure the edges with blanket stitching, and finish the block for use in a quilt, pillow, wall hanging, or table decoration.
EASILY FIND THE PDF FOR THIS PATTERN HERE!
The pattern can be resized, recolored, and personalized, making every finished chicken unique. After creating your own version, please leave your sincere opinion about the project and share any suggestions, color combinations, or creative ideas that could inspire other sewing and quilting enthusiasts.