
The Yankee Puzzle Quilt Block Tutorial is a fascinating journey into creating a timeless quilt design. This block, with its intricate geometric patterns, is perfect for beginners and seasoned quilters alike.
Its history, versatility, and charm make it a favorite among quilting enthusiasts. Whether you’re crafting a standalone piece or incorporating it into a larger quilt, the Yankee Puzzle is a wonderful choice.
In this tutorial, we will break down the process of creating a Yankee Puzzle Quilt Block. From fabric selection to assembly, you’ll learn the steps to confidently make your own version. Yankee Puzzle Quilt Block Tutorial offers a practical approach to mastering this design while infusing your projects with creativity and precision.
Let’s dive into the details and discover how this classic quilt block can bring your artistic vision to life. With clear instructions and expert tips, this guide is designed to ensure your quilting success.
1. Understanding the Yankee Puzzle Quilt Block
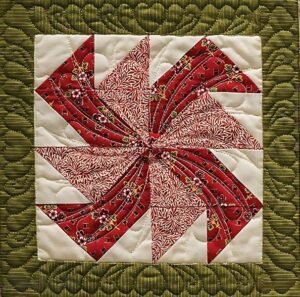
The Yankee Puzzle Quilt Block has a rich history rooted in traditional quilting. Its unique design features a series of triangles that interlock to form a stunning geometric pattern. Here’s everything you need to know about this block:
- Historical Significance: The Yankee Puzzle pattern has been a staple in American quilting traditions, often used to symbolize unity and resilience.
- Visual Appeal: The interlocking triangles create a sense of movement, making it an eye-catching addition to any quilt.
- Versatility: This block works well with various fabric choices, from bold prints to subtle solids.
- Skill Level: While it may seem complex, the Yankee Puzzle is approachable with the right guidance.
- Creative Potential: You can experiment with color placement to achieve different visual effects.
- Practical Use: Ideal for quilts, wall hangings, and table runners, this block adds a touch of elegance to any project.
2. Materials and Fabric Selection
Before you begin, gathering the right materials is crucial for a smooth quilting experience. Here’s what you’ll need for your Yankee Puzzle Quilt Block Tutorial:
- Fabric Choices: Select three contrasting fabrics—a dark, medium, and light tone—to emphasize the geometric pattern.
- Tools: A rotary cutter, cutting mat, and quilting ruler are essential for precise cuts.
- Thread: Choose a thread color that complements your fabric selection.
- Sewing Machine: Ensure your machine is equipped with a 1/4-inch presser foot for accurate seams.
- Iron and Pressing Mat: Pressing seams is critical for a polished finish.
- Marking Tools: Use a fabric pen or chalk to mark guidelines on your fabric.
By preparing these materials ahead of time, you’ll set yourself up for a successful quilting session.
3. Step-by-Step Assembly Guide
Creating the Yankee Puzzle Quilt Block involves several straightforward steps. Follow this guide to assemble your block with precision:
- Cutting the Fabric: Cut the following pieces:
- Four 4-inch squares in your dark fabric
- Four 4-inch squares in your medium fabric
- Eight 4-inch squares in your light fabric
- Making Half-Square Triangles (HSTs): Pair a dark square with a light square and sew along the diagonal. Cut along the sewn line and press the seams open to create HSTs.
- Arranging the Pieces: Lay out your HSTs and remaining squares in the Yankee Puzzle pattern. Ensure the triangles interlock seamlessly.
- Sewing Rows: Stitch each row together, maintaining a 1/4-inch seam allowance. Press the seams open for a flat finish.
- Assembling the Block: Join the rows together to complete the block. Use pins to align seams for accuracy.
- Final Pressing: Press the entire block to ensure it lies flat and neat.
4. Tips and Tricks for Success
To enhance your quilting experience and ensure a flawless Yankee Puzzle Quilt Block, consider these expert tips:
- Precision is Key: Accurate cutting and sewing are essential for achieving sharp points and clean lines.
- Use a Design Wall: Arrange your pieces on a design wall or flat surface to preview the final look before sewing.
- Chain Piecing: Save time by sewing multiple HSTs in a chain sequence.
- Consistent Seams: Use a 1/4-inch seam allowance throughout to maintain uniformity.
- Press as You Go: Press each seam after sewing to prevent bulk and ensure a smooth assembly.
- Experiment with Colors: Don’t be afraid to try unconventional color combinations for a modern twist on this traditional block.
FAQ
Q1: Can beginners attempt the Yankee Puzzle Quilt Block?
A1: Absolutely! While the design may appear complex, following a detailed tutorial like this makes it accessible for quilters of all skill levels.
Q2: What are the best fabrics for this block?
A2: Cotton fabrics work best due to their durability and ease of handling. Opt for contrasting colors to highlight the geometric design.
Q3: How do I ensure my seams align perfectly?
A3: Use pins to secure the pieces before sewing and take your time while stitching to maintain precision.
Q4: Can I make this block in different sizes?
A4: Yes, you can adjust the measurements proportionally to create larger or smaller blocks based on your project needs.
Q5: What projects can I use this block for?
A5: The Yankee Puzzle Quilt Block is versatile and works well in quilts, table runners, cushion covers, and wall hangings.
Q6: How do I fix mistakes in my block?
A6: Seam rippers are your best friend! Carefully remove incorrect stitches and reassemble the pieces as needed.
PATTERN HERE
The Yankee Puzzle Quilt Block Tutorial offers a rewarding way to enhance your quilting skills. By understanding the history, selecting the right materials, and following the step-by-step guide, you can create a beautiful and functional quilt block. Don’t forget to experiment with colors and layouts to make your block uniquely yours.
We hope this tutorial inspires you to try the Yankee Puzzle Quilt Block. Share your thoughts and suggestions in the comments below—we’d love to hear about your quilting journey!