
The Woven Star Block Quilt is a visually striking and intricate design that quilters love for its woven-like appearance and its ability to add a sophisticated touch to any quilt project.
In this blog, we will walk you through the process of creating your very own Woven Star Block Quilt, including fabric cuts, measurements, and a step-by-step tutorial.
This quilt pattern is ideal for intermediate-level quilters but can also be attempted by beginners who are ready to take on a bit of a challenge.
What is the Woven Star Block Quilt?
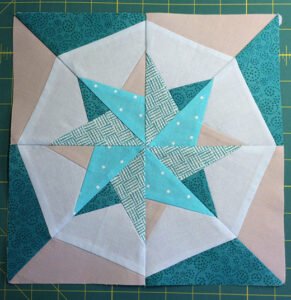
The Woven Star Block Quilt is a block-based design that gives the impression of interlacing or weaving star shapes together. It’s a versatile quilt pattern that can be adapted for various color schemes and fabrics, making it suitable for all sorts of quilting projects, from bedspreads to wall hangings. The quilt combines geometric precision with creative flair, offering endless possibilities for customization.
One of the most attractive features of this quilt is its complex-looking design, which is actually quite straightforward once broken down into its basic components. Each block is a star shape that appears woven, creating a beautiful interlocking effect. This pattern works wonderfully with both solids and prints, allowing you to experiment with contrast and color combinations.
The Woven Star Block Quilt is made using traditional quilting techniques, but its modern design appeals to quilters of all styles. Whether you’re making a quilt as a gift or a project for yourself, this pattern is sure to impress.
Materials and Tools You’ll Need
Before diving into the tutorial, it’s important to gather all the necessary materials and tools. The key to creating a successful Woven Star Block Quilt lies in preparation, as precision in cutting and stitching will make the finished product stand out.
You’ll need the following materials:
- Fabric: 3-4 different fabrics for contrast. You’ll need light, medium, and dark shades to create depth in the woven star effect. Fat quarters or yardage will work depending on the size of your quilt.
- Rotary cutter and cutting mat: For precise fabric cuts.
- Quilting ruler: A clear acrylic ruler is ideal for measuring and cutting.
- Sewing machine: A basic machine will suffice, but ensure it has a ¼-inch seam foot for accurate piecing.
- Thread: Use a matching or neutral thread for stitching the blocks together.
- Iron and ironing board: Pressing is key to neat quilt blocks.
- Pins or clips: To hold pieces in place while sewing.
Once you have all your materials ready, the next step is to carefully follow the cutting instructions. Cutting fabric accurately is essential for ensuring the pieces fit together perfectly.
Fabric Cuts and Measurements
The Woven Star Block Quilt is typically made using square and rectangular fabric pieces. Below are the fabric cuts and measurements needed to create one block. You can multiply these measurements based on how many blocks you need for your quilt.
For one Woven Star Block, you will need:
- Background fabric: Four 4 ½” x 4 ½” squares and eight 2 ½” x 2 ½” squares
- Star fabric (Fabric A): Four 2 ½” x 4 ½” rectangles and eight 2 ½” x 2 ½” squares
- Secondary color fabric (Fabric B): Four 2 ½” x 4 ½” rectangles
- Corner fabric (Fabric C): Four 2 ½” x 2 ½” squares
These fabric cuts create the illusion of a star being woven into the quilt block. The combination of larger squares and smaller squares makes the block visually interesting while allowing for variation in fabric patterns.
Step-by-Step Tutorial for the Woven Star Block Quilt
Step 1: Prepare Your Fabrics
Begin by cutting your fabric pieces according to the measurements listed above. Lay out your fabric squares and rectangles on your cutting mat, and double-check that everything is cut to size. Accurate cutting ensures that your quilt block will be neat and uniform.
Next, organize your fabrics by grouping the background fabric, star fabric, and secondary color fabric. This will make it easier to follow the pattern and ensure that all pieces are sewn in the correct order.
Press all of your fabric pieces with an iron before sewing. This step will help to remove any wrinkles or creases that could cause inaccuracies in your piecing.
Step 2: Construct the Star Points
Take your 4 ½” x 4 ½” background squares and mark a diagonal line from corner to corner on the wrong side of the fabric using a fabric marker or chalk. Lay one 2 ½” x 2 ½” star fabric square on top of each background square, right sides together, aligning the edges. Stitch along the marked diagonal line.
After stitching, trim away the excess fabric, leaving a ¼” seam allowance. Press the seam towards the star fabric. Repeat this process for the remaining squares to form the points of the star. You should now have four star points, each with a small triangle of the star fabric sewn onto the background square.
Step 3: Assemble the Block
Lay out your pieces in a 4×4 grid, ensuring that the star points, rectangles, and squares are all in the correct positions. The rectangles should alternate between star fabric and secondary color fabric, creating the woven effect. Make sure the smaller squares form the inner part of the star.
Sew the pieces together in rows, pressing the seams as you go. Once all the rows are complete, sew the rows together, matching the seams carefully to ensure the points of the stars align perfectly. Press the final block thoroughly to set the seams.
Final Assembly and Quilting Tips
Once you’ve completed all of your blocks, arrange them in your desired layout. You can alternate the direction of the stars to create a secondary pattern or keep them aligned for a more uniform look. The Woven Star Block Quilt lends itself well to creative layouts, so feel free to experiment with different arrangements.
After arranging your blocks, sew them together row by row, pressing the seams in between each step. When the quilt top is fully assembled, add a border if desired, and then prepare your quilt sandwich by layering the quilt top, batting, and backing fabric. Quilt as desired, either by hand or machine, following the lines of the stars to enhance the woven effect.
Once quilted, bind the edges using your preferred binding method. Your Woven Star Block Quilt is now complete and ready to be enjoyed!
The Woven Star Block Quilt is a timeless and visually engaging quilt pattern that can be adapted to fit any color scheme or style. By following this step-by-step guide, you’ll be able to create your own version of this intricate-looking quilt, adding depth and beauty to your quilting repertoire. Whether you’re making it for yourself or as a gift, the Woven Star Block Quilt is sure to be cherished for years to come.
This project not only hones your piecing skills but also teaches you how to manage complex patterns, making it an excellent addition to any quilter’s list of completed projects. Keep experimenting with fabric combinations to create new variations of this beautiful quilt pattern. Happy quilting!