
What is the Walk About Quilt Block?
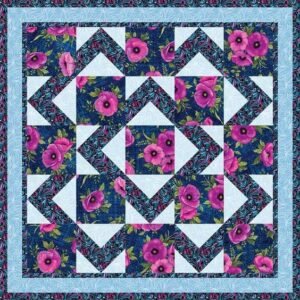
The Walk About Quilt Block is a modern and versatile design that features geometric shapes and clean lines. The name “Walk About” suggests a journey, and that’s exactly what this quilt block evokes with its unique layout. The blocks appear to “walk” across the quilt top, creating movement and visual interest.
This pattern is perfect for showcasing various fabric prints and colors. You can choose a monochromatic theme for a modern look or go bold with contrasting colors to make each block stand out. One of the key features of this quilt is the use of half-square triangles, which are a staple in many quilt patterns.
If you’re familiar with basic quilt blocks, this one will feel like a refreshing twist. For beginners, it’s an ideal project to learn new techniques like making precise half-square triangles and assembling quilt blocks with perfect alignment.
Materials You’ll Need for the Walk About Quilt Block
Before diving into the step-by-step tutorial, let’s gather the materials. Having everything ready will make the process much smoother and enjoyable. Here’s what you’ll need:
- Fabric: Choose four different fabrics, including a background fabric and three contrasting fabrics.
- Rotary Cutter and Mat: To ensure precise fabric cuts, a rotary cutter and cutting mat are essential.
- Quilting Ruler: A quilting ruler will help you measure and cut fabric accurately.
- Sewing Machine: While hand quilting is an option, using a sewing machine will make the process quicker.
- Thread: Pick a thread color that complements your fabric choices.
By having these materials on hand, you’ll be well-prepared to start your quilting project. You can also customize your Walk About Quilt Block by choosing fabrics that reflect your personal style, whether that’s vintage, modern, or somewhere in between.
Fabric Cuts and Measurements for the Walk About Quilt Block
Now that we have the materials, let’s move on to fabric cuts and measurements. For a 12-inch finished block, here’s what you’ll need:
- Background Fabric:
- Cut (2) 6.5” x 6.5” squares.
- Cut (4) 3.5” x 3.5” squares.
- Fabric A:
- Cut (2) 6.5” x 6.5” squares.
- Fabric B:
- Cut (4) 3.5” x 3.5” squares.
- Fabric C:
- Cut (2) 6.5” x 6.5” squares.
- Cut (4) 3.5” x 3.5” squares.
Once your fabric pieces are cut, it’s important to double-check your measurements. This ensures that your pieces will align perfectly during the sewing process, which is crucial for achieving a professional-looking quilt block.
Step-by-Step Tutorial: How to Make the Walk About Quilt Block
Now that your fabric is ready, let’s move on to creating the Walk About Quilt Block. Follow these steps for precise assembly:
Step 1: Create Half-Square Triangles
- Pair a 6.5” x 6.5” square from Fabric A with a 6.5” x 6.5” square from Fabric C, right sides facing.
- Draw a diagonal line from one corner to the opposite corner of the background fabric using a fabric marking pen.
- Sew a 1/4” seam on both sides of the drawn line. Then, cut along the drawn line to create two half-square triangles (HSTs).
This method of creating HSTs is commonly used in quilt patterns because it’s efficient and accurate. Press the seams toward the darker fabric and trim each HST to 6.5” square. Repeat this process with the remaining 6.5” squares from Fabrics A and C.
Step 2: Assemble the Four-Patch Units
- Next, take the 3.5” x 3.5” squares from Fabric B and the background fabric.
- Sew one background fabric square to one Fabric B square, right sides together. Repeat this process with all the 3.5” squares to create a total of four small four-patch units.
These four-patch units will serve as the cornerstones of your Walk About Quilt Block, adding depth and contrast to the overall design. As with the HSTs, pressing the seams carefully will make it easier to assemble the block later.
Step 3: Block Layout and Assembly
- Lay out your block pieces following the Walk About Quilt Block pattern: the half-square triangles in the center, surrounded by the four-patch units in the corners.
- Double-check the layout to make sure the colors and shapes are aligned correctly before sewing the pieces together.
- Sew the rows together, pressing the seams as you go. Once the rows are sewn, join them to complete the block.
At this point, you should have a finished Walk About Quilt Block measuring 12.5” x 12.5”. The extra 0.5” is for seam allowance, so once it’s sewn into a quilt, it will be a perfect 12” block.
Tips for Making the Perfect Walk About Quilt Block
Creating the Walk About Quilt Block is a rewarding process, but there are a few tips that can make it even smoother:
- Accurate Cutting: Precision is key when cutting your fabric pieces. Using a sharp rotary cutter and measuring carefully will ensure that your pieces fit together perfectly.
- Consistent Seams: Maintain a consistent 1/4” seam allowance throughout the project. This will help your quilt blocks align properly and give your quilt a professional look.
- Pressing: Don’t skip pressing your seams after each step. Pressing helps to set the seams and keeps the fabric flat, making it easier to sew accurate blocks.
Following these tips will make your quilting experience more enjoyable and lead to a more polished final product. The Walk About Quilt Block is a great opportunity to practice these techniques and improve your quilting skills.
Creative Ideas for Using the Walk About Quilt Block
The beauty of the Walk About Quilt Block lies in its versatility. You can use this block in a variety of quilt patterns to create stunning designs. Here are a few creative ideas for incorporating this block into your projects:
- Full Quilt: Use multiple Walk About blocks to create a full quilt. You can alternate the blocks with solid-colored blocks or other quilt patterns for added variety.
- Table Runner: If you don’t have time for a full quilt, a table runner is a great way to showcase a few Walk About blocks.
- Pillows: Transform a single Walk About Quilt Block into a decorative pillow. It’s a simple way to add a handmade touch to your home decor.
Experimenting with fabric choices and layouts can lead to unique quilt patterns that reflect your personal style. Don’t be afraid to get creative and try new things with the Walk About Quilt Block!
Master the Walk About Quilt Block
The Walk About Quilt Block is a fantastic addition to any quilter’s collection. Its geometric design and versatility make it suitable for a wide range of quilt patterns, from traditional to modern styles. By following the step-by-step tutorial and using the recommended fabric cuts and measurements, you’ll be able to create your own stunning Walk About Quilt Block.
Whether you use this block in a full quilt, a table runner, or a pillow, the possibilities are endless. Incorporate your favorite fabrics and get creative with color combinations to make a quilt that truly reflects your style.