
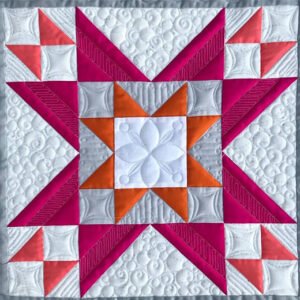
The Atlas Star Block is a stunning and versatile quilt block that stands out in any quilt project.
Its intricate design combines geometric shapes, offering both a classic and modern touch. Whether you’re a beginner or an experienced quilter, the Atlas Star Block can add beauty and sophistication to your quilt patterns.
In this blog post, we’ll explore a step-by-step tutorial on how to create this block, including fabric cuts, measurements, and tips for assembling the pieces.
What Is The Atlas Star Block?
The Atlas Star Block is a striking quilt block that combines triangles and squares to form a star-like pattern. It’s known for its sharp points and clean lines, making it a favorite among quilters who want to create visually appealing quilt designs. The symmetry and balance of this block give it a timeless look that works well in both traditional and modern quilts.
This block is often used in quilts as a focal point or as part of a larger star-themed design. The contrast between the different fabric choices makes the star pattern pop, adding depth and texture to the overall quilt. Quilters love the versatility of this block because it can be customized with a wide range of colors and patterns.
In terms of difficulty, the Atlas Star Block is manageable for beginners but offers enough complexity to keep experienced quilters engaged. With precise cutting and careful piecing, this block can be a stunning addition to your quilt patterns collection.
Materials Needed for The Atlas Star Block
Before starting on your Atlas Star Block, it’s essential to gather all the necessary materials. This will ensure you have everything you need to create a beautiful quilt block without any interruptions. Here’s what you’ll need for this project:
- Fabric: Choose a variety of fabrics, including one for the background, one for the star points, and one for the center. The contrast between these fabrics is what makes the design stand out.
- Rotary Cutter and Mat: These tools are crucial for accurate fabric cuts. A rotary cutter allows for clean, precise edges, which is important when creating a block with sharp points like the Atlas Star.
- Quilting Ruler: Use a clear quilting ruler to measure and cut your fabric pieces accurately. Precision is key in this block, so having the right tools will make your process smoother.
In addition to these basic quilting tools, you’ll also need thread, pins, and a sewing machine. Choose a thread color that matches your fabrics to keep the seams neat and cohesive throughout the block.
Fabric Cuts and Measurements
To create the Atlas Star Block, you’ll need to cut several pieces of fabric in specific sizes. These cuts will form the base of the star and background sections. Below are the fabric cuts and measurements for a finished 12-inch Atlas Star Block:
- Background Fabric: Cut (4) 3.5” x 3.5” squares and (4) 4” x 4” squares.
- Star Points Fabric: Cut (8) 3.5” x 3.5” squares.
- Center Fabric: Cut (1) 4.5” x 4.5” square.
Make sure to press your fabric before cutting to avoid any wrinkles or uneven edges. Accurate measurements and clean cuts are essential for assembling the block correctly. The key to success with this quilt pattern lies in precision at every step of the process.
Assembling the Atlas Star Block
Now that you have all your fabric pieces cut and ready, it’s time to start assembling your Atlas Star Block. Follow these steps carefully to ensure everything lines up perfectly:
- Create Half-Square Triangles (HSTs): Take the 4” x 4” squares from both the background and star points fabrics. Pair them up, draw a diagonal line on the back of the background squares, and sew ¼ inch on either side of the line. Cut along the line to create two HSTs from each pair.
- Press and Trim: Press the HSTs open, with seams towards the darker fabric. Then, trim each HST to measure 3.5” x 3.5” to ensure all your pieces fit together smoothly when sewing the block.
- Assemble the Rows: Lay out your HSTs, center square, and background squares according to the Atlas Star Block layout. Sew the squares together in rows, using a ¼ inch seam allowance. Press the seams after sewing each row.
Once your rows are assembled, sew them together to complete the Atlas Star Block. Take care to match up the points and seams to achieve a polished, professional-looking block.
Tips for a Perfect Atlas Star Block
Creating a perfect Atlas Star Block requires attention to detail and patience. Here are some tips to help you achieve the best results when working with this quilt pattern:
- Pin the Points: When sewing the rows together, use pins to align the star points accurately. This will prevent any shifting while sewing and ensure the points are crisp and clean.
- Starch Your Fabric: Lightly starching your fabric before cutting and sewing can help maintain the fabric’s shape and prevent any stretching or distortion, which is especially helpful with half-square triangles.
- Check Your Seam Allowance: Maintaining a consistent ¼ inch seam allowance is critical for this block. If your seam allowance is too wide or too narrow, your pieces won’t fit together correctly, causing issues when assembling the block.
By following these tips, you’ll be able to create a stunning Atlas Star Block that will be the highlight of any quilt.
Using The Atlas Star Block in Your Quilt
The Atlas Star Block can be used in a variety of quilt patterns. Whether you want to make a full quilt featuring only this block or incorporate it into a larger design, the Atlas Star adds a dynamic and intricate element to your project. Its star shape draws the eye, making it an excellent choice for quilt tops, wall hangings, or even table runners.
For those who want to experiment with different quilt patterns, consider alternating Atlas Star Blocks with simpler designs to balance the complexity. You can also play with the color scheme, using contrasting or complementary fabrics to create a bold or subtle effect.
No matter how you choose to use the Atlas Star Block, it will undoubtedly become a cherished addition to your quilting repertoire. The versatility and elegance of this block make it suitable for both modern and traditional quilts, allowing quilters to express their creativity in countless ways.
Final Thoughts on The Atlas Star Block
The Atlas Star Block is a captivating and intricate quilt pattern that can elevate any quilting project. With its sharp points and geometric precision, it is both challenging and rewarding to create. By carefully following the fabric cuts and assembly steps outlined in this tutorial, quilters of all skill levels can successfully complete this beautiful block.
As you continue to expand your collection of quilt patterns, don’t hesitate to include the Atlas Star Block in your next project. Its timeless design and versatility make it an excellent choice for various types of quilts, and with practice, you’ll master the techniques needed to create a flawless block. Happy quilting!