
The art of quilting has always been a creative way to blend colors, textures, and stories into one piece of fabric. If you’re passionate about quilting and love unique designs, this Teacup Tutorial – Quilt Pattern will spark your imagination and inspire your next project. From delicate stitches to vibrant fabrics, creating a teacup-themed quilt is both relaxing and rewarding. In this guide, you’ll learn everything you need to know to design, piece, and finish your own Teacup Quilt Pattern from start to finish.
The Teacup Tutorial – Quilt Pattern is more than just a sewing guide; it’s a journey into a charming and cozy aesthetic. Whether you’re a beginner eager to learn or an experienced quilter searching for a new challenge, this tutorial provides clear instructions and creative freedom. By following the steps carefully, you’ll produce a stunning quilt that adds a touch of warmth and nostalgia to any room. Quilts like these make perfect gifts for tea lovers, collectors, or anyone who appreciates handcrafted art.
Before diving into the details, it’s important to understand why the Teacup Quilt Pattern has become a favorite among quilters. The teacup motif symbolizes comfort, conversation, and creativity — three elements that make quilting itself such a special craft. With the right combination of fabric selection, cutting techniques, and assembly, you can bring this motif to life in a way that reflects your personal style. Now, let’s explore how to make your teacup quilt both visually appealing and skillfully crafted.
Choosing the Right Fabrics for Your Teacup Quilt Pattern
When starting your Teacup Tutorial – Quilt Pattern, fabric selection is one of the most crucial steps. The beauty of quilting lies in how colors and textures work together. Choose fabrics that complement each other while emphasizing the teacup design. Soft pastels, floral prints, and vintage tones work wonderfully for a classic teacup theme, while bold, modern prints can give your project a more contemporary feel.
It’s best to use 100% cotton quilting fabric because it’s durable, easy to handle, and holds its shape well after washing. You’ll need a mix of background fabric, teacup fabric, and accent fabric. The background should be neutral enough to make the teacups stand out. Consider shades like ivory, cream, or light gray. Your teacup fabric can feature intricate patterns or solids, depending on the aesthetic you want to achieve.
Before cutting any pieces, make sure to wash and press your fabrics to prevent shrinkage and ensure accuracy when sewing. Ironing also helps remove wrinkles that can distort your cutting lines. Remember, the quality of your fabric and how you prepare it will directly impact the final result of your Teacup Quilt Pattern. Preparation may take time, but it’s a step that should never be skipped.
Another key tip is to plan your color palette in advance. You can use color theory to guide your choices. Complementary colors create vibrant contrast, while analogous colors provide harmony and softness. If you’re going for a cozy, cottage-style quilt, warm shades of yellow, peach, and pink often work beautifully with muted greens or blues.
Once your fabrics are chosen, organize them according to your pattern layout. Labeling pieces with small tags or sticky notes can help you stay on track during assembly. Quilting requires patience and precision, and staying organized will save you hours of frustration. This preparation phase sets the foundation for a smooth and enjoyable quilting experience.
Finally, don’t be afraid to experiment. One of the joys of the Teacup Tutorial – Quilt Pattern is how versatile it can be. You can use scraps from previous projects or mix different textures such as cotton, linen, or batik for a unique finish. Creativity is the key ingredient that transforms a simple quilt pattern into a masterpiece.
Cutting and Piecing Your Teacup Shapes
After selecting your fabrics, it’s time to move into the cutting and piecing stage of the Teacup Tutorial – Quilt Pattern. Accuracy here is essential. Using a rotary cutter, self-healing mat, and clear acrylic ruler will help you achieve clean, precise cuts. Start by cutting the background squares and teacup shapes according to the pattern measurements. If you’re using a downloadable template, print it to scale to maintain consistency.
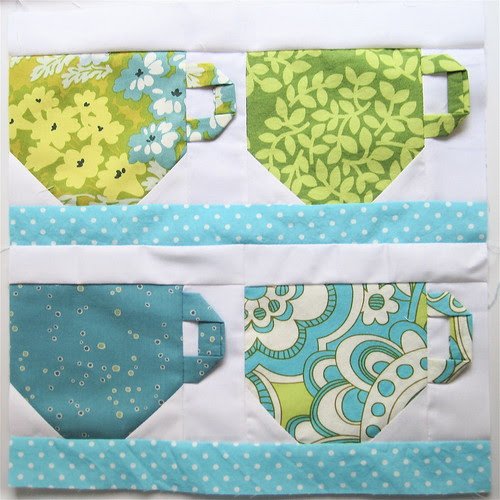
Piecing the teacup involves sewing together small fabric components that make up the cup, handle, and saucer. Always pin or clip the pieces before sewing to avoid misalignment. A quarter-inch seam allowance is standard for quilting, ensuring your design stays proportional. Remember to press each seam flat after sewing to create a crisp and professional look.
When working on curved seams, such as the teacup’s handle or rim, take your time. Curves require gentle handling and smaller stitches to prevent puckering. You can use a few extra pins or hand-baste the pieces before machine sewing. This extra effort makes a significant difference in how smooth your final Teacup Quilt Pattern appears.
Chain piecing — sewing multiple units continuously without cutting the thread between them — is another helpful technique for saving time. It keeps your workspace organized and allows for a more efficient workflow. Once you’ve pieced all the teacup blocks, arrange them on a flat surface to see how the design flows visually. Adjust the placement of colors or patterns until you’re satisfied with the layout.
You can add borders or sashing between blocks to frame each teacup and create a balanced composition. Depending on the size of your quilt, you might also include cornerstones or additional decorative stitching. These small details add personality to your Teacup Tutorial – Quilt Pattern, making it truly one of a kind.
Lastly, take a photo of your layout before you start sewing the final assembly. This simple step acts as a visual guide in case your pieces get mixed up during stitching. Documenting your progress is also a wonderful way to track your growth as a quilter.
Quilting and Assembling Your Layers
Once your teacup blocks are pieced together, it’s time to assemble the quilt sandwich — the top layer, batting, and backing. This is where your Teacup Tutorial – Quilt Pattern comes to life. Choose a soft batting that complements the weight of your fabrics. Cotton or bamboo batting offers a natural feel and works well for lightweight quilts.
Lay your backing fabric right side down, then place the batting on top, followed by your quilt top facing up. Smooth each layer carefully to eliminate wrinkles and ensure even alignment. Use quilting pins or temporary spray adhesive to hold everything in place before stitching. Proper basting prevents shifting during quilting, resulting in a smoother finish.
You can choose between hand quilting and machine quilting. For beginners, machine quilting with a walking foot is recommended because it offers control and precision. Follow the outlines of the teacups or create free-motion patterns for a textured effect. If you prefer a more traditional look, hand quilting adds a beautiful, homemade charm to your Teacup Quilt Pattern.
Quilt stitching not only enhances the design but also strengthens the fabric layers. Experiment with stitch patterns such as echo quilting around the teacups or gentle waves to mimic the flow of tea. The choice depends on your personal style and the mood you want the quilt to convey.
After quilting, trim any excess batting or backing fabric. Then, prepare your binding strips — these will enclose the quilt’s raw edges. Fold the binding in half lengthwise, press, and sew it around the perimeter. Binding gives the quilt a neat and professional finish. Choose a color that frames your design without overpowering it.
Finally, give your quilt a gentle wash to soften the fabrics and reveal the stitched textures. Dry it flat or on low heat. You’ll be amazed at how the Teacup Tutorial – Quilt Pattern transforms from individual pieces of fabric into a cohesive work of art ready to be displayed or gifted.
Creative Variations and Display Ideas
The best part about quilting is the opportunity for creativity. Once you’ve mastered the Teacup Tutorial – Quilt Pattern, you can explore endless variations. Try creating teacups with seasonal fabrics — spring florals, autumn hues, or festive winter prints. You can even personalize each teacup block with embroidered initials or small appliqué details.
Another fun idea is to create a wall hanging instead of a full-sized quilt. Mini teacup quilts make lovely kitchen décor or thoughtful gifts for tea enthusiasts. Add lace borders or buttons for a charming, vintage touch. If you’re confident in your skills, combine multiple Teacup Quilt Patterns into a large patchwork design for an eye-catching centerpiece.
You can also incorporate digital embroidery machines to add intricate motifs such as steam swirls or teabag tags. Mixing traditional quilting with modern techniques brings a fresh and artistic flair. Remember, the goal of this Teacup Tutorial – Quilt Pattern is not just to follow instructions but to use it as a foundation for creative exploration.
Display your finished quilt proudly. Drape it over a sofa, hang it on a wall, or use it as a table runner. Each teacup block tells a story — maybe of a cozy morning, a cherished memory, or a peaceful afternoon. When friends or family see your handmade creation, it will undoubtedly become a conversation piece.
If you decide to sell your quilts or share your work online, be sure to photograph them in natural light. A well-lit photo showcases your craftsmanship and helps others appreciate the fine details. Adding descriptive captions using keywords like Teacup Tutorial – Quilt Pattern can also boost your visibility in search results.
Lastly, don’t forget to label your quilt with your name and the completion date. It’s a small but meaningful touch that preserves your legacy as a quilter and celebrates the hard work that went into every stitch.
FAQ – Teacup Tutorial Quilt Pattern
1. What skill level is needed for the Teacup Tutorial – Quilt Pattern?
This pattern is suitable for confident beginners and intermediate quilters. It involves basic piecing, curved seams, and some precision cutting, but the steps are easy to follow.
2. How long does it take to complete a Teacup Quilt Pattern?
The time varies depending on your experience and quilt size. A small wall hanging might take two to three days, while a full quilt can take a week or more.
3. Can I use fabric scraps for this quilt?
Absolutely! The Teacup Tutorial – Quilt Pattern is perfect for using leftover fabric pieces. Mixing prints and textures gives each teacup a unique personality.
4. Do I need special tools for this project?
You’ll need basic quilting tools: rotary cutter, mat, ruler, sewing machine, pins, and an iron. Optional tools like a walking foot or appliqué scissors can improve precision.
5. How should I wash and care for the finished quilt?
Wash your quilt gently in cold water with mild detergent. Air dry flat or tumble dry on low. Avoid harsh chemicals to preserve colors and stitches.
6. Can I resize the teacup pattern?
Yes! You can enlarge or reduce the template to create different-sized blocks. Just be sure to adjust your seam allowances accordingly.
Conclusion
The Teacup Tutorial – Quilt Pattern offers a delightful blend of creativity, skill, and relaxation. From choosing the perfect fabrics to stitching the final seam, each step brings you closer to a handmade treasure filled with warmth and charm. This project allows you to express your personality while mastering essential quilting techniques.
If you’ve enjoyed this guide, share your thoughts and suggestions below. Your feedback helps inspire future tutorials and connects our quilting community. Now it’s your turn — gather your fabrics, thread your needle, and let the Teacup Tutorial – Quilt Pattern be the start of your next beautiful creation.