
Quilting is a beloved art form, celebrated for its ability to turn small pieces of fabric into stunning masterpieces. The Stair Quilt Block is one such design that is both simple and elegant.
Its geometric patterns create a visual movement that gives quilts a dynamic look. If you’re interested in learning how to make this block and add it to your collection of quilt patterns, you’ve come to the right place!
In this guide, we’ll walk you through the steps to create a Stair Quilt Block and provide all the details for fabric cuts and measurements.
What is a Stair Quilt Block?
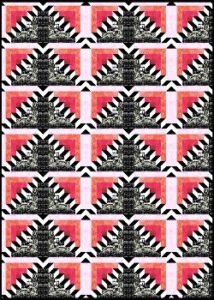
The Stair Quilt Block is characterized by its stair-like visual effect, created by the strategic arrangement of fabric pieces. This block is an excellent choice for both beginners and seasoned quilters due to its straightforward assembly and endless design possibilities. By using various fabric colors and patterns, you can customize the block to suit your unique vision.
In terms of its structure, the Stair Quilt Block features squares and rectangles arranged in a step-like pattern. This simple yet striking design makes it a perfect addition to any quilt, whether you’re creating a wall hanging or a full-sized bedspread. The pattern’s versatility also allows you to experiment with different quilting techniques, from traditional piecing to more advanced methods like foundation paper piecing.
If you are familiar with other quilt patterns, you’ll notice that the Stair Quilt Block is somewhat similar to log cabin and rail fence blocks. However, its distinctive step pattern sets it apart, offering a modern twist on classic designs. Whether you’re looking for a fresh take on quilting or adding to your collection of quilt patterns, this block is sure to impress.
Choosing Your Fabrics for a Stair Quilt Block
Selecting fabrics for your Stair Quilt Block is where creativity really shines. While the block itself is simple, the choice of fabric can drastically alter the appearance of the finished quilt. To create visual interest, consider using fabrics with contrasting colors or complementary tones. For instance, using a dark fabric next to a light one will emphasize the stair effect, making your design pop.
When it comes to quilt patterns, the Stair Quilt Block is versatile in terms of fabric choices. You can opt for solid colors, which will create a more modern look, or choose prints that add texture and depth to the overall design. Some quilters even use a mix of solids and prints to achieve a balanced yet dynamic composition. If you’re a beginner, choosing fabric that contrasts well with each other will help you see the stair pattern more clearly during assembly.
In addition to colors and prints, consider the type of fabric you are using. Cotton is the most common choice for quilting due to its durability and ease of use. However, feel free to experiment with other types of fabric like linen or blends for a different texture. Just make sure that all the fabrics you choose are of similar weight so they piece together easily.
Preparing Your Fabric and Cutting Pieces
To create a Stair Quilt Block, accurate cutting is crucial. You’ll need the following cuts for a single block:
- Four 4.5” x 4.5” squares of Fabric A (main fabric)
- Four 2.5” x 4.5” rectangles of Fabric B (contrasting fabric)
- Four 2.5” x 2.5” squares of Fabric C (secondary fabric)
Start by ironing your fabric to remove any wrinkles. This ensures that your cuts will be precise, and your fabric will lay flat during assembly. Next, use a rotary cutter and quilting ruler to make your cuts. It’s important to be as accurate as possible because uneven cuts can lead to misaligned seams, which may distort the quilt pattern.
Once your pieces are cut, lay them out in the Stair Quilt Block formation. This will give you an idea of how the colors and patterns work together before you start sewing. Take this time to rearrange pieces if necessary, ensuring that the stair pattern is clearly visible. The layout is critical for ensuring that your final product resembles the stair-step design you’re aiming for.
Piecing Together the Stair Quilt Block
Now that you have your fabric pieces cut, it’s time to start assembling the Stair Quilt Block. Begin by piecing together the smaller squares and rectangles. Take one 2.5” x 4.5” rectangle (Fabric B) and sew it to a 2.5” x 2.5” square (Fabric C) using a ¼” seam allowance. Press the seam toward the darker fabric. Repeat this process with the remaining rectangles and squares.
Next, sew each of these newly assembled units to a 4.5” x 4.5” square (Fabric A). Again, press the seams toward the darker fabric to reduce bulk and ensure that the block lays flat. At this point, you should have four units, each consisting of one large square and one smaller rectangle/square combination.
To complete the Stair Quilt Block, arrange these four units in a 2×2 grid, ensuring that the stair pattern forms. Once you’re happy with the layout, sew the units together, first in pairs, and then combine the pairs to form the final block. Press all seams flat, and your Stair Quilt Block is now complete!
Troubleshooting Common Issues in Stair Quilt Blocks
Even experienced quilters can run into issues when assembling quilt blocks, and the Stair Quilt Block is no exception. One of the most common problems is misaligned seams. To avoid this, take your time when cutting and piecing. Use pins to hold pieces in place before sewing, and ensure that your seam allowances are consistent throughout the block.
Another issue that may arise is fabric stretching, especially if you’re working with lightweight or loosely woven fabrics. To prevent this, use a walking foot on your sewing machine, which helps feed the fabric evenly through the machine. Also, avoid pulling the fabric as you sew, which can distort the quilt pattern.
Lastly, if your Stair Quilt Block isn’t lying flat, it could be due to bulky seams. In this case, double-check that you’re pressing the seams toward the darker fabric and trimming any excess thread or fabric along the seams. Proper pressing and seam management are key to achieving a smooth, flat block that will integrate seamlessly into your larger quilt.
Customizing Your Stair Quilt Block
One of the best aspects of the Stair Quilt Block is its adaptability. Once you’ve mastered the basic pattern, you can experiment with different layouts and color schemes to create something entirely unique. For example, try alternating the direction of the stairs in each block to create a zigzag or chevron effect. This small change can add complexity and depth to your quilt without requiring additional piecing techniques.
Another option is to adjust the size of the blocks. By simply scaling the measurements up or down, you can create larger or smaller stairs. Larger blocks can give a quilt a more modern feel, while smaller blocks can create a more intricate and traditional design. This flexibility is what makes the Stair Quilt Block one of the most versatile quilt patterns out there.
Finally, consider using the Stair Quilt Block as part of a sampler quilt. Pair it with other classic blocks like the log cabin or pinwheel to showcase a variety of quilt patterns in one project. This is a great way to practice different techniques and create a visually diverse quilt that is sure to impress.
The Stair Quilt Block is a fantastic addition to any quilter’s repertoire. Its simple structure, combined with endless customization possibilities, makes it ideal for both beginners and experienced quilters alike.
Whether you’re creating a single block or incorporating it into a larger project, this versatile design will bring dynamic movement and visual interest to your quilt. With just a few basic cuts and a little attention to detail, you’ll be on your way to creating a beautiful quilt pattern that is sure to stand the test of time. Happy quilting!