
If you love combining creativity, precision, and color, then the Scrappy Acorn Quilt Block Tutorial – Quilt Pattern is the perfect project to inspire your next quilting adventure. This charming pattern captures the beauty of autumn and the cozy feeling that handmade quilts bring into every home. Whether you’re a beginner learning the fundamentals of quilting or an experienced crafter exploring new block ideas, this tutorial will help you create a delightful acorn-themed quilt block using scraps you already have in your fabric stash.
One of the most wonderful aspects of the Scrappy Acorn Quilt Block Tutorial is its flexibility. You can personalize every detail—from the fabrics you choose to the layout and size of the blocks. The acorn motif represents growth, potential, and natural beauty, making it a perfect symbol for handmade projects that carry warmth and meaning. This Quilt Pattern is not only beautiful but also a great way to use leftover fabric pieces that might otherwise go to waste.
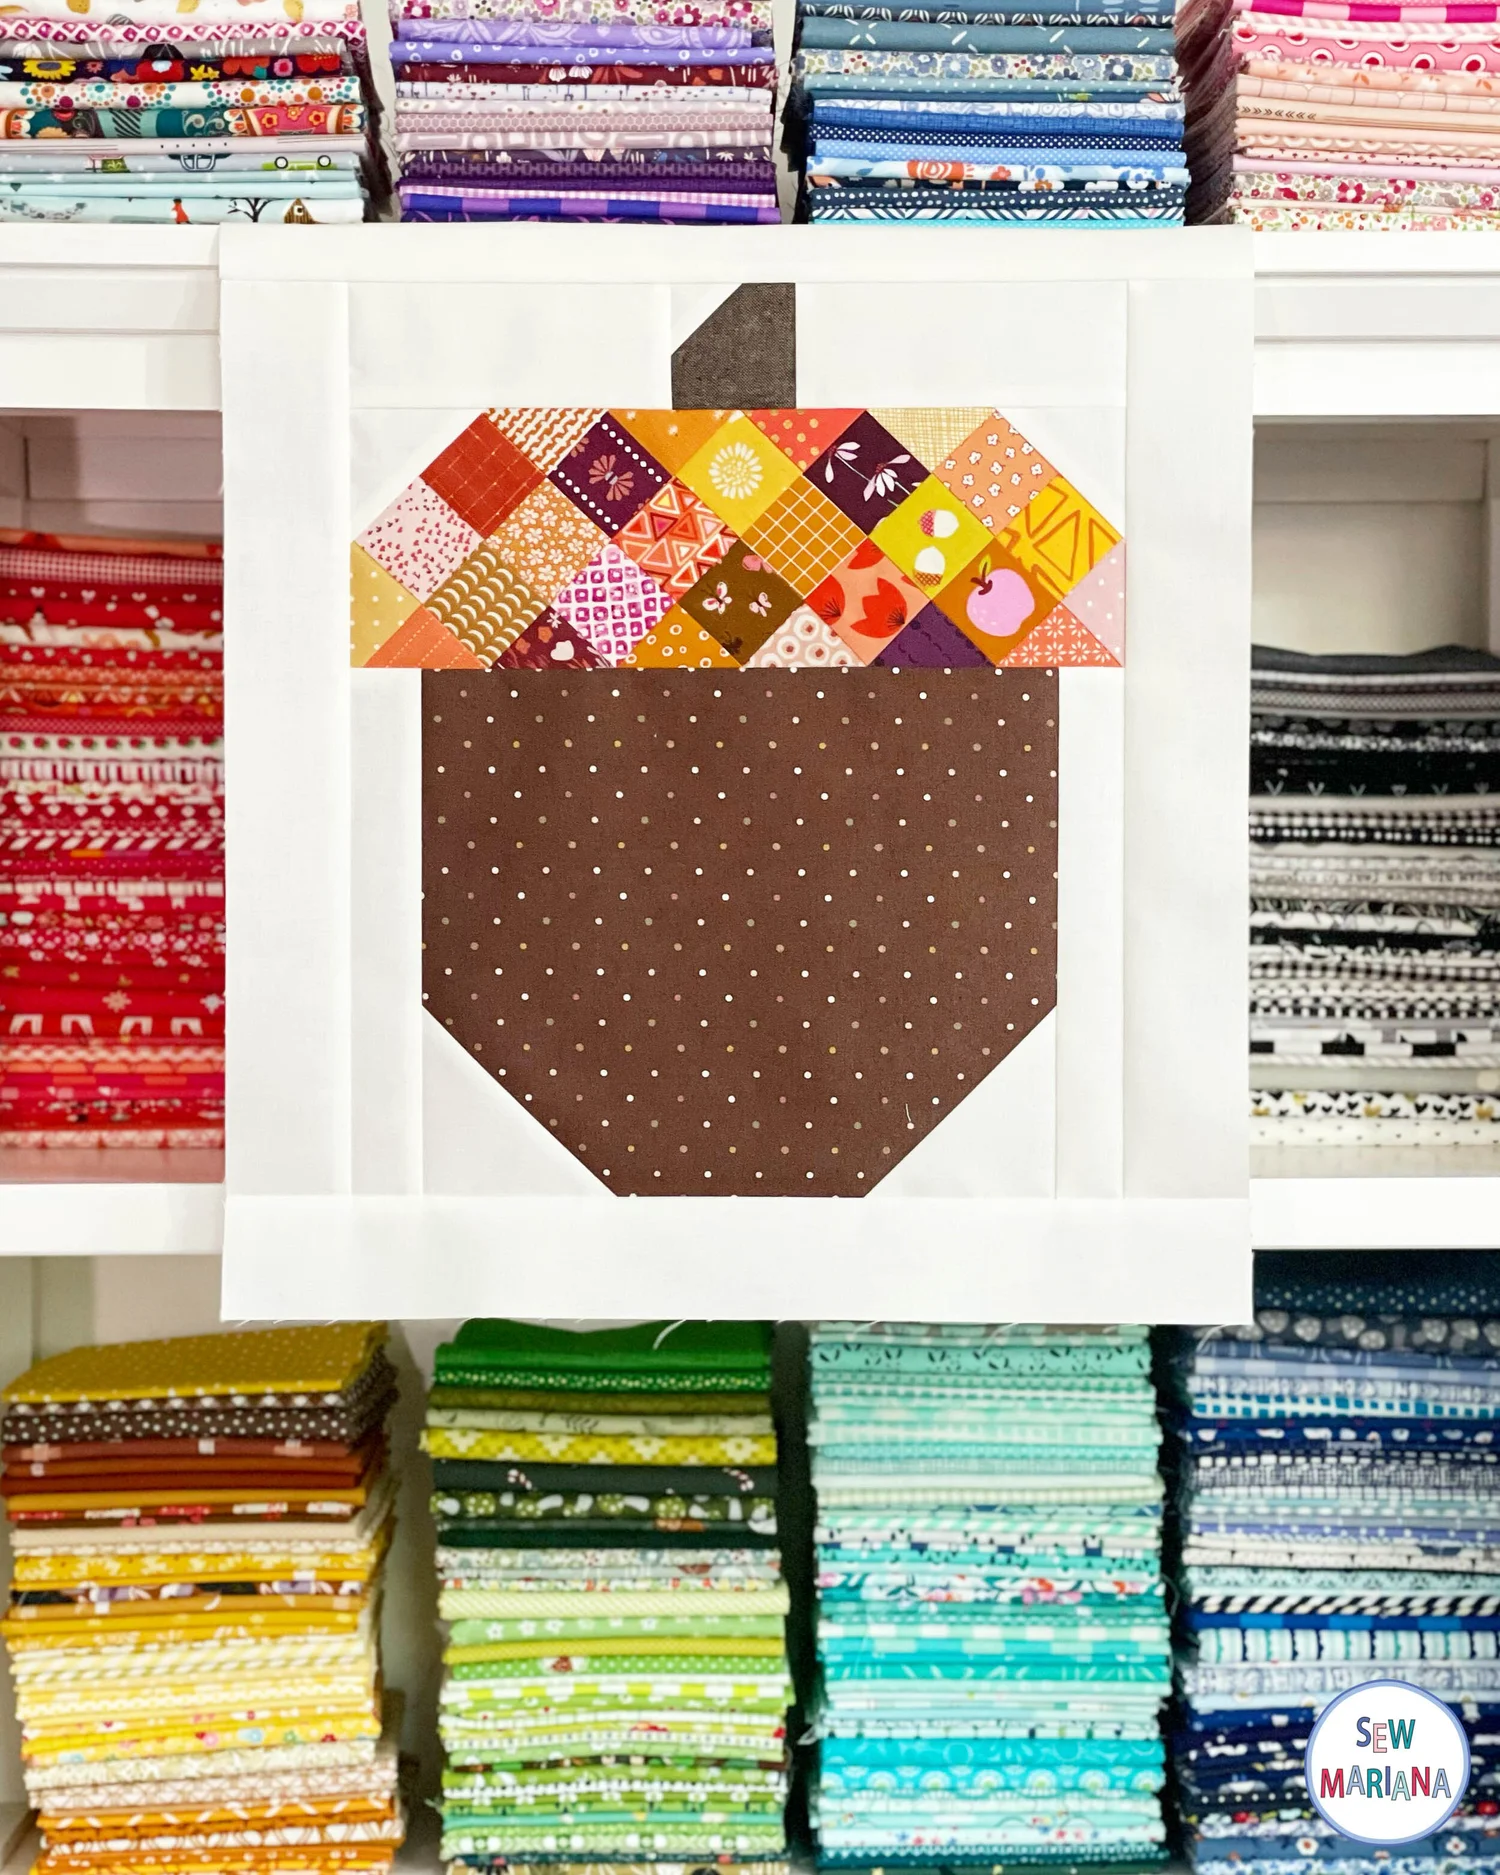
The Scrappy Acorn Quilt Block Tutorial – Quilt Pattern encourages quilters to experiment with textures, tones, and prints. You can use earthy browns and greens for a traditional fall look or mix bold and modern colors for a more contemporary aesthetic. Each block tells a story through its fabrics, making your finished quilt one-of-a-kind. Whether you plan to turn your acorn blocks into a full quilt, wall hanging, or table runner, this pattern adds a touch of nature-inspired charm to your home decor.
1. Getting Started with the Scrappy Acorn Quilt Block Tutorial
Before you begin crafting your Scrappy Acorn Quilt Block Tutorial – Quilt Pattern, it’s essential to prepare your materials and workspace. Gathering the right tools will make your sewing experience smoother and more enjoyable.
Start by choosing your fabrics. Since this is a “scrappy” quilt project, feel free to use an assortment of fabric scraps in various shades. The acorn cap can feature darker tones such as chocolate brown, taupe, or deep rust, while the nut portion works beautifully with lighter prints like beige, gold, or even soft greens. Mixing patterns—such as florals, plaids, and solids—adds a charming handmade touch.
Next, prepare your cutting tools. A rotary cutter, self-healing cutting mat, and quilting ruler are must-haves for precision. Accurate cutting ensures that all your fabric pieces align perfectly when sewn together, which is key to creating crisp and professional-looking quilt blocks.
You’ll also need basic sewing supplies like thread that matches your fabric tones, pins or clips for holding pieces together, and a reliable sewing machine with a sharp needle. Ironing equipment is equally important since pressing seams as you go helps your block lay flat and look polished.
Once your materials are ready, review your Quilt Pattern layout. Most acorn quilt blocks consist of a simple patchwork design with half-square triangles and rectangular pieces. Even if you’re new to quilting, this block is manageable and satisfying to complete.
Finally, set aside a clean and organized workspace. Having your fabric pieces sorted by color and size helps you stay efficient and creative throughout the process. With everything in place, you’re ready to begin stitching your beautiful acorn block.
2. Step-by-Step Guide to Creating the Acorn Quilt Block
Now that your materials are ready, let’s dive into the steps of the Scrappy Acorn Quilt Block Tutorial – Quilt Pattern. This section will walk you through assembling the block, from cutting your pieces to sewing the final seams.
Start by cutting your fabrics according to the pattern measurements. For each block, you’ll typically need several squares and rectangles of coordinating fabrics. Cut precisely and double-check your dimensions before sewing. Consistent sizing ensures a smooth assembly process later on.
Next, create your half-square triangles (HSTs). These form the tapered shape of the acorn top. Pair two squares of contrasting fabrics, place them right sides together, and draw a diagonal line from corner to corner. Sew a seam ¼ inch on each side of that line, then cut along the diagonal and press your seams open. You now have two perfectly matched HST units.
Sew the acorn top together first, combining your HSTs with smaller rectangles to form the cap. Then, assemble the bottom portion of the acorn using your chosen fabrics for the nut body. Press all seams flat after each step to maintain clean lines.
Once the top and bottom sections are ready, join them carefully to complete the acorn shape. Align your seams and edges accurately to prevent distortion. A quick press with your iron will smooth everything out and give your block a crisp appearance.
At this stage, admire your work! The Scrappy Acorn Quilt Block can be made in multiple sizes depending on your final project’s purpose. You can make several identical blocks for a uniform quilt, or vary your fabrics for a fun, eclectic look.
Finally, trim your finished block to ensure it’s perfectly square. Consistency in block size makes it easier to assemble them into a full quilt later. Your Scrappy Acorn Quilt Block Tutorial – Quilt Pattern is now coming to life beautifully.
3. Design Variations and Creative Ideas
One of the best things about the Scrappy Acorn Quilt Block Tutorial – Quilt Pattern is how easily it can be customized to reflect your personal style. With a few creative tweaks, you can make each block distinct and visually exciting.
Experiment with different color schemes to set a unique tone. Traditional autumn-inspired acorns use warm hues like brown, gold, and orange, but you can give your quilt a fresh look by using unexpected colors such as blue, pink, or gray. Don’t be afraid to mix modern prints with vintage fabrics for added character.
Consider the background fabric carefully. A light or neutral background will make your acorn design pop, while darker backgrounds can add depth and drama. If you want to create a patchwork forest theme, alternate blocks with leaf or tree motifs for added interest.
You can also play with scale. Try making mini acorn blocks for smaller projects like coasters, pot holders, or pillow covers. Larger blocks work well for wall hangings or quilts. Varying block sizes within one project creates a dynamic and artistic effect.
Adding appliqué or embroidery details enhances your design further. Stitch small leaves or vines around your acorns for a whimsical touch. You can even embroider initials or a date to personalize your quilt, especially if you plan to gift it to someone special.
Finally, don’t forget the layout possibilities. Set your blocks in straight rows for a clean, traditional quilt look, or use diagonal or staggered layouts for a modern twist. Each variation tells a different story through the same Quilt Pattern, allowing you to express your creativity freely.
4. Finishing Touches and Display Ideas
After completing your blocks, it’s time to assemble and finish your Scrappy Acorn Quilt Block Tutorial – Quilt Pattern. The finishing process brings your hard work together into a polished masterpiece ready for display or gifting.
Join your blocks carefully, aligning seams and pressing as you go. Use sashing strips or borders to separate each block if you prefer a structured layout. This also helps highlight the acorn shapes and adds a clean frame around your work.
Once your quilt top is complete, layer it with batting and backing fabric. Baste the layers together using pins or spray adhesive to keep them secure during quilting. Choose a quilting style that complements your design—simple straight-line quilting looks clean and modern, while free-motion stitching adds texture and movement.
Bind your quilt edges neatly to finish the project. The binding not only secures the layers but also provides a professional edge. Choose a color that contrasts or coordinates with your quilt top for a visually pleasing finish.
After binding, give your quilt a final press and admire your craftsmanship. Each block, stitch, and fabric choice reflects your creativity and attention to detail. This finished Scrappy Acorn Quilt Block piece can serve as a cozy throw, a charming wall hanging, or even a thoughtful handmade gift.
For displaying, consider draping it over a sofa or quilt ladder to add warmth to your living space. You can also hang it in your entryway as seasonal décor during fall. However you choose to use it, this quilt adds handmade charm and artistic flair to any room.
FAQ: Scrappy Acorn Quilt Block Tutorial – Quilt Pattern
1. What skill level is needed for this quilt block?
The Scrappy Acorn Quilt Block Tutorial is beginner-friendly. Basic knowledge of cutting, piecing, and sewing is sufficient to complete this pattern successfully.
2. What fabric types work best for this project?
Cotton fabrics are ideal because they’re easy to sew and press. You can mix scraps from previous projects for a unique patchwork effect.
3. How big should each acorn block be?
Standard blocks range from 8 to 12 inches, but you can resize the pattern to fit your project needs.
4. Can I make this quilt by hand instead of using a machine?
Yes! Hand sewing works beautifully, though it takes more time. The result is just as charming and durable.
5. How do I keep my blocks from stretching while sewing?
Use a consistent ¼-inch seam allowance and press your seams instead of ironing back and forth. This prevents distortion.
6. What kind of batting should I use?
Choose a lightweight cotton or cotton-blend batting for a soft, comfortable quilt that drapes nicely.
7. How can I make the acorn design stand out more?
Use high-contrast fabrics for the cap and body of the acorn. This visual separation helps define the shape clearly.
Conclusion
The Scrappy Acorn Quilt Block Tutorial – Quilt Pattern combines creativity, sustainability, and tradition in one enjoyable project. It’s a perfect way to use up leftover fabric scraps while crafting something meaningful and beautiful. Whether you make a single block or a full quilt, this pattern allows for endless customization and personal expression.
Throughout this article, we explored the steps, materials, and creative possibilities behind the Scrappy Acorn Quilt Block, showing how each fabric choice and stitch contributes to the final masterpiece. With practice and imagination, you can create quilts that capture the warmth of fall and the charm of handmade art.
Now it’s your turn—grab your favorite fabrics, follow the Scrappy Acorn Quilt Block Tutorial, and enjoy the process of bringing this lovely Quilt Pattern to life. Don’t forget to share your honest opinions and suggestions about this project. Your feedback helps keep the quilting community creative and inspired!