
The Scrap Happy Shoofly Block is a timeless quilt pattern that is both simple and versatile, making it perfect for quilters of all skill levels.
Whether you are just starting or are an experienced quilter looking to use up fabric scraps, this block offers a charming and creative way to bring your fabrics together.
In this blog post, we will walk you through the step-by-step process of creating your very own Scrap Happy Shoofly Block, complete with fabric cuts, measurements, and tips for achieving a balanced design.
What is the Scrap Happy Shoofly Block?
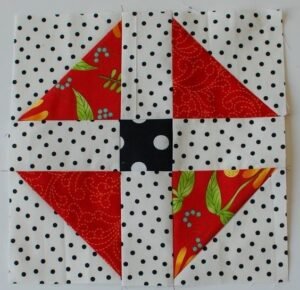
The Scrap Happy Shoofly Block is a variation of the traditional Shoofly quilt block, which consists of a nine-patch layout made from half-square triangles (HSTs) and plain squares. This version adds a playful twist by incorporating fabric scraps, allowing you to create a colorful and unique block each time. The simplicity of the pattern makes it an ideal project for both beginners and seasoned quilters.
Quilters often choose the Scrap Happy Shoofly Block because it is a great way to use up leftover fabric from previous projects. You can mix and match various patterns, colors, and textures to create a one-of-a-kind design. Additionally, the block’s symmetry and clean lines provide a beautiful contrast to the varied fabric choices, giving the finished quilt an eye-catching appeal.
When planning your quilt, the Scrap Happy Shoofly Block can be used as a single statement block or repeated across the entire quilt. It’s adaptable to many color schemes, making it an ideal choice for modern, traditional, or eclectic quilt designs.
Choosing Fabrics for the Scrap Happy Shoofly Block
When selecting fabrics for your Scrap Happy Shoofly Block, you can embrace the freedom of using scraps from your collection. Choose a variety of light, medium, and dark fabrics to create depth and contrast within the block. Mixing solids with prints, or combining bold colors with muted tones, will give your quilt an extra layer of visual interest.
Scrap quilts like the Scrap Happy Shoofly encourage creative freedom, so don’t be afraid to mix fabrics that may not traditionally “match.” The juxtaposition of different fabrics often leads to a quilt that feels dynamic and lively. However, if you prefer a more coordinated look, you can stick to a specific color palette or theme, such as pastels, neutrals, or holiday colors.
In terms of fabric types, cotton is generally the best choice for quilting due to its durability and ease of handling. Since the Shoofly Block involves straight seams and basic shapes, it is a forgiving pattern that works well with fabrics of varying weights and textures.
Fabric Cuts and Measurements
To create a single Scrap Happy Shoofly Block, you will need the following fabric cuts:
- Four half-square triangles (HSTs): For these, you will cut two contrasting 5-inch squares. These will be used to create the half-square triangles.
- One center square: Cut one 4.5-inch square from a contrasting fabric for the center of the block.
- Four outer squares: You will need to cut four 4.5-inch squares from various scrap fabrics to form the outer edges of the block.
Once your fabrics are cut, you are ready to begin assembling your Scrap Happy Shoofly Block. These cuts will form a 12.5-inch unfinished block, which will measure 12 inches when sewn into the quilt top.
Step-by-Step Tutorial: How to Assemble the Scrap Happy Shoofly Block
Step 1: Create the Half-Square Triangles (HSTs)
To begin, take your two 5-inch squares of contrasting fabric. Place them right sides together and draw a diagonal line from corner to corner on the back of one of the squares. Sew a seam 1/4 inch on both sides of the drawn line. After sewing, use your rotary cutter to cut along the drawn line, creating two half-square triangles.
Press the seams open or to one side, depending on your preference. Once pressed, trim the HSTs down to 4.5 inches. You now have four HSTs ready to be incorporated into your Scrap Happy Shoofly Block.
Step 2: Layout Your Block
Next, lay out your block in a three-by-three grid. Place the four half-square triangles in the corner positions, with the diagonal seam running from the center of the block outward. The center square, which is cut from your contrasting fabric, goes in the middle of the grid. The four outer squares, which should be cut from your scrap fabrics, are placed in the remaining spots.
Take a moment to arrange your pieces in a way that looks visually appealing. This is where you can play with color balance, ensuring that your scrap fabrics create a cohesive and interesting design.
Step 3: Assemble the Rows
Now, sew the block together row by row. Start with the top row: sew the first HST to the outer square, then sew the outer square to the second HST. Repeat this process for the second and third rows.
Once the rows are sewn, press the seams. For best results, alternate the direction in which you press the seams for each row (press one row to the left and the next to the right). This will help your seams nest together more neatly when you sew the rows together.
Final Assembly and Quilting
Step 4: Sew the Rows Together
After pressing the rows, it’s time to sew them together. Line up the edges and pin them if necessary, ensuring that the seams align. Sew the top row to the middle row and the middle row to the bottom row, using a 1/4-inch seam allowance throughout.
Once your rows are connected, press the entire block one final time. Congratulations, your Scrap Happy Shoofly Block is complete! Repeat the process to make additional blocks if you plan to use this design for a larger quilt.
Step 5: Join Blocks and Add Borders (Optional)
If you are making a quilt with multiple Scrap Happy Shoofly Blocks, the next step is to sew your blocks together. You can arrange the blocks in straight rows or alternate them for a more dynamic design. Adding borders around your quilt can also frame the Shoofly Blocks and give the finished piece a polished look.
For a cohesive quilt, consider using a solid color or neutral fabric for the sashing between blocks. This will help the scrappy nature of the blocks stand out and create visual balance across the quilt top.
Step 6: Quilt and Bind
Once your quilt top is assembled, it’s time to quilt it. You can quilt it by hand or use a sewing machine to stitch the layers together. A simple grid quilting pattern works well with the Scrap Happy Shoofly Block, but feel free to experiment with free-motion quilting for added texture.
Finally, add binding to the edges of your quilt for a finished look. Your Scrap Happy Shoofly Quilt is now ready to be enjoyed!
Conclusion: Why the Scrap Happy Shoofly Block is a Must-Try Quilt Pattern
The Scrap Happy Shoofly Block is not only a great way to use up leftover fabric but also a fun and easy-to-make quilt pattern. Its adaptability and creative potential make it a must-try for quilters of all levels. Whether you’re creating a single block or piecing together an entire quilt, this pattern allows you to showcase your unique style while keeping the process enjoyable.
With simple fabric cuts, easy-to-follow steps, and endless design possibilities, the Scrap Happy Shoofly Block is sure to become a favorite in your quilting repertoire. Happy quilting!