
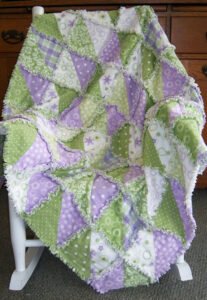
Rag quilts are a popular choice among quilters due to their simplicity and unique, rustic appearance. Unlike traditional quilts, rag quilts are designed with exposed seams that fray over time, creating a cozy, textured look. They are perfect for beginners and experienced quilters alike. Plus, they come together quickly and don’t require intricate quilting.
Rag quilts are versatile, making excellent gifts or home décor items, and they’re ideal for using up fabric scraps. In this article, we’ll walk you through a detailed tutorial on how to create a rag quilt, covering fabric cuts, measurements, and the assembly process. With this guide, you’ll be able to create your own cozy quilt patterns effortlessly.
Before diving into the step-by-step instructions, it’s important to gather your materials and familiarize yourself with the basic technique. Let’s get started on your quilting journey!
1. Materials Needed for a Rag Quilt
When preparing to make a rag quilt, having the right materials is essential. You’ll need several key items, including fabric, thread, and quilting scissors. Choosing the right type of fabric is especially important for achieving the signature ragged edge look.
For most rag quilts, flannel or cotton fabrics are preferred because they fray easily, creating a soft and worn texture over time. Additionally, you’ll need batting for added warmth and texture. When purchasing your fabric, aim for three layers: a top layer, batting, and a backing layer, typically using contrasting colors or patterns to enhance the design.
Other supplies include sharp scissors, preferably ones made for quilting, as you’ll need to snip the seams to create the ragged edges. Regular sewing supplies like thread and a sewing machine are also necessary. Ensure that your fabric cuts are precise, as this will help with the overall alignment of your quilt blocks.
2. Fabric Cuts and Measurements
The first step in creating a rag quilt is cutting your fabric into squares. The size of the squares will depend on your personal preference, but for this tutorial, we will use 7-inch squares. This size creates a manageable project while still showing off the frayed edges.
To make a basic lap-sized rag quilt, you will need approximately 90 squares for the front, 90 squares for the back, and 90 squares of batting. This means you’ll need to cut 90 squares from your chosen top fabric, 90 from the backing fabric, and 90 from your batting. Each quilt block will consist of three layers: top fabric, batting, and backing fabric.
Once you’ve cut all of your squares, it’s time to assemble your quilt sandwiches. For each block, place the backing fabric square wrong side up, followed by a square of batting, and then the top fabric square right side up. Pin or clip these layers together to prepare for sewing.
3. Sewing the Rag Quilt Blocks
With your quilt sandwiches pinned together, it’s time to sew. Sew an “X” across each square to hold the layers in place. This can be done by sewing from corner to corner, creating an “X” shape on each block. This step ensures that the batting stays securely between the fabric layers and helps keep the quilt intact after repeated washing.
The stitches don’t need to be perfect, as the frayed seams will hide minor imperfections. For best results, use a walking foot on your sewing machine, which helps to evenly feed all three layers of fabric. Once all your blocks are sewn with an “X,” you’re ready to move on to the assembly of the quilt.
Sewing the “X” on each block can feel repetitive, but it’s an essential part of creating the final rag quilt look. Once complete, you’ll be able to see how the layers start coming together, giving your quilt its classic ragged texture.
4. Assembling the Quilt
Now that your blocks are complete, it’s time to sew them together. Unlike traditional quilts where seams are hidden, in a rag quilt, the seams are left exposed on the front of the quilt. To achieve this look, place two blocks together with the back sides facing each other and sew a ½-inch seam allowance.
Continue sewing the blocks together in rows, keeping the seams exposed on the front side. Once you’ve completed each row, sew the rows together in the same manner. Be sure to maintain the same ½-inch seam allowance throughout to create uniform fraying.
After the rows are sewn together, you’ll have the base of your quilt. It’s important to press the seams open to ensure they lay flat and contribute to the ragged effect. At this stage, your quilt may look rough around the edges, but the final touches will bring everything together.
5. Snipping the Seams for Fraying
The final step in completing your rag quilt is snipping the exposed seams to create the frayed edges. Use sharp scissors to cut small snips, about ¼-inch apart, along all the seams, being careful not to cut through the stitching.
This step takes some time, but it’s what gives the rag quilt its signature look. Be mindful of your cuts and try to keep them evenly spaced. This will ensure that the frayed edges are consistent throughout the quilt.
Once you’ve finished snipping the seams, it’s time to wash your quilt. Washing the quilt will help the seams fray and fluff up, creating the cozy, ragged texture that rag quilts are known for. Use cold water and a gentle cycle, followed by a tumble dry on low heat.
6. Final Thoughts on Rag Quilts
Rag quilts are a fantastic project for quilters of all skill levels. They are forgiving, quick to assemble, and provide instant gratification as you watch the frayed edges come to life. The more you wash and use the quilt, the softer and cozier it becomes.
One of the best things about rag quilts is their versatility. You can customize the design with different fabrics and colors, or even create themed quilts for different seasons. They make perfect gifts for friends and family, especially when you personalize them with favorite fabrics or patterns.
Now that you’ve completed your rag quilt, take pride in your handiwork! Whether it’s used as a throw blanket, a baby quilt, or even a picnic blanket, your rag quilt will bring warmth and comfort for years to come.
7. Tips for Creating Unique Rag Quilt Patterns
If you’re looking to take your rag quilt to the next level, consider experimenting with different quilt patterns. By using various sizes of squares or incorporating patterned fabrics, you can create intricate designs that showcase your creativity. Rag quilts lend themselves to playful, colorful combinations, making them ideal for modern or traditional quilt patterns.
Another way to enhance your rag quilt is by adding appliqué or embroidery to the fabric squares before assembling the quilt. This adds a layer of complexity and personalization, making your quilt truly one-of-a-kind.
Finally, remember that the beauty of a rag quilt lies in its imperfections. Embrace the frayed edges, uneven stitches, and soft, worn look. These elements give rag quilts their charm and make them a timeless addition to your quilt collection.