
Creating a placemat by sewing circular fabrics together origami style is a beautiful and unique way to add a touch of elegance to your dining table. This technique combines elements of quilting, fabric manipulation, and origami-inspired folds to craft a stunning and functional piece. Whether you’re a seasoned quilter or a beginner, this project is a great way to experiment with circular fabric sewing techniques.
In this guide, we will walk you through the process of making your own placemat by sewing circular fabrics together origami, providing step-by-step instructions, tips, and tricks to achieve the best results. This project is perfect for using fabric scraps or creating a coordinated set for your table decor.
Let’s dive into the world of quilting and fabric manipulation and create a unique handmade placemat that will impress your guests!
1. Materials Needed to Create Your Origami Placemat
To begin your placemat by sewing circular fabrics together origami project, you will need some essential materials. Gathering everything beforehand will make the process smoother and more enjoyable.
- Fabric Choices: Select cotton or linen fabric for the best structure and durability.
- Fabric Scissors or Rotary Cutter: Essential for cutting precise circles.
- Sewing Machine & Thread: A sewing machine will help create clean and strong stitches.
- Pins or Fabric Clips: These will hold your layers in place while sewing.
- Iron & Pressing Board: Necessary for crisp folds and seams.
- Measuring Tape & Fabric Marker: To ensure accurate sizing and alignment.
Make sure to choose fabrics that complement your decor, whether you prefer a modern, rustic, or colorful theme. Pre-washing the fabric is recommended to prevent shrinkage after the placemat is completed.
The rotary cutter will help achieve precise circular cuts, while the iron will ensure that your origami folds stay crisp and structured. A well-prepared workspace with all your tools at hand will make the sewing process enjoyable and efficient.
2. Cutting and Preparing the Circular Fabrics
The first step in making a placemat by sewing circular fabrics together origami style is to cut and prepare your fabric circles. This is a crucial step as the accuracy of the cuts will determine the final look of your placemat.
- Step 1: Choose a Size – Decide on the diameter of your placemat. A standard size is about 12-15 inches.
- Step 2: Cut the Circles – Using a fabric marker, draw a perfect circle on your fabric and cut it with precision.
- Step 3: Cut Multiple Layers – Depending on your design, you may need two or more layers for depth and strength.
- Step 4: Press the Fabric – Iron each fabric piece to remove wrinkles and make them easier to manipulate.
- Step 5: Mark Fold Lines – Lightly mark the areas where the fabric will be folded to achieve the origami effect.
- Step 6: Arrange Before Sewing – Lay out your fabric circles to visualize the final design before stitching.
Taking the time to carefully cut and press your fabric will ensure a professional-looking final product. Accuracy is key in this stage, as small misalignments can affect the overall symmetry of the placemat.
3. Sewing the Circular Fabrics Together
Now that your fabric circles are ready, it’s time to sew them together. This process requires patience, but the results will be worth the effort.
- Step 1: Layer the Circles – Stack your fabric pieces in the order you want them to appear.
- Step 2: Pin the Pieces – Use fabric pins or clips to keep them aligned.
- Step 3: Sew Around the Edges – Using a sewing machine, sew a seam around the outer edge, leaving a small opening.
- Step 4: Turn the Fabric Inside Out – Pull the fabric through the opening to reveal the right sides.
- Step 5: Press the Seam Flat – Use an iron to flatten the seam for a neat finish.
- Step 6: Topstitch for Strength – A final topstitch around the edge will add durability and a polished look.
This sewing process ensures that your placemat by sewing circular fabrics together origami remains sturdy and maintains its shape even after multiple washes.
4. Adding the Origami Folds and Finishing Touches
The final step in this project is to add the origami-style folds and finishing details. This is where the artistic aspect of the project comes into play.
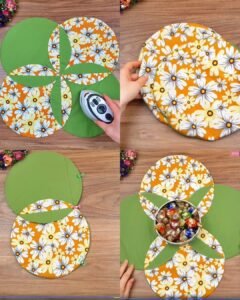
- Step 1: Create Origami Folds – Fold the fabric in a geometric pattern to create dimension.
- Step 2: Pin the Folds in Place – Use fabric pins to hold the folds before sewing.
- Step 3: Sew Along the Folds – Carefully stitch along the folds to maintain their shape.
- Step 4: Add Decorative Elements – Consider adding buttons, embroidery, or contrast stitching.
- Step 5: Press the Final Design – A final press will set the folds in place.
- Step 6: Inspect and Adjust – Ensure all seams and folds are secure before use.
Once completed, your placemat by sewing circular fabrics together origami will be a unique and stylish addition to your home decor.
FAQ
Q1: What type of fabric is best for this project?
Cotton or linen works best as they hold their shape well and are easy to fold and press.
Q2: Can I make different sizes of placemats?
Yes! Adjust the circle size based on your needs, from small coasters to larger table settings.
Q3: Do I need a sewing machine for this project?
While a sewing machine makes the process faster, you can hand-stitch if preferred.
Q4: How do I keep the folds crisp?
Using an iron and pressing each fold well before sewing helps maintain sharp lines.
Q5: Can I wash these placemats?
Yes, machine wash on a gentle cycle and press with an iron to refresh the folds.
PATTERN HERE
Creating a placemat by sewing circular fabrics together origami style is a rewarding and creative sewing project. From selecting fabrics to executing origami folds, this technique allows you to explore quilting and fabric manipulation in a new way. Whether making a single statement piece or a set for your dining table, this project is a fun and practical addition to your sewing repertoire.
We would love to hear your thoughts! Leave a comment below with your experience, suggestions, or questions about this project. Happy sewing!