
The Pineapple Quilt Block is a timeless pattern that has captured the hearts of quilters for generations.
Its intricate design and versatility make it a perfect choice for both beginners and advanced quilters. In this blog post, we’ll explore the history of the Pineapple Quilt Block, its variations, and provide a detailed step-by-step guide on how to create your own Pineapple block.
We’ll also dive into essential quilting tips to help you achieve professional results. Let’s get started!
The History of the Pineapple Quilt Block
The Pineapple Quilt Block is believed to have originated in the mid-1800s, becoming a popular pattern in American quilting culture. Its name is derived from the resemblance of the block to the shape of a pineapple, a symbol of hospitality and warmth. Over the years, this block has evolved into various forms, making it one of the most recognized quilt patterns.
Quilters have enjoyed the versatility of the Pineapple block, using it to create everything from traditional quilts to modern designs. The intricate geometric patterns formed by the block make it a stunning focal point in any quilt. Whether you’re working with bright fabrics or muted tones, the Pineapple block allows for endless creativity.
What makes the Pineapple block particularly appealing is its potential for variation. By tweaking the colors, angles, or layout of the pieces, quilters can create unique versions of this classic design. We’ll explore some of these variations later in the post.
The Pineapple Quilt Block: Basic Structure
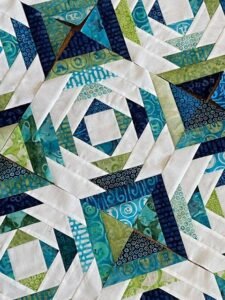
At its core, the Pineapple Quilt Block is built upon a central square, with strips of fabric sewn around the square in a log-cabin-like manner. Each layer of strips radiates outward, creating the appearance of a pineapple. The block typically consists of a series of narrow and wide strips that are placed at alternating angles, giving it a striking, three-dimensional look.
This block is typically square in shape, with the size of each block determined by the width of the strips and the central square. While the traditional block uses a set number of strips, many quilters adapt the design to create blocks of varying sizes. The structure remains the same, but the block can be adjusted to fit any quilt pattern.
The choice of fabric plays a significant role in the final look of the Pineapple Quilt Block. High contrast between light and dark fabrics creates a more dramatic effect, while using a more subtle fabric combination results in a softer, more blended appearance.
How to Make a Pineapple Quilt Block: Step-by-Step Tutorial
Creating a Pineapple Quilt Block requires careful attention to detail and precision in cutting and sewing. Below, we outline a step-by-step guide to help you achieve perfect results.
Fabric and Measurements:
- Central square: 2.5″ x 2.5″ (cut 1)
- Dark strips: 1.5″ wide (cut 4 pieces, 2 of each length)
- Light strips: 1.5″ wide (cut 4 pieces, 2 of each length)
- Outer strips (light and dark): 2″ wide (cut 8 pieces)
- Final strips: 2.5″ wide (cut 4 pieces)
Step 1: Prepare the Central Square Start by cutting a 2.5″ x 2.5″ central square from your chosen fabric. This square forms the core of your block, so pick a fabric that contrasts well with the strips you will be adding.
Place the central square in the middle of your workspace. You’ll be adding alternating rows of light and dark strips to create the “pineapple” effect. Ensure that your fabric is well-pressed and straight before starting.
Step 2: Add the First Layer of Strips Sew the first two dark strips (1.5″ wide) to opposite sides of the central square. Press the seams outward to ensure the block lies flat. Then, sew the remaining two dark strips to the other sides of the central square, completing the first layer.
Repeat the process with the light strips, adding them in the same way. The alternating light and dark strips create the characteristic pineapple look. Be sure to press each layer as you go to avoid bulkiness.
Step 3: Continue Adding Layers As you add more strips, continue alternating between light and dark fabrics. Cut your strips in increasing lengths to fit the growing block size. For example, after the second layer, the strips will need to be slightly longer to accommodate the expanded size of the block.
Each time you add a new layer, carefully align the strips so that they form neat angles. This is what gives the Pineapple block its distinct geometric look. Use a rotary cutter and ruler to ensure precise cuts.
Exploring Variations of the Pineapple Quilt Block
While the traditional Pineapple block is stunning on its own, there are several variations that allow for creative exploration. By changing the fabric placement or the number of strips, you can create entirely new patterns.
Scrappy Pineapple Block: This variation involves using a variety of fabric scraps for each layer of strips, creating a more eclectic and vibrant design. The randomness of the fabric choices adds character and uniqueness to each block, making it perfect for a more relaxed, playful quilt.
Color Gradient Pineapple Block: Another option is to create a color gradient effect by carefully selecting fabrics that transition from light to dark. This gives the block a flowing, ombre look that adds depth and dimension to your quilt.
Mini Pineapple Block: For quilters who love intricate designs, the mini Pineapple block offers a fun challenge. By reducing the width of the strips, you can create smaller, more detailed blocks that are perfect for use in miniature quilts or as accents in larger projects.
Quilting Tips for a Perfect Pineapple Block
Creating a Pineapple block requires patience and precision, but these tips can help you achieve professional results. First, always use a rotary cutter for precise fabric cuts, as this will ensure that your strips are straight and even.
Second, press your seams carefully after each layer. Proper pressing prevents bulk and keeps your block flat, which is crucial for piecing the blocks together later. Avoid ironing back and forth, as this can distort the fabric.
Finally, consider using foundation paper piecing to ensure accuracy. This technique involves sewing the fabric directly onto a paper template, which keeps everything aligned. Once the block is complete, the paper is removed, leaving behind a perfect Pineapple block.
Using Pineapple Quilt Blocks in Your Quilt Projects
The Pineapple Quilt Block is incredibly versatile and can be used in a variety of quilt projects. Whether you’re making a full-sized quilt, a table runner, or even quilted pillows, this block adds a dynamic and eye-catching element to your work.
For a cohesive quilt, consider using the Pineapple block in alternating rows with other classic blocks like the Log Cabin or the Courthouse Steps. This creates a visually interesting quilt while still maintaining a traditional feel.
You can also experiment with block size to create different effects. Larger Pineapple blocks can be used as the main focus of the quilt, while smaller blocks can be used for borders or as accents in a more complex design.
Embrace the Pineapple Quilt Block
The Pineapple Quilt Block is a must-try pattern for any quilter looking to expand their skills and explore new design possibilities. Its timeless beauty, combined with the potential for endless variations, makes it a favorite among quilting enthusiasts. Whether you’re creating a traditional quilt or putting a modern spin on the block, the Pineapple Quilt Block is sure to impress.
Take your time with this pattern, follow the steps outlined in this tutorial, and enjoy the process of creating your own Pineapple Quilt Block masterpiece. Happy quilting!