
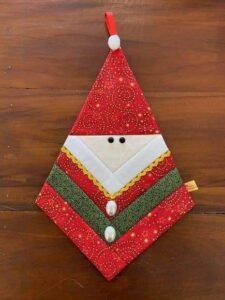
If you’re looking to create a festive and cozy project this holiday season, the Patchwork Log Cabin Santa Free Sewing Pattern is the perfect choice. Combining the timeless quilt technique of Log Cabin blocks with a charming Santa Claus design, this project will bring warmth and cheer to your home.
This step-by-step tutorial will guide you through the process of creating your very own quilt patterns, complete with fabric measurements, cuts, and detailed instructions.
The Log Cabin block is one of the most recognizable and versatile designs in quilting. When paired with a Santa theme, it becomes a delightful project that is great for Christmas décor or gifting. Whether you’re an experienced quilter or a beginner looking for a fun project, this tutorial will make the process simple and enjoyable. By the end, you’ll have a beautiful quilt block that can be turned into a pillow, wall hanging, or incorporated into a larger quilt.
In this tutorial, we’ll cover everything you need to know to make the Patchwork Log Cabin Santa. From the materials list to fabric measurements and a step-by-step guide, you’ll have all the tools to succeed. Let’s get started on this festive quilt project and bring Santa to life in the form of a beautiful Log Cabin block!
H2: Materials and Fabric Requirements
Before starting your Patchwork Log Cabin Santa Free Sewing Pattern, gather all the essential supplies and fabrics. Proper preparation will ensure your project goes smoothly.
- Basic Materials: You’ll need a sewing machine, rotary cutter, self-healing mat, quilting ruler, and iron. Having these tools ready will speed up the sewing process and ensure precise cuts.
- Fabric Choices: Select fabrics that reflect Santa’s colors. You’ll need:
- Red fabric for Santa’s hat and suit.
- White fabric for Santa’s beard and fur trim.
- Beige fabric for Santa’s face.
- Black fabric for Santa’s belt and boots.
- Background fabric: Choose neutral colors like cream or light gray for contrast.
- Fabric Measurements:
- Red fabric: (2) 2.5”x6” strips, (2) 2.5”x8” strips
- White fabric: (2) 2.5”x4” strips, (2) 2.5”x6” strips
- Beige fabric: (1) 4”x4” square for the face
- Black fabric: (2) 1.5”x6” strips for the belt
- Background fabric: (4) 2.5”x8” strips, plus additional squares for finishing edges.
- Thread and Needles: Use high-quality cotton thread in coordinating colors. For piecing, use neutral thread to avoid visible seams.
- Optional Embellishments: Add buttons for Santa’s eyes or a decorative pom-pom for his hat.
- Batting and Backing: If turning your block into a mini quilt, prepare batting and backing fabric sized at least 1” larger than your block.
H2: Cutting Your Fabric for the Log Cabin Santa
With your materials ready, the next step is precise cutting. Accurate fabric cuts are essential for a clean, professional finish to your quilt patterns.
- Start with the Center Square: Cut a 4”x4” square from the beige fabric. This will serve as Santa’s face in the center of the block.
- Prepare Strips for the Beard and Trim: Using the white fabric, cut strips to surround the center square:
- Two strips measuring 2.5”x4” for the first row.
- Two strips measuring 2.5”x6” for the second row.
- Cut Red Strips for Santa’s Suit and Hat: Cut two 2.5”x6” strips and two 2.5”x8” strips. These pieces will form the iconic red layers of Santa’s attire.
- Add Black for the Belt: Cut two thin strips measuring 1.5”x6”. These will create the illusion of Santa’s belt across the block.
- Prepare the Background Strips: Cut four background fabric strips measuring 2.5”x8”. These strips will frame the Santa block and enhance the Log Cabin effect.
- Double-Check Measurements: Before sewing, lay out all the pieces on your work surface. Confirm that the sizes match and that you have all the required pieces.
Precise cutting ensures that the Log Cabin design will fit together seamlessly. Use a rotary cutter and quilting ruler to achieve straight, even cuts.
H2: Step-by-Step Sewing Instructions
Now that your fabric is ready, let’s sew your Patchwork Log Cabin Santa Free Sewing Pattern. Follow this step-by-step guide carefully.
- Start with the Center Square: Place the beige 4”x4” square at the center. This is the starting point for your Log Cabin block.
- Attach the First Row of Strips:
- Sew a white 2.5”x4” strip to the top edge of the square.
- Sew another white strip to the right side.
- Press the seams open using an iron to keep the block flat.
- Add the Second Row of Strips:
- Attach the longer white 2.5”x6” strips to the remaining sides of the center square.
- Trim excess fabric if needed and press the seams open.
- Incorporate Red for Santa’s Suit:
- Sew a red 2.5”x6” strip to the top and bottom edges.
- Add the longer red 2.5”x8” strips to the sides.
- Add Santa’s Belt:
- Sew the black 1.5”x6” strips horizontally across the middle of the red rows.
- This creates the illusion of Santa’s belt.
- Finish with Background Strips:
- Attach the background 2.5”x8” strips around the edges to frame the block.
- Press all seams open and trim any uneven edges.
Your Log Cabin Santa block is now complete! The combination of rows creates a balanced, layered effect that brings Santa to life.
H2: Final Touches and Finishing Options
Once the main block is assembled, it’s time to add the finishing touches. Decide how you want to use your Patchwork Log Cabin Santa in your project.
- Quilting Your Block:
- If turning your block into a mini quilt, sandwich it with batting and backing fabric.
- Use straight-line quilting to emphasize the Log Cabin layers or outline Santa’s shape.
- Add Embellishments:
- Sew small black buttons for Santa’s eyes.
- Attach a white pom-pom at the tip of Santa’s hat for a festive touch.
- Binding Your Block:
- Finish the edges with a coordinating binding. Cut binding strips at 2.5” wide and attach them around the block.
- Use a mitered corner technique for clean, professional edges.
- Create a Pillow:
- Sew a pillow back onto the block to turn it into a decorative cushion.
- Use envelope backing or a zipper closure for easy insertion.
- Wall Hanging Option:
- Add hanging loops to the back of the block for display on a wall or door.
- This makes a perfect holiday decoration!
- Incorporate into Larger Quilts:
- Combine multiple Log Cabin Santa blocks with other festive designs to create a Christmas-themed quilt.
- Use sashing strips to separate each block and add visual balance.
With these final touches, your Patchwork Log Cabin Santa Free Sewing Pattern is complete! Whether displayed as a pillow, mini quilt, or wall hanging, this charming design will brighten your home during the holidays.