
The Ocean Moon Bedspread Quilt Pattern is a beautiful textile project inspired by moonlight reflecting across moving ocean waves. Its design combines curved fabric strips, layered shades of blue, pale highlights, and a large moon positioned above the horizon. Although the composition looks detailed, the project becomes much easier when it is divided into sections and assembled one stage at a time. The irregular waves are especially attractive because they allow the maker to work creatively instead of trying to reproduce perfectly identical shapes. This handcrafted appearance gives the finished quilt depth, movement, and a peaceful nighttime atmosphere. Whether displayed as a decorative bedspread or used as textile wall art, the design can become a memorable feature in a bedroom, sewing room, or coastal-inspired interior.
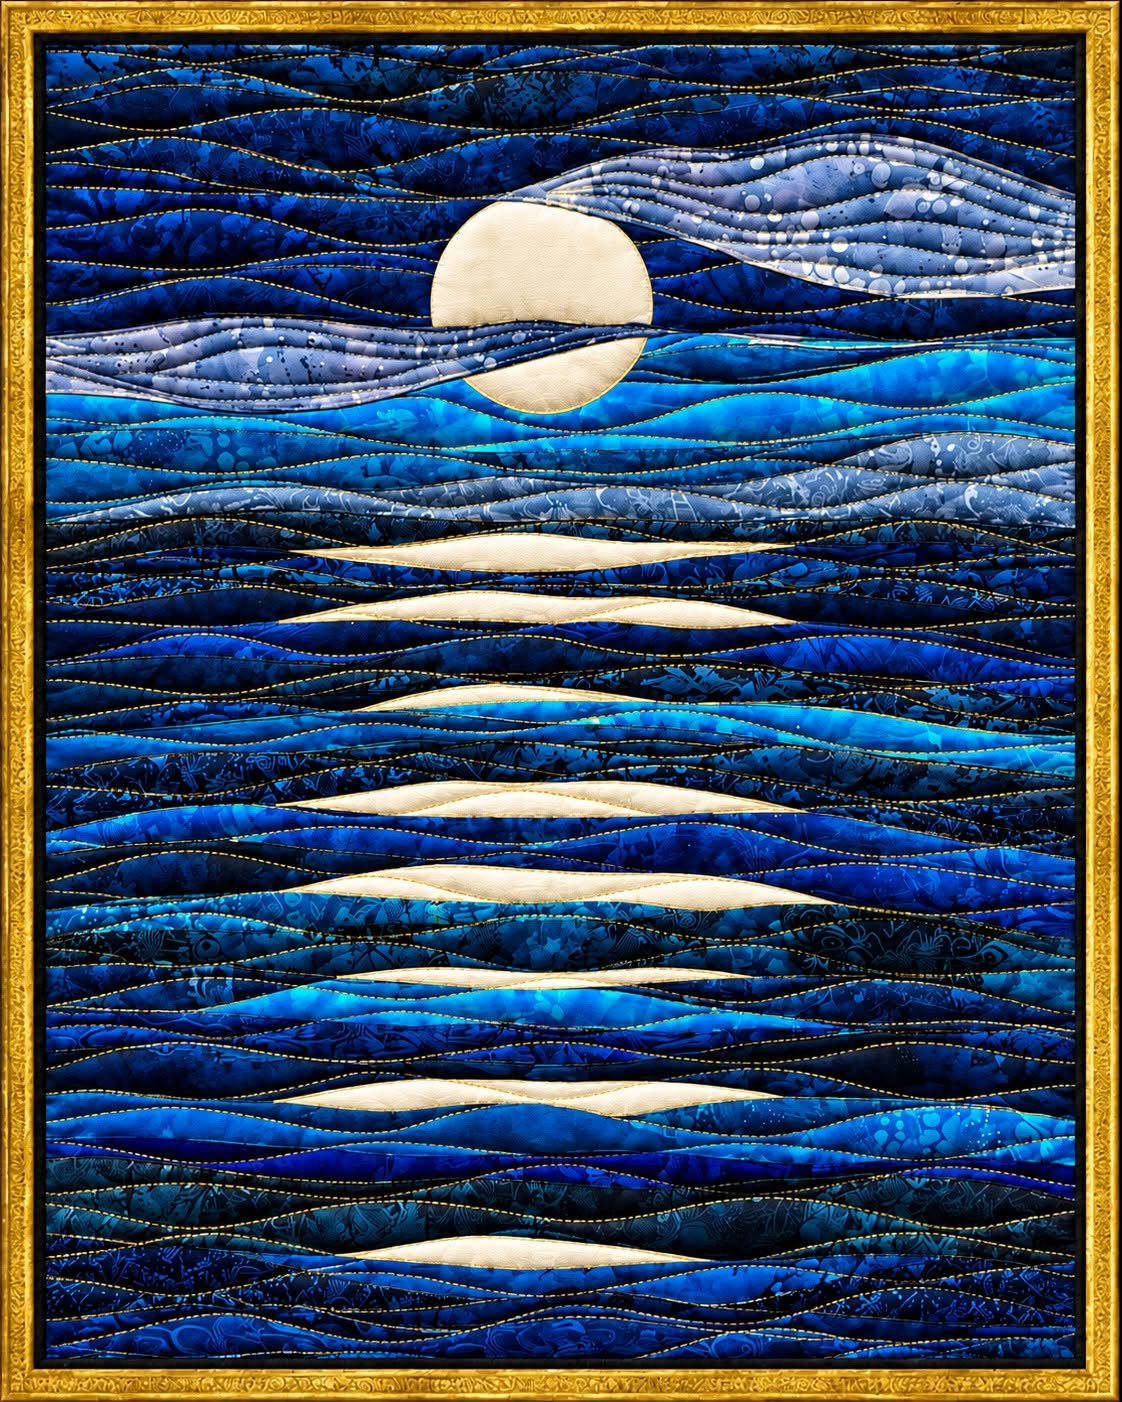
In this guide, the term Ocean Moon Bedspread Quilt Pattern refers to a quilt design constructed from layered, gently curved fabric pieces that represent the sea, the night sky, the moon, clouds, and reflected light. The pattern is based on color placement and organic lines rather than traditional square quilt blocks. Dark navy fabrics create depth, medium blues form the main waves, turquoise pieces add brightness, and white or cream fabric creates the moon and its reflection. Quilting lines following the direction of the waves help connect all these layers visually. The result is a landscape quilt that appears complex but can be adapted to different skill levels, dimensions, fabric collections, and sewing methods.
Before starting, decide whether the project will be used as a functional quilt, a lightweight cover, or a decorative panel. This choice will influence the finished measurements, batting thickness, backing fabric, and amount of quilting required. Beginners may prefer to create a smaller sample before attempting a full-size ocean quilt pattern, while experienced quilters can enlarge the composition to fit a twin, queen, or king-size bed. The most important part of the process is planning the color transitions carefully. When the darker fabrics are balanced with turquoise and pale reflections, the quilt develops a convincing sense of distance, moonlight, and water movement.
Materials and Planning for the Ocean Moon Quilt
Begin by choosing a range of blue fabrics rather than relying on only one or two shades. A successful Ocean Moon Bedspread Quilt Pattern usually includes navy, midnight blue, royal blue, cobalt, teal, turquoise, aqua, gray-blue, and pale blue. Batik fabrics are excellent for this project because their mottled surfaces resemble water and clouds. However, cotton prints, hand-dyed fabrics, solids, and fabric scraps can also be combined. Select fabrics with enough contrast to keep the individual wave shapes visible after the quilt is assembled.
DISCOVER MORE FREE PATTERNS HERE!
You will also need white, cream, ivory, or very pale yellow fabric for the moon and reflected light. Avoid using too many bright white pieces because a small amount of light fabric creates a stronger focal point. A soft ivory moon can appear warmer, while a white moon creates a cooler and more dramatic nighttime effect. Small pieces of lavender, silver-gray, or pale blue may be included in the clouds to create a subtle transition between the sky and the ocean.
Prepare basic quilting supplies, including a rotary cutter, cutting mat, acrylic ruler, sharp fabric scissors, sewing machine, neutral or blue thread, pins or fabric clips, and an iron. You will also need batting and backing fabric sized slightly larger than the quilt top. For the outer edge, prepare enough dark fabric to create a narrow inner frame and a wider binding. A dark border helps contain the movement of the waves and makes the lighter areas appear more luminous.
Create a full-size paper layout before cutting the important fabric pieces. Draw the moon, horizon, cloud shapes, and major wave lines using a pencil. The shapes do not need to be symmetrical. In fact, slightly irregular curves will make the moonlight ocean quilt appear more natural. Number each section and note the intended fabric color. This preparation reduces confusion when several similar blue pieces are placed on the work surface.
Determine the dimensions of the finished project and add seam allowances wherever the pieces will be joined traditionally. A quarter-inch seam allowance is commonly used for quilt piecing. When using raw-edge appliqué, additional seam allowance may not be necessary, although a small overlap between sections can prevent gaps. Label the top and bottom of every pattern piece because curved shapes can be difficult to identify after they have been separated.
Wash and press the fabrics before cutting if you normally prewash quilting cotton. Prewashing helps remove excess dye and reduces the risk of uneven shrinkage. Dark blue batiks may release color, so washing them separately is a sensible precaution. After drying, press each piece carefully without stretching it. Smooth, flat fabric makes it easier to cut the long curved strips needed for the Ocean Moon Bedspread Quilt Pattern.
Creating the Moon, Sky, Clouds, and Horizon
Start the quilt top with the sky section. Arrange the darkest fabrics near the upper edge and gradually introduce medium blues closer to the horizon. Cut long, shallow curves that overlap visually like bands of nighttime clouds. These pieces may be sewn with curved piecing, attached with appliqué, or placed on a foundation fabric. Keep the curves wide and gentle at first, as extremely narrow points can be difficult to sew neatly.
To use curved piecing, place two neighboring strips right sides together and align the cut edges gradually. Pin or clip the center first, then secure both ends and distribute the remaining fullness evenly. Sew slowly using a quarter-inch seam allowance. Clip the seam allowance carefully where necessary, press the seam toward the darker fabric, and check that the section remains flat. Slight distortion can usually be corrected with gentle pressing.
The moon is the main focal point of the Ocean Moon Bedspread Quilt Pattern. Cut a full circle from pale fabric using a paper template, a compass-drawn pattern, or a circular household object of the desired size. Position it above the horizon, slightly away from the exact center if you want a more dynamic composition. The horizon and waves may overlap the lower portion of the moon, making it look as though the moon is rising from the sea.
Attach the moon with turned-edge appliqué, fusible appliqué, or raw-edge stitching. For a clean turned edge, cut the fabric slightly larger than the template, fold the seam allowance around the paper shape, press it, and remove the template before stitching. Fusible web offers a faster alternative and keeps the circle stable. Stitch around the edge with a narrow zigzag, blanket stitch, or straight stitch, depending on the finish you prefer.
Create the cloud formations with pale blue, lavender, gray, and white fabrics. Place them behind or near the moon without covering the entire circle. Long horizontal clouds will strengthen the sense of distance. Their curves should be softer and broader than the waves below. Add one or two darker blue strips between the pale clouds so the sky does not become visually separated from the rest of the ocean landscape quilt.
Establish the horizon with a dark, nearly straight fabric band. It should not be perfectly level because a slight curve creates a more organic appearance. The horizon is an important visual resting point between the detailed sky and the layered water. Place a bright turquoise band directly below it to represent moonlit water. Step back and view the composition from a distance before securing the pieces, adjusting the contrast until the moon remains clearly visible.
Building the Layered Ocean Waves and Moonlight Reflections
The ocean section can be created from many long fabric strips with irregular, flowing edges. Begin near the horizon with narrow strips and gradually make the shapes larger toward the bottom of the quilt. This change in scale creates perspective. Distant waves appear smaller, while foreground waves look broader and more prominent. Alternate dark and medium blues to keep neighboring shapes from blending into one large area.
Cut each wave freehand or use reusable paper templates. A rotary cutter provides smooth curves, but scissors may offer greater control for narrow points. Avoid creating sharp corners because they can be difficult to stitch and may cause fabric puckering. Arrange several pieces on the design surface before sewing them. This makes it easier to evaluate the balance of dark and light fabrics across the Ocean Moon Bedspread Quilt Pattern.
Add turquoise and aqua fabrics in selected areas rather than spreading them evenly throughout the quilt. Concentrate some brighter colors near the horizon and repeat them in the middle and lower sections. This repetition guides the viewer’s eye from the moon down through the water. Turquoise pieces can also separate groups of dark waves, preventing the lower portion of the design from appearing too heavy.
The reflected moonlight should form an irregular vertical pathway. Cut several narrow white, cream, and pale blue shapes and place them between the waves. Make the reflections wider near the horizon and divide them into smaller fragments as they move toward the foreground. Do not arrange them in a perfectly straight column. Slight side-to-side movement will make the light appear as though it is being broken by the surface of the water.
Join the wave pieces gradually, working in manageable horizontal sections. If you are using appliqué, place the lowest pieces first and overlap the upper pieces on top. This creates a natural layered effect similar to overlapping waves. When using curved piecing, join neighboring strips in pairs, press them, and then combine the completed sections. Constantly check that the quilt top remains square and flat.
Continue building the ocean until the desired length is reached. Keep some areas quiet by using larger dark sections with fewer color changes. These resting spaces are essential because they allow the bright reflections to stand out. A successful blue ocean quilt design is not created by placing equal amounts of every color everywhere. Its depth comes from controlled contrast, repeated curves, and carefully positioned highlights.
Quilting, Binding, Finishing, and Displaying the Bedspread
Once the quilt top is complete, press it carefully from the reverse side. Trim loose threads and repair any areas where the fabric edges have not been secured. Place the backing fabric wrong side up on a clean surface, center the batting over it, and position the quilt top right side up. Smooth all three layers from the center outward to remove wrinkles. Baste them together with safety pins, temporary spray, or long hand stitches.
Choose quilting lines that support the direction of the design. Flowing horizontal stitching works especially well for the Ocean Moon Bedspread Quilt Pattern because it emphasizes the movement of the waves. The lines may be irregular and do not need to follow every seam precisely. Vary the spacing slightly to create a more natural texture. Dense quilting can produce a firm art-quilt finish, while wider spacing will keep a bedspread softer.
Quilt the sky with long, gently curved lines that resemble wind or thin clouds. Around the moon, use curved or circular stitching to define its shape. Inside the moon, add only a few lines so it remains smoother than the surrounding background. This difference in quilting density can make the moon appear slightly raised. Pale thread may be used over the moon, while blue thread blends more discreetly into the sky and water.
When quilting the ocean, follow the main curves from one side to the other. Echo quilting is a useful method: sew one line beside a wave edge, then add additional lines that repeat the same contour. Some lines can cross from one fabric into another to visually unite the design. Use free-motion quilting for a fluid result or a walking foot for greater control. Both techniques can produce an attractive wave quilt pattern.
Square the completed quilt by trimming the edges with a ruler and rotary cutter. Add an optional dark inner border before binding if the composition needs stronger definition. Prepare double-fold binding from navy or black cotton and attach it evenly around the quilt. Miter the corners, join the binding ends neatly, and finish the reverse side by hand or machine. A dark binding complements the nighttime palette and creates a clean frame.
Add a label to the back with the project name, maker’s name, date, and care instructions. A large quilt can be used as a bedspread, while a smaller version may be displayed with a hanging sleeve. To care for the finished piece, wash it gently in cool water and dry it flat or on a low setting, depending on the fabrics and batting used. Proper care will help preserve the rich colors and detailed stitching of the Ocean Moon Bedspread Quilt Pattern.
Frequently Asked Questions About the Ocean Moon Bedspread Quilt Pattern
What does the term Ocean Moon Bedspread Quilt Pattern mean?
The Ocean Moon Bedspread Quilt Pattern describes a textile pattern that combines an ocean landscape with a moonlit sky. It generally includes layered blue waves, a pale moon, clouds, and pieces of light fabric representing reflections. The word “bedspread” indicates that the project may be enlarged to cover a bed, although the same composition can also be used for a wall hanging.
Is this quilt suitable for beginners?
A simplified version is suitable for confident beginners. The easiest method is raw-edge or fusible appliqué because it avoids complex curved seams. Beginners can first create a small sample to practice cutting waves, arranging colors, attaching the moon, and quilting curved lines. Traditional curved piecing may require more patience and sewing experience.
How much fabric is required for a full-size ocean quilt?
The amount depends on the bed size, number of fabric colors, and width of the waves. A full-size bedspread requires considerably more material than a decorative panel. Draft the complete dimensions first and calculate the area of the quilt top, backing, batting, borders, and binding. Buying several smaller cuts of blue fabric often creates more variety than purchasing a large amount of one print.
What fabrics work best for ocean waves?
High-quality quilting cotton is the most practical choice. Batiks, hand-dyed fabrics, ombré cotton, subtle prints, and solids are especially effective. Fabrics with mottled or marbled patterns naturally resemble moving water. Avoid combining too many large prints because they can distract from the wave shapes and moonlight reflections.
Can the waves be made without sewing curved seams?
Yes. Fusible appliqué, raw-edge appliqué, and foundation appliqué are excellent alternatives. The curved strips can be arranged on a background fabric, fused or pinned in place, and secured with straight or decorative stitching. These methods make it easier to preserve long points and narrow reflections.
How can I enlarge the pattern for a queen-size bed?
Create a proportional grid over the original drawing and transfer each section to a larger grid. Another option is to enlarge the pattern in sections and join the paper pages. Maintain the relative size of the moon, clouds, and reflections so the composition remains balanced. You can also extend the lower ocean area with additional wave rows instead of enlarging every element.
What thread color should be used for quilting?
Navy, medium blue, gray-blue, and variegated blue thread blend well with the ocean. Pale gray or cream thread can be used on the moon and bright reflections. When one thread color must cross several fabrics, a medium blue or subtle variegated thread is usually the most forgiving option.
How do I prevent the curved pieces from puckering?
Use gentle curves, sew slowly, avoid stretching the bias edges, and press rather than dragging the iron across the fabric. When piecing curves, use several pins or clips and distribute fullness evenly. For appliqué, secure each section smoothly before stitching and start in the center of long pieces, working toward the ends.
Can fabric scraps be used for this project?
Yes. The Ocean Moon Bedspread Quilt Pattern is ideal for using blue, teal, gray, and white scraps. Sort the scraps by value, separating dark, medium, and light pieces. Join smaller scraps into longer units when necessary, or use them as short wave fragments. Repeated colors will help the design remain cohesive.
Should the moon be perfectly circular?
A precise circle creates a calm, polished appearance, but a slightly irregular moon can suit a more artistic style. A paper template or circular object will help produce a clean shape. The lower part may be covered by the horizon and waves, so the entire circle does not need to remain visible.
How can I make the moonlight reflections look realistic?
Use broken shapes instead of one continuous white strip. Vary their width, direction, and spacing. Mix white with cream, pale blue, and light gray, and surround the reflections with dark fabric. Strong contrast will make the moonlight shimmer without requiring complicated details.
Can this pattern be adapted to other colors?
Absolutely. Purple and indigo can create a dreamy night scene, while green and teal can produce a tropical effect. A sunset version may include orange, coral, red, and gold. Regardless of the palette, preserve a clear difference between the light source, reflected areas, and darker surrounding waves.
Conclusion
The Ocean Moon Bedspread Quilt Pattern transforms layers of blue fabric into a peaceful nighttime seascape filled with flowing waves, soft clouds, and glowing moonlight. The main steps include selecting a balanced fabric palette, drawing a full-size layout, constructing the sky, attaching the moon, layering the ocean waves, placing fragmented reflections, assembling the quilt sandwich, and adding directional quilting. Each stage contributes to the visual movement and depth of the finished composition.
EASILY FIND THE PDF FOR THIS PATTERN HERE!
This project can be created through curved piecing, fusible appliqué, or raw-edge appliqué, making it adaptable to different skill levels. Careful color placement is more important than achieving perfectly identical shapes. By combining dark blues, brighter turquoise accents, and small sections of pale fabric, you can create an expressive quilt that works as a bedspread, decorative textile, or wall display. Leave your sincere opinion about this project and share your suggestions for colors, quilting details, or creative variations you would enjoy adding to your own ocean moon design.