
Lisbon’s iconic tile designs are a timeless inspiration for various art forms, including quilting.
In this tutorial, you’ll learn how to create your very own Lisbon Tile Quilt, blending traditional quilting techniques with the intricate beauty of Portuguese tiles.
Whether you’re a beginner or an experienced quilter, this guide will walk you through the process step-by-step, ensuring your quilt turns out perfect.
What is a Lisbon Tile Quilt?
The Lisbon Tile Quilt pattern is inspired by the unique and colorful azulejos tiles found throughout Lisbon. These tiles, with their geometric patterns and rich history, offer an excellent source of design inspiration for quilters. By incorporating their intricate designs, you can create a quilt that combines artistry with practicality.
When creating a Lisbon Tile Quilt, it’s essential to select fabrics that reflect the patterns and colors commonly seen in these tiles. Blues, whites, and yellows are typical hues used in the traditional Portuguese tiles, which will lend authenticity to your quilt pattern. By understanding the origin and design principles behind Lisbon’s tiles, you’ll appreciate the artistic depth of this quilting pattern.
From selecting the right quilt fabric to cutting precise shapes, each step in creating a Lisbon Tile Quilt requires attention to detail. In this tutorial, we will cover everything from fabric selection, cutting the fabric pieces, assembling the quilt blocks, and finally piecing it all together.
Choosing Fabrics for Your Quilt
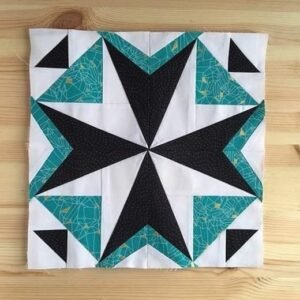
Choosing the right fabric for your Lisbon Tile Quilt is crucial to achieving the tile-like effect. Start by selecting fabrics in bold colors such as deep blues, bright yellows, and crisp whites. These colors will help replicate the look of Lisbon’s traditional tiles. To give your quilt a more modern feel, you can experiment with other shades like teal, gold, and grey.
It’s important to choose high-quality quilting cotton for your fabric. This type of fabric is durable and will hold up well after repeated washings. When purchasing fabric, ensure that it’s pre-washed and pressed before starting to cut, as this will prevent shrinking later on. You will need about 4-5 yards of fabric depending on the size of the quilt you plan to make.
For this quilt pattern, solid fabrics work best as they allow the intricate tile patterns to stand out. However, if you prefer a more eclectic design, you can mix in patterned fabrics for added texture and interest. Make sure that all your fabrics coordinate to create a cohesive design.
Cutting the Fabric: Precision is Key
Now that you’ve selected your fabric, it’s time to start cutting. For the Lisbon Tile Quilt pattern, you will need to cut the following pieces from your chosen fabrics:
- Cut (16) 6.5-inch squares for the tile center.
- Cut (64) 3.5-inch squares for the tile corners.
- Cut (32) 3.5-inch x 6.5-inch rectangles for the borders of the tiles.
- Cut (128) 2.5-inch squares for the connecting pieces between tiles.
Use a rotary cutter and cutting mat to ensure that your fabric pieces are precise. Accurate cutting is essential for achieving clean lines and symmetry in your quilt patterns. Measure twice before cutting to avoid any mistakes, and always follow the grain of the fabric.
Once you have all your pieces cut, it’s helpful to organize them by size and color. This will make the assembly process smoother and more efficient. Be sure to label each pile so that you can easily grab the right piece as you move through the assembly process.
Assembling the Quilt Blocks
Now comes the fun part – assembling your Lisbon Tile Quilt blocks. Start by creating the center of the tile. Take one of your 6.5-inch squares and sew a 3.5-inch square to each corner, using a quarter-inch seam allowance. This creates the main square that represents the tile itself.
Next, take two of your 3.5-inch x 6.5-inch rectangles and sew them to the sides of your square block. Then, sew two more rectangles to the top and bottom of the block. This will create a border around the main tile pattern. Repeat this process until you have assembled all of your quilt blocks.
Once all of your blocks are assembled, you’ll start joining them together with the 2.5-inch connecting squares. These smaller squares will be placed between each tile block, helping to create a cohesive, flowing design that mimics the look of a tiled surface.
Pressing and Trimming the Blocks
As you complete each block, it’s important to press the seams open or to the side, depending on your preference. Pressing helps the blocks lie flat, making it easier to piece them together later on. Use a hot iron and press each seam gently without distorting the fabric.
After pressing, check each block for accuracy. The finished blocks should measure 12.5 inches square. If any blocks are slightly off, use a rotary cutter to trim them down to the correct size. Taking the time to ensure that all blocks are uniform will make the final assembly much smoother and result in a more polished quilt.
Remember, precise trimming and pressing are crucial for achieving clean, crisp lines in your Lisbon Tile Quilt pattern. Skipping this step can lead to a quilt that looks uneven or distorted.
Joining the Quilt Top
With all your blocks assembled, it’s time to join the quilt top. Lay out your blocks on a large surface to arrange them in a pattern that you find pleasing. Once you are happy with the layout, begin sewing the blocks together in rows, using the 2.5-inch connecting squares to join each block.
After sewing the blocks into rows, sew the rows together to form the complete quilt top. Be sure to press the seams between each row so that your quilt top lies flat. This will make it easier when it comes time to add the quilt backing and batting.
Take care to match up the seams between blocks for a seamless look. Pinning the blocks together before sewing can help keep everything aligned and prevent the pieces from shifting.
Adding the Batting and Backing
Once the quilt top is complete, it’s time to add the batting and backing. Choose a backing fabric that complements the colors of your quilt top. Lay the backing fabric flat, then place the batting on top, followed by the quilt top. Make sure everything is smooth and wrinkle-free before pinning the layers together.
For a Lisbon Tile Quilt, cotton batting works best as it provides the right amount of warmth without making the quilt too bulky. Once the layers are pinned together, you’re ready to start quilting the layers. You can quilt by hand or use a sewing machine, depending on your preference and skill level.
Quilting in straight lines or creating geometric patterns will enhance the tile design. You can also add free-motion quilting to create more texture and depth, bringing out the intricate patterns inspired by Lisbon’s tiles.
Binding and Finishing the Quilt
The final step in your Lisbon Tile Quilt is adding the binding. Cut strips of fabric measuring 2.5 inches wide for the binding. Sew the strips together end to end to create one long strip. Fold the strip in half lengthwise, wrong sides together, and press.
Attach the binding to the edge of your quilt, sewing it onto the front of the quilt first. Then, fold the binding over the raw edges of the quilt and hand-sew it to the back, using small, invisible stitches. This will give your quilt a clean, finished edge.
Once the binding is complete, give your Lisbon Tile Quilt one final press to smooth out any wrinkles. Your quilt is now ready to display, use, or give as a beautiful, handmade gift.
A Timeless Quilt Pattern Inspired by History
Creating a Lisbon Tile Quilt is a rewarding project that blends tradition with creativity. The intricate patterns found in Lisbon’s azulejos tiles offer endless possibilities for quilt design, and by following this step-by-step tutorial, you can create a quilt that is both beautiful and functional. Whether you’re a seasoned quilter or just starting, this pattern provides the perfect opportunity to explore new techniques and design concepts.
So gather your fabrics, fire up your sewing machine, and let the timeless beauty of Lisbon’s tiles inspire your next quilt project. Happy quilting!