
 What Is a Hunter Star Quilt Block?
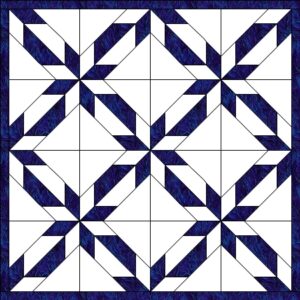
The Hunter Star quilt block is a classic pattern that has been popular in the quilting world for over a century. Its complex design, featuring stars and diamonds, makes it a standout choice for both beginner and experienced quilters. While it may appear intricate, with careful planning and precision, this quilt block can be easily mastered.
One of the reasons quilters love the Hunter Star quilt block is its versatility. Depending on the color and fabric choices, this pattern can create a variety of visual effects. Whether you’re going for a modern look or a more traditional aesthetic, the Hunter Star fits the bill.
This block can be used on its own to create a full quilt, or it can be combined with other quilt patterns to make a unique design. Its adaptability is one of the reasons it remains a beloved pattern in the quilting community.
Materials Needed for a Hunter Star Quilt Block
Before diving into the steps for creating a Hunter Star quilt block, let’s take a look at the materials you’ll need. Like most quilt patterns, the success of your block will depend on the quality of your materials and tools.
You’ll need two contrasting fabrics for this quilt block. The contrast is key in making the star pattern stand out. A light and dark fabric combination works well, but you can experiment with various color schemes based on your overall quilt design.
Additionally, make sure you have a rotary cutter, quilting ruler, cutting mat, and sewing machine handy. These tools will ensure precision when cutting and piecing your quilt block together. Don’t forget to also have an iron on hand for pressing your seams as you sew.
Cutting Fabric for the Hunter Star Block
The first step in creating your Hunter Star quilt block is cutting your fabric. Precision is crucial here, as any deviation in size can lead to misaligned seams and a distorted pattern. For this quilt block, you’ll be cutting squares and triangles from your two fabric choices.
Start by cutting two 6.5-inch squares from each fabric (light and dark). These squares will be used to form the center of your Hunter Star block. Next, cut eight 3.5-inch squares from each fabric. These smaller squares will be turned into half-square triangles later in the process.
After cutting the squares, you’ll need to cut triangles. Take the 6.5-inch squares and cut them in half diagonally, forming triangles. Then, cut the 3.5-inch squares in half diagonally as well. You should now have a set of triangles ready for the next step.
Assembling the Hunter Star Block
Now that your fabric pieces are cut, it’s time to start assembling your quilt block. Begin by pairing one light and one dark triangle from your larger pieces. Sew these together along the diagonal edge, using a ¼-inch seam allowance. Press the seam towards the darker fabric to create a smooth finish.
Next, take the smaller triangles and arrange them to form half-square triangle units. Pair one light and one dark triangle and sew along the diagonal edge, again using a ¼-inch seam. Press the seams and trim any excess fabric to square the unit to 3 inches. You’ll need four of these half-square triangle units for one Hunter Star block.
Once you have your triangles and half-square triangles sewn and pressed, it’s time to piece them together. Begin by arranging the triangles and half-square triangle units in a star pattern. The larger triangles will form the star points, while the half-square triangles will complete the design.
Sewing the Quilt Block Together
With all the units arranged, it’s time to sew your Hunter Star quilt block together. Start by sewing the pieces row by row. Ensure that your seams are aligned, as this will help the star points meet neatly in the center. Use pins if necessary to hold the pieces in place as you sew.
After sewing the rows together, press the seams. Pressing is an essential step in quilting, as it helps your quilt block lay flat and ensures crisp, sharp lines in the final design. Use an iron to press the seams towards the darker fabric to reduce bulk.
Once the rows are sewn and pressed, sew the rows together to complete the block. At this point, you should have a completed Hunter Star quilt block that measures 12.5 inches square. If needed, you can trim the edges to ensure the block is perfectly square before moving on to your next block or quilt project.
THE BEST QUILT PATTERNS
Adding Hunter Star Blocks to a Quilt
Now that you’ve mastered the process of making a Hunter Star quilt block, it’s time to think about how to incorporate it into a full quilt. One of the great things about this quilt block is its versatility. You can create an entire quilt from just Hunter Star blocks, or you can mix and match with other quilt patterns to create a unique design.
For a cohesive look, consider using the same color palette throughout your quilt. Alternatively, you can experiment with different fabric choices for each block, creating a more modern, scrappy look. The choice is yours, and the possibilities are endless.
Once you’ve decided on the layout, sew your blocks together row by row, making sure to press the seams as you go. Add a border if desired, and then your quilt top is ready to be quilted and finished.
Quilting and Finishing Your Hunter Star Quilt
Once you’ve completed your quilt top, it’s time to quilt and finish your project. Quilting can be done in a variety of ways, depending on the look you’re going for. Some quilters prefer simple straight-line quilting to let the Hunter Star pattern stand out, while others opt for more intricate quilting designs.
Before you begin quilting, make sure to layer your quilt top with batting and backing fabric. Baste the layers together using safety pins or quilting spray to ensure that they stay in place while you quilt. Then, using your sewing machine or a longarm quilting machine, quilt as desired.
After quilting, trim any excess batting and backing fabric, and then bind the edges of your quilt. Your Hunter Star quilt is now complete, ready to be used and admired!
Tips for Success with the Hunter Star Quilt Block
While the Hunter Star quilt block can be challenging for beginners, a few tips can help ensure success. First, always press your seams carefully and frequently. Pressing is key to achieving sharp lines and accurate piecing.
Another important tip is to take your time with fabric cutting. Using a rotary cutter and quilting ruler will help ensure that your cuts are precise. Any errors in cutting can lead to misaligned seams, so accuracy is critical.
Finally, practice patience. The Hunter Star quilt block is intricate, but with practice, you’ll become more comfortable with the process. Start with a few blocks and build your confidence before tackling a full quilt.
By following these tips, you’ll soon be creating beautiful Hunter Star quilt blocks that are perfect for any quilt project.