
The Friendship Star Quilt Block Tutorial – Pattern is one of the most charming and meaningful designs in the quilting world. Whether you’re a beginner taking your first steps into patchwork or an experienced quilter looking for a nostalgic and symbolic block, this pattern offers both simplicity and emotional warmth. The Friendship Star design has been loved for generations because it represents unity, kindness, and the beauty of shared creativity. In this tutorial, you’ll discover how to make this classic block while also learning tips that help elevate your quilting skills.
Crafting a quilt block is more than sewing pieces of fabric together — it’s preserving tradition, expressing creativity, and sometimes even telling a story. The Friendship Star Quilt Block Tutorial – Pattern allows you to create a block that holds a special message, making it ideal for gifts, memory quilts, and community quilting projects. Its clean lines, rotating star shape, and versatile layout make it easy to personalize with fabric choices and color combinations. This pattern becomes even more beautiful when you understand its symbolic history and incorporate your own meaning into the project.
In this article, we will guide you step by step through the construction of the Friendship Star block, from choosing fabrics to assembling the pieces with precision. You’ll also find tips for improving your accuracy, customizing your design, and incorporating this block into larger quilt layouts. The Friendship Star Quilt Block Tutorial – Pattern is easy to follow and helps you achieve a polished result, even if you’re still developing your piecing skills. By the end, you’ll feel inspired to create a full quilt or multiple projects using this timeless star motif.
Understanding the Friendship Star Design
The first step in mastering the Friendship Star Quilt Block Tutorial – Pattern is understanding the basic components that form this classic design. The block consists of a simple nine-patch layout, which makes it accessible to quilters of all skill levels. The central square and its outer corners frame the star points, creating movement and visual interest without overwhelming complexity. This simplicity is one of the reasons the pattern remains a favorite among quilting communities worldwide.
Traditionally, the Friendship Star uses contrasting fabric colors to emphasize the spinning motion of the star. Choosing the right color palette can enhance the pattern’s emotional message. Many quilters select soft, warm hues for a heartfelt touch, while others opt for bold, modern tones that give the star a contemporary twist. The Friendship Star Quilt Block Tutorial – Pattern works beautifully with either approach, giving you creative freedom to match your quilting vision.
One essential part of this design is the use of half-square triangles (HSTs). These triangles form the star points and give the block its dynamic shape. Even if you are new to sewing triangles, this tutorial will guide you through making precise HSTs with clean, sharp edges. Learning to master this technique opens the door to many other quilt blocks in future projects.
Another key element of the Friendship Star is its versatility. The block can be used alone, repeated for a full quilt top, or combined with other blocks to create beautiful patchwork layouts. Because of its simplicity, it also works well for small projects like mug rugs, table runners, and decorative wall hangings. With the Friendship Star Quilt Block Tutorial – Pattern, you can explore multiple creative possibilities from one classic block.
The block’s timeless design is deeply rooted in quilting history. Many believe that Friendship Star quilts were gifted to celebrate important moments such as weddings, new homes, or community gatherings. Some also say these quilts were used symbolically to honor bonds and togetherness. Using this pattern today carries those same heartfelt meanings forward.
Finally, this tutorial helps you understand not only how to sew the block but how to personalize it. Adding embroidery, variations in value contrast, or slight modifications to the star shape can make each block uniquely yours. The Friendship Star Quilt Block Tutorial – Pattern gives you the structure while encouraging your creativity to shine through.
Step-by-Step Guide to Making the Block
The Friendship Star Quilt Block Tutorial – Pattern begins with gathering the right materials. You will need two contrasting fabrics, a cutting tool, a quilting ruler, and a sewing machine or needle if you prefer hand-piecing. The contrast between fabrics is important because it enhances the visibility of the star shape. Soft backgrounds with bold star colors often produce the most striking results.
Start by cutting your fabric into squares. The standard block size uses nine equal squares arranged in a three-by-three grid. The center square and corner squares will be in your background fabric, while the star points are made using HSTs. Precision in cutting ensures your block fits together neatly and maintains its shape. The Friendship Star Quilt Block Tutorial – Pattern emphasizes accuracy from the beginning to avoid mistakes later.
Next, create your half-square triangles. Place two fabric squares right sides together, mark a diagonal line, and sew a quarter-inch seam along both sides of the line. Cut along the marked diagonal and press open your triangles. This step forms the foundational star points. Taking time to trim the HSTs to accurate measurements helps your finished block lay flat.
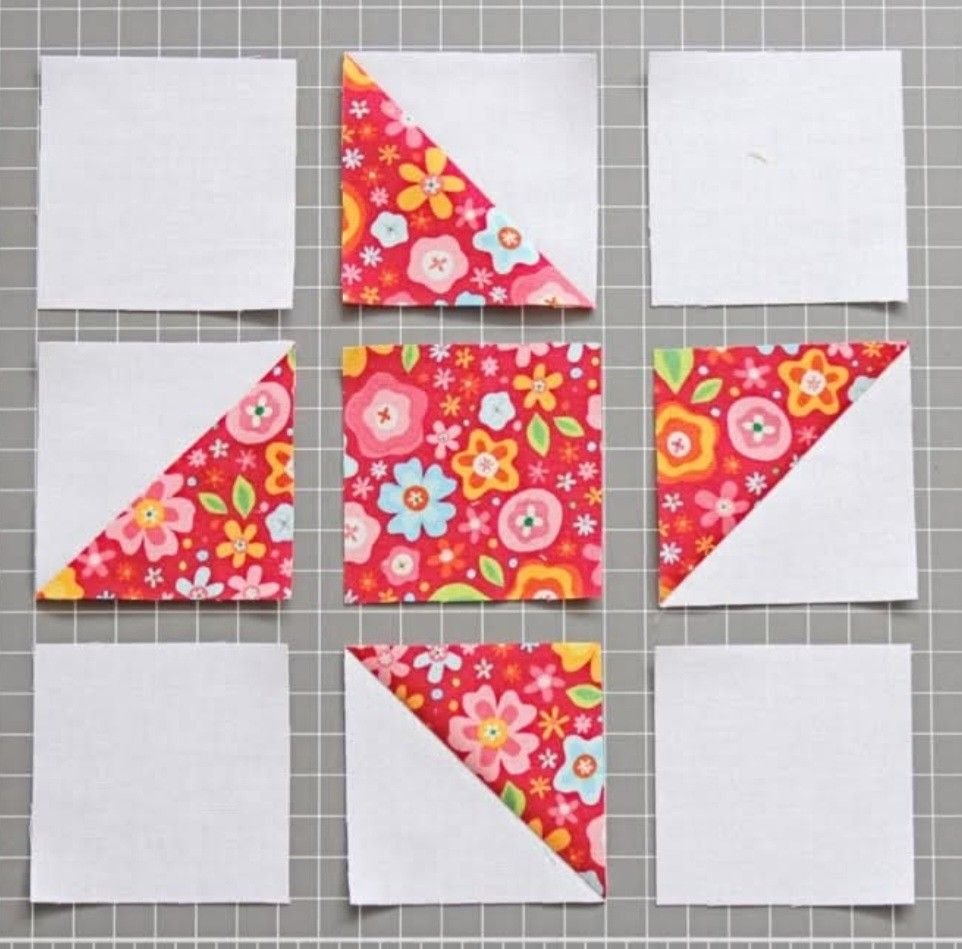
After preparing the HSTs, lay out all nine pieces in their correct positions. The star points should form a rotating pattern around the center square. This visual arrangement allows you to check color balance, orientation, and symmetry before sewing. The Friendship Star Quilt Block Tutorial – Pattern highlights the importance of layout to prevent accidentally flipping a triangle and altering the star shape.
Begin sewing the block together row by row. Use consistent quarter-inch seams for each join. Press your seams carefully — either toward one side or open, depending on your preference — to reduce bulk and help the pieces align smoothly. Proper pressing technique improves your block’s precision, making it easier to assemble into larger quilts later.
Finally, sew the rows together to complete your Friendship Star block. Give the entire block one last press for a crisp finish. The result is a clean, charming quilt block that can be used immediately or stored for future projects. The Friendship Star Quilt Block Tutorial – Pattern ensures that by following these steps, even beginners can achieve a beautifully accurate block.
Creative Variations and Design Ideas
The Friendship Star Quilt Block Tutorial – Pattern opens the door to countless creative variations. One popular option is experimenting with color gradients. Using fabrics that gradually shift from light to dark can create a subtle, luminous effect within the star. This technique adds depth and movement while keeping the traditional block structure intact.
Another creative idea is to alter the size of your block. Enlarging the Friendship Star makes it ideal for quilt centers, wall hangings, or statement pillows. Shrinking the block, on the other hand, works beautifully for miniature quilts or detailed borders. The flexibility of the pattern lets you adapt it to any scale without changing its charm.
You can also add texture by incorporating different fabric types. Linen, batiks, and quilting cottons each bring their own personality to the block. Mixing textures makes your quilt visually interesting and adds a tactile experience. The Friendship Star Quilt Block Tutorial – Pattern supports all fabric choices as long as they are stable and easy to work with.
Fussy cutting the center square is another fun option. Choosing a fabric print with a special motif — such as flowers, animals, or meaningful symbols — gives the block a personalized touch. This technique is especially effective when creating quilts as gifts, making each block a little story in itself.
Advanced quilters may enjoy creating a double Friendship Star by adding an extra round of star points. This variation adds complexity and makes the star look more dramatic and intricate. It’s a wonderful way to elevate the original Friendship Star Quilt Block Tutorial – Pattern while keeping its foundational structure.
Finally, consider using the block in themed quilts. Seasonal colors, holiday palettes, or coordinated hues for special occasions make this block visually adaptable. Whether it’s for a baby quilt, a memory quilt, or a friendship-themed project, the pattern’s versatility shines in every application.
Using the Block in Larger Quilt Projects
The Friendship Star Quilt Block Tutorial – Pattern is perfect for many quilt layouts. When repeated, the block forms beautiful spinning patterns across an entire quilt top. The star points can appear to dance when the blocks are placed side by side, creating a sense of movement and harmony.
One popular layout option is alternating Friendship Star blocks with solid or patterned squares. This method gives the quilt breathing room and highlights each star individually. It’s ideal for showcasing bold or intricate fabrics that might be too overwhelming if used in every block.
Sashing is another technique that works well with this design. Adding borders between each block creates clean separation and makes each star look framed. This method enhances clarity and structure while keeping the quilt visually organized. The Friendship Star Quilt Block Tutorial – Pattern adapts easily to sashed or unsashed layouts.
You can also use the block as an accent within a sampler quilt. Sampler quilts include many different block types, and the Friendship Star fits beautifully among more complex designs. Its simplicity balances detailed blocks and creates a cohesive, visually pleasing quilt.
For quilters who enjoy storytelling through fabric, combining Friendship Star blocks with memory prints, embroidered pieces, or appliqué elements can create a meaningful narrative quilt. The block’s symbolic value enhances quilts made for milestones such as weddings, graduations, or anniversaries.
Even small projects benefit from this pattern. Table runners, tote bags, mug rugs, and decorative pillows can all be made using the Friendship Star Quilt Block Tutorial – Pattern. Its versatility makes it a foundational design every quilter should master and keep in their creative toolkit.
FAQ – Friendship Star Quilt Block Tutorial – Pattern
1. Is the Friendship Star block good for beginners?
Yes. The Friendship Star Quilt Block Tutorial – Pattern is simple and uses basic techniques, making it perfect for beginners.
2. What size should I cut the fabric squares?
Standard blocks use equal-sized squares, usually between 3 and 5 inches, depending on the final block size you want.
3. Do I need special tools to make this block?
No. A rotary cutter, ruler, and standard sewing machine are sufficient, though pressing tools help with accuracy.
4. How do I keep my half-square triangles accurate?
Trimming your HSTs to the correct measurement is the key to precise and clean block assembly.
5. Can I use scrap fabrics for this pattern?
Absolutely. The Friendship Star Quilt Block Tutorial – Pattern is scrap-friendly and great for using leftover pieces.
6. What projects can I make with this block?
You can create quilts, pillows, wall hangings, tote bags, table runners, and more.
Conclusion
The Friendship Star Quilt Block Tutorial – Pattern is a timeless and meaningful project that combines tradition, creativity, and heartfelt symbolism. Whether you’re quilting for yourself or crafting a gift for someone special, this design offers both simplicity and beauty. By learning how to cut, sew, assemble, and personalize your block, you gain skills that can be applied to countless future quilting projects.
I hope this guide has inspired you to try this classic block and explore your creativity. Please share your honest opinion about the tutorial and feel free to leave suggestions — your feedback helps enrich the quilting community and encourages more beautiful creations. Happy quilting! 🧵✨