
The folded corners quilt block is a simple yet versatile block that can elevate any quilt design. It’s a great starting point for beginners but offers endless possibilities for experienced quilters as well.
In this tutorial, we’ll walk through everything you need to know about creating a folded corners quilt block free pattern, from fabric cutting to step-by-step sewing instructions.
In addition, we’ll incorporate essential SEO-friendly keywords such as “quilt” and “quilt patterns” to ensure this article reaches those interested in exploring the creative world of quilting.
What is a Folded Corners Quilt Block?
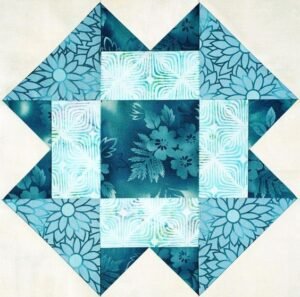
A folded corners quilt block is a traditional quilting block with a distinctive geometric design. The magic of this pattern lies in its simplicity—folded triangles on the corners of square blocks create dynamic lines that give quilts a structured and visually interesting appearance. It’s perfect for adding dimension to your quilt patterns.
Quilters love this block because it’s easy to make and adaptable. Whether you’re using solids, prints, or even scraps, the folded corners quilt block is a versatile choice for any quilt project. This block also allows you to practice sewing perfect corners, an essential skill for quilters.
In many quilt patterns, folded corners are used as accent blocks or as the foundation for larger designs. Whether you’re making a wall hanging or a full-sized quilt, this block will help you add clean lines and striking patterns to your quilt.
Materials Needed for the Folded Corners Quilt Block
Before diving into the step-by-step process of creating this block, it’s essential to gather all the necessary materials. For this quilt pattern, you’ll need fabric, a rotary cutter, a ruler, and a sewing machine, among other tools.
- Fabric: Choose high-quality quilting cotton fabric. You’ll need two contrasting fabrics—one for the main block and one for the folded corners. This will help the corners stand out and create a clear, crisp design. You can opt for solid colors or mix and match patterned fabrics.
- Rotary Cutter and Ruler: Accurate cutting is crucial for quilting success. A rotary cutter with a sharp blade will allow you to cut precise fabric pieces for your blocks. Use a clear quilting ruler to ensure your cuts are accurate.
- Sewing Machine: While you can hand-sew quilt blocks, using a sewing machine speeds up the process and ensures consistency in your stitches. A quarter-inch presser foot will help you sew with precise seam allowances.
Fabric Cutting Instructions
To create the folded corners quilt block, follow these fabric cutting instructions. Accurate cutting is essential to ensure all pieces fit together perfectly. For a standard 12-inch folded corners block, you will need the following cuts:

- Main Square (Background Fabric): Cut one square measuring 6.5 inches by 6.5 inches. This will be the base of your quilt block where the folded corners will be attached.
- Corner Triangles (Contrasting Fabric): Cut two squares measuring 3.5 inches by 3.5 inches. These will be used to create the folded corners on your main block.
- Optional Accent Pieces: If you want to add more complexity to your design, you can also cut smaller squares (2.5 inches) from a third fabric to create additional folded corner designs on your block.
Ensure you press and starch your fabric before cutting to reduce stretching and fraying.
Step-by-Step Instructions for Sewing the Folded Corners Quilt Block
Step 1: Aligning the Corner Squares
Take your 3.5-inch corner squares and align them on the corners of your 6.5-inch background square. Place the squares on the top right and bottom left corners of the larger square. The right sides of the fabric should be facing each other.
Using a fabric pen or pencil, draw a diagonal line from one corner of the smaller square to the opposite corner. This will serve as your sewing guide. Make sure the diagonal line is straight and passes through the center of the corner square.
Step 2: Sew Along the Diagonal Line
With your sewing machine set up, sew directly on the line that you drew on the smaller squares. This stitching will secure the folded corners to the background square. Be sure to sew carefully to maintain a straight seam.
After sewing, cut off the excess fabric by trimming a quarter-inch away from the seam. Use your rotary cutter and ruler to make precise cuts. This will reduce bulk in the corners and ensure a flat finish when you press the block.
Step 3: Press and Fold
After trimming the excess fabric, press the seam towards the corners. This step is crucial to create a crisp, professional-looking quilt block. Fold the sewn triangles open so they now form the folded corners of your quilt block.
Use an iron to press the folded triangles flat. Be sure not to stretch the fabric as you press. If desired, you can add a small amount of starch to keep the block crisp and ensure your quilt pattern stays sharp.
Variations of the Folded Corners Quilt Block
One of the best things about the folded corners quilt block is its flexibility. Once you’ve mastered the basic design, you can play around with different fabric choices, layouts, and block sizes to create unique quilt patterns. Here are a few ideas to inspire your next project:
- Scrappy Folded Corners: Instead of using two solid fabrics, try making each corner out of different fabric scraps. This is a great way to use up leftover material and add visual interest to your quilt.
- Multi-Colored Folded Corners: Experiment with adding more than two colors to your folded corners quilt block. For example, you can layer smaller corner triangles on top of larger ones to create a complex, multi-dimensional pattern.
- Reverse Folded Corners: For a fun twist, reverse the placement of your fabrics so that the main square is a bold pattern and the corners are a neutral or solid fabric. This creates an inverted effect that adds a modern touch to traditional quilt patterns.
How to Use Folded Corners in Quilt Projects
Now that you’ve learned how to create a folded corners quilt block, you may be wondering how to incorporate it into your larger quilt designs. There are countless ways to use folded corners to elevate your quilt patterns.
Folded corners blocks can be used as standalone blocks in a quilt, arranged in rows or clusters for a more cohesive design. You can also use them as accent blocks within a more complex quilt pattern. The clean lines of folded corners work well in both traditional and modern quilt designs.
Another popular option is to use folded corners as border blocks. By adding these blocks around the edge of your quilt, you can frame your central design and create a balanced, eye-catching quilt pattern. The possibilities are truly endless.

Tips for Quilting Success
While creating a folded corners quilt block is relatively simple, there are a few tips that can help ensure success with your quilt patterns.
- Measure Twice, Cut Once: Accurate fabric cutting is the foundation of a well-made quilt block. Always double-check your measurements before cutting to avoid mistakes.
- Use a ¼-inch Seam Allowance: Consistent seam allowances are crucial when piecing together quilt blocks. A quarter-inch presser foot can help ensure uniform seams throughout your project.
- Press, Don’t Iron: When working with quilt patterns, press your seams carefully rather than ironing them. Pressing ensures the fabric lies flat without distorting the shape of your blocks.
The folded corners quilt block is a fantastic choice for quilters of all skill levels. It’s simple enough for beginners, but with a few variations, it can become the star of your next quilt pattern. Whether you’re making a full quilt or using these blocks as accents, folded corners add structure and beauty to any quilt.
By following the steps outlined above and incorporating the SEO keywords “quilt” and “quilt patterns,” this guide will help you create a beautiful folded corners quilt block and inspire your next project. Happy quilting!