
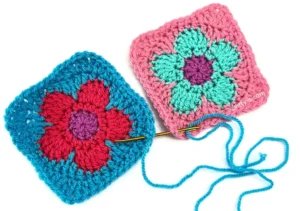
Crochet is a timeless art that continues to captivate crafters worldwide. One of the most delightful patterns to create is the Flower Power Square, a vibrant and charming crochet square that adds a touch of nature to any project. Whether you’re making blankets, pillows, or bags, this pattern offers versatility and beauty.
This tutorial will guide you through every step, ensuring that even beginners can confidently complete their Flower Power Square. By following the detailed instructions below, you’ll learn how to combine various crochet stitches to achieve a floral motif at the center of a perfectly shaped square. With crochet patterns like this one, you can experiment with different colors and textures to make each square unique.
With a bit of patience and creativity, the Flower Power Square will become a staple in your crochet repertoire. This guide will cover the materials needed, the fundamental stitches used, and a step-by-step tutorial to help you craft this beautiful crochet piece. Let’s get started!
Materials Needed
Before you begin, gather all the necessary materials to make the process smooth and enjoyable. Having the right supplies ensures your crochet work turns out just as envisioned.
- Yarn: Choose a lightweight or medium-weight yarn in three colors (one for the flower center, one for the petals, and one for the square background).
- Hook: A 4.0 mm (G/6) crochet hook works well with most medium-weight yarns.
- Scissors: A good pair of sharp scissors will help with trimming ends.
- Tapestry Needle: Needed for weaving in loose ends to give your work a clean finish.
Having these materials ready before you start helps prevent interruptions while crocheting. The right yarn choice will also impact the final look, so consider using cotton or acrylic yarn for durability and a neat stitch definition.
Crochet Stitches Used
Understanding the stitches used in this pattern is crucial for achieving the desired design. This pattern incorporates several basic and decorative stitches.
- Magic Ring: A technique to start crochet in the round with a tight center.
- Chain (ch): The foundation of most crochet patterns, used to create spaces and height.
- Slip Stitch (sl st): A joining stitch that connects stitches without adding height.
- Single Crochet (sc): A tight and compact stitch used for stability.
- Double Crochet (dc): A taller stitch that gives the petals their shape.
- Treble Crochet (tr): A high stitch used to enhance the floral effect.
Practicing these stitches beforehand will help you crochet the Flower Power Square smoothly. Beginners can take their time mastering each stitch before proceeding to the full pattern.
Step-by-Step Crochet Tutorial
Follow these step-by-step instructions to complete your Flower Power Square. Each step builds on the previous one, so be sure to complete them in order.
Step 1: Creating the Flower Center
- Make a magic ring, then chain 2 (counts as first dc).
- Crochet 11 dc into the ring, making a total of 12 dc.
- Pull the ring tight and join with a sl st to the first dc. Fasten off.
This forms the foundation of your flower, providing a solid and well-shaped center. Ensure the stitches are even and snugly packed together to maintain the circular form.
Step 2: Forming the Petals
- Attach a new color yarn and ch 3 (counts as first tr).
- In the same stitch, work 3 tr, then ch 2 and sl st in the next stitch.
- Repeat around, making 6 petals in total. Fasten off.
These petals create the floral design, adding a delicate yet defined look. Adjust your tension to ensure that the petals are full and uniform in size.
Step 3: Transitioning to the Square Shape
- Attach the background color to the top of any petal, then ch 3 (counts as dc).
- Work 1 dc in the next two stitches, then (2 dc, ch 2, 2 dc) in the next stitch for a corner.
- Continue this pattern around, making four corners in total. Join with a sl st.
This step turns the floral motif into a structured square, setting the stage for easy joining with other squares in a blanket or project.
Step 4: Adding the Final Border
- Chain 1, then sc in each stitch around, making (sc, ch 2, sc) at each corner.
- Continue until the square reaches your desired size, joining with a sl st at the end.
- Fasten off and weave in all loose ends with a tapestry needle.
This border provides stability and a polished edge, ensuring the square maintains its shape. You can add additional border rounds if you want a larger square.
Tips for Customization
One of the joys of crochet patterns is the ability to personalize them to your taste. Here are some customization ideas:
- Color Variations: Experiment with different color combinations to match your project’s theme.
- Yarn Choices: Use variegated yarn for a unique, multicolored effect without changing yarns frequently.
- Joining Techniques: Combine multiple Flower Power Squares using slip stitches or whipstitching to create a seamless design.
These small changes can make each square unique and help integrate them into various crochet projects. Play around with textures and tones to achieve the look you desire.
Final Thoughts
The Flower Power Square Pattern is a fantastic addition to any crocheter’s skill set. It is a delightful blend of floral motifs and geometric shaping, making it an eye-catching element in blankets, table runners, or even clothing embellishments.
By mastering this pattern, you’ll gain confidence in working with color changes, different stitches, and shaping techniques. Whether you’re a beginner or an experienced crocheter, this pattern offers endless creative possibilities.
Now that you’ve completed your Flower Power Square, consider making multiple squares and joining them into a larger piece. Share your beautiful creations with fellow crochet enthusiasts and keep exploring new crochet patterns to expand your skills!


