
The Feather Star Block is an intricate and eye-catching design that elevates any quilt.
With its sharp angles and star-like appearance, it stands out in the world of quilt patterns. In this article, we’ll walk you through how to make a Feather Star Block, complete with fabric cuts, measurements, and a step-by-step tutorial.
Whether you’re a seasoned quilter or looking for a new challenge, this block will certainly inspire your creativity.
What is a Feather Star Block?
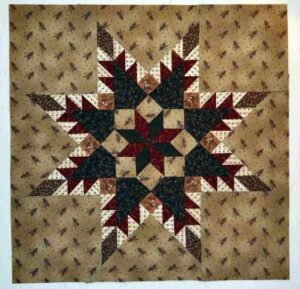
The Feather Star Block is a traditional quilt block known for its intricate points and unique feather-like design. It is often admired for its complexity, making it a favorite among experienced quilters who love to push their skills to the limit. This block is composed of multiple triangles and diamonds, which come together to form a star, giving it a three-dimensional effect.
This block is a great choice if you’re looking to add a bold statement piece to your quilt. It looks fantastic as a focal point in large quilts, or it can be repeated to create an entire quilt with a striking geometric design. If you’re into modern or traditional quilt patterns, the Feather Star Block works well with both styles.
The beauty of this block lies in its versatility. You can play around with different fabrics, colors, and textures to create a unique pattern each time. The detailed nature of the block, along with its sharp, defined lines, allows you to experiment with contrasting or complementary colors, making it ideal for all kinds of quilts.
Materials and Fabric Cuts for the Feather Star Block
Before starting your Feather Star Block, you’ll need to gather the right materials and fabric cuts. While it may seem a bit more complicated due to the number of pieces, breaking it down step by step makes it manageable. Here’s what you’ll need to cut:
- Center Square: Cut 1 piece at 4½ inches by 4½ inches.
- Small Diamonds (Star Points): Cut 8 pieces at 3½ inches by 3½ inches.
- Triangles for Star Points: Cut 8 triangles from 3½ inch squares, cut diagonally.
- Outer Diamonds (Feathers): Cut 16 pieces at 2½ inches by 2½ inches.
- Background Triangles: Cut 8 triangles from 5½ inch squares, cut diagonally.
Choosing fabrics is an important part of this block’s construction. The center square should be a strong contrasting color, such as deep red or navy, to make the star design pop. For the star points, use two contrasting fabrics—one for the diamonds and one for the triangles. The feathers should be a lighter or softer hue to complement the star. Finally, select a neutral color for the background, which allows the star and feathers to stand out.
Precision is key when cutting your fabric for the Feather Star Block. Using a rotary cutter, mat, and ruler will ensure your pieces are exact, which is critical for the final assembly. Don’t skip out on pressing your fabric between cuts, as wrinkles can throw off your measurements.
Step-by-Step Guide: Assembling the Feather Star Block
Now that your fabric is cut and prepared, it’s time to assemble the Feather Star Block. Although this block looks complicated, following these steps carefully will help you create a clean and beautiful finished product.
Step 1: Assembling the Star Points
First, we’ll work on the star points. Take your small diamonds and pair them with the triangles that will form the points of the star. Sew a triangle to each side of the diamond, creating a triangle-diamond-triangle unit. Once the units are sewn, press the seams open for a crisp, clean finish.
After assembling all the star points, arrange them around the center square. The diamonds should point outward from the center, giving the block its star-like appearance. Once you’re satisfied with the arrangement, stitch each point to the center square, one by one. Ensure your points are sharp by aligning the edges perfectly before stitching.
Star points are what give the Feather Star Block its signature look, so take your time here. If you notice any misalignments, it’s worth the effort to adjust. A perfectly aligned star will make your block look professional and well-executed.
Step 2: Adding the Feathers
Now, it’s time to add the feathered edges to your star. Take your outer diamonds and arrange them between each star point. The diamonds should extend outward, giving the block its feathered look. Sew each diamond into place, taking care to press the seams as you go.
The feather detail is what makes this block truly unique, and it requires a bit of finesse. Pin your pieces before stitching, and ensure that the edges meet accurately to avoid gaps or uneven lines. Once the feathers are attached, the block should start to take its characteristic shape.
At this stage, you’ll have the core of the Feather Star Block completed. It’s important to step back and check your work to make sure everything is aligned correctly. The feather edges should flow seamlessly into the star, enhancing its overall design.
Step 3: Completing the Block with Background Triangles
To complete the block, you’ll need to add the background triangles. These triangles frame the star and feathers, pulling the entire block together. Take the triangles you cut from the 5½ inch squares and position them in each corner of the block. Sew them carefully, ensuring that your edges line up perfectly.
Once you’ve added the background triangles, press your block and square it up. It should measure 12½ inches by 12½ inches when finished. If your block is slightly off, you can trim the edges, but be cautious not to cut too much, as this can throw off the overall design.
Finishing with the background triangles gives the Feather Star Block its complete and polished look. The contrast between the star, feathers, and background enhances the design, making this block a standout piece in any quilt.
Feather Star Block Variations and Quilting Ideas
One of the great things about the Feather Star Block is its adaptability to different quilt patterns. You can create an entire quilt using only this block, or mix it with other traditional blocks for a more dynamic quilt. Play around with different color schemes—bold colors for the star and neutral tones for the background create a striking contrast, while more muted colors can give a softer, vintage feel.
Another idea is to use the Feather Star Block as a focal point in a larger quilt. By surrounding it with simpler blocks, you can really make it the star of the show (pun intended). This block works beautifully in both traditional and modern quilts, giving you endless possibilities for customization.
For quilting, consider echo quilting around the star and feathers to accentuate the sharp lines. You can also use feather motifs in the quilting to complement the design. Hand quilting is another option, especially if you want to emphasize the delicate nature of the block.
Final Thoughts on the Feather Star Block
The Feather Star Block is a challenging but rewarding project that adds a stunning visual element to any quilt. Whether you’re making it as part of a larger quilt or using it as a standalone piece, this block will elevate your quilting skills and give you a sense of accomplishment.
With its intricate design and striking appearance, the Feather Star Block is sure to become a favorite in your collection of quilt patterns. By following this step-by-step guide and using the right materials and techniques, you’ll be able to create a beautiful block that you can be proud of. Happy quilting!