
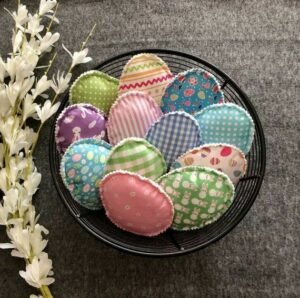
Creating Fabric Easter Eggs is a fun and easy project, perfect for beginners who enjoy sewing. This tutorial will guide you through the step-by-step process of making beautiful, reusable fabric eggs that can be used for decoration, gifts, or even as part of your seasonal quilt patterns. These handmade fabric eggs are a fantastic way to use up fabric scraps while adding a charming, handcrafted touch to your Easter celebration.
Sewing fabric Easter eggs allows for creativity with colors and patterns, making each piece unique. Whether you’re an experienced quilter or just starting, this tutorial is designed to be simple and easy to follow. Using basic sewing skills, you can create delightful decorations that can be cherished year after year. Plus, they are an eco-friendly alternative to plastic eggs.
In this Fabric Easter Eggs Beginner Sewing Tutorial, we will cover everything from selecting the right fabrics to stitching and assembling the eggs. You’ll also find helpful tips on achieving a professional finish. By the end of this guide, you’ll have a set of beautifully sewn Easter eggs ready for display. Let’s get started!
Choosing Fabric and Preparing Materials
Selecting the right fabric is essential for achieving a polished and attractive look. Choose quilting cotton or lightweight fabric with vibrant prints that match the Easter theme. Small floral, polka dot, or pastel-colored fabrics work well for this project.
Before cutting the fabric, ensure it is properly ironed to remove wrinkles. This will help in achieving precise cuts and smooth seams. You can also use fabric scraps from previous quilt patterns to add variety to your eggs. Mixing different textures and prints can create a charming, patchwork-style design.
For each fabric Easter egg, you will need the following materials:
- Two pieces of fabric measuring 5 inches by 5 inches
- Lightweight interfacing for added structure (optional)
- Polyester or cotton stuffing
- Matching sewing thread
- A sewing machine or needle for hand-stitching
- Fabric scissors and pins
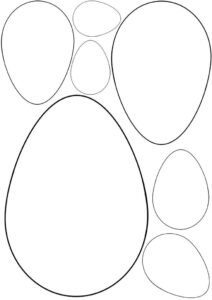
- A simple egg-shaped template (approximately 4 inches tall)
Trace the egg template onto the fabric and cut two identical shapes. If using interfacing, fuse it to the wrong side of the fabric before stitching. Now you’re ready to start sewing!
Sewing the Fabric Easter Egg
Begin by placing the two fabric pieces right sides together. Pin around the edges to secure them, leaving a small gap (about 1.5 inches) at the bottom for turning and stuffing.
Using a quarter-inch seam allowance, sew around the egg shape, starting at one side of the opening and stopping at the other. Go slowly around the curved edges to maintain an even stitch line. If you prefer a hand-stitched look, you can use a backstitch for durability.
After sewing, trim the seam allowance slightly and make small snips along the curved edges. This helps the fabric lay flat once turned inside out. Be careful not to cut into the stitching. If desired, press the seams with an iron to smooth out any puckering.
Turn the fabric right side out through the opening. Use a blunt tool like a chopstick or the end of a pencil to gently push out the curves. The fabric should now resemble an empty egg shape, ready for stuffing.
Stuffing and Finishing Touches
Using small amounts of polyester or cotton stuffing, begin filling the egg through the opening. Use your fingers or a tool to evenly distribute the stuffing, ensuring the egg maintains a smooth and rounded shape.
Avoid overstuffing, as this can cause the seams to stretch or pucker. If necessary, adjust the stuffing until the egg holds its form while remaining soft and flexible. Once you are satisfied with the shape, it’s time to close the opening.
Using a ladder stitch or an invisible stitch, hand-sew the opening shut with matching thread. Take small, even stitches along the edge to create a seamless finish. Pull the thread tightly as you sew to ensure the seam blends in naturally with the rest of the egg.
For an extra decorative touch, consider adding embellishments such as lace, embroidery, or fabric appliqués. These details can enhance the handmade look and make each fabric egg unique. You can also personalize them with initials or small floral designs using embroidery floss.
Displaying and Using Your Fabric Easter Eggs
Once your fabric Easter eggs are complete, there are many creative ways to use them in your holiday decor. Arrange them in a basket as a festive centerpiece, or string them together to create a charming garland for your home.
If you have children, these fabric eggs make a great alternative to plastic eggs for Easter egg hunts. They are soft, reusable, and safe for little hands to play with. You can even add small pockets or openings to hide tiny surprises inside.
Another fun idea is to incorporate these fabric eggs into your quilt projects. Sew them onto a quilted wall hanging or use them as appliqué elements in a spring-themed quilt pattern. The possibilities are endless when it comes to blending sewing and quilting techniques.
These handmade Easter eggs also make thoughtful gifts for family and friends. Place a few in a decorative bag or box and pair them with homemade treats for a heartfelt Easter present. Handmade items always carry a special touch that store-bought decorations simply cannot match.
By following this Fabric Easter Eggs Beginner Sewing Tutorial, you can create beautiful and reusable Easter decorations while honing your sewing skills. Whether you make one or a dozen, these fabric eggs will add a charming, handmade touch to your holiday celebrations. Happy sewing!