
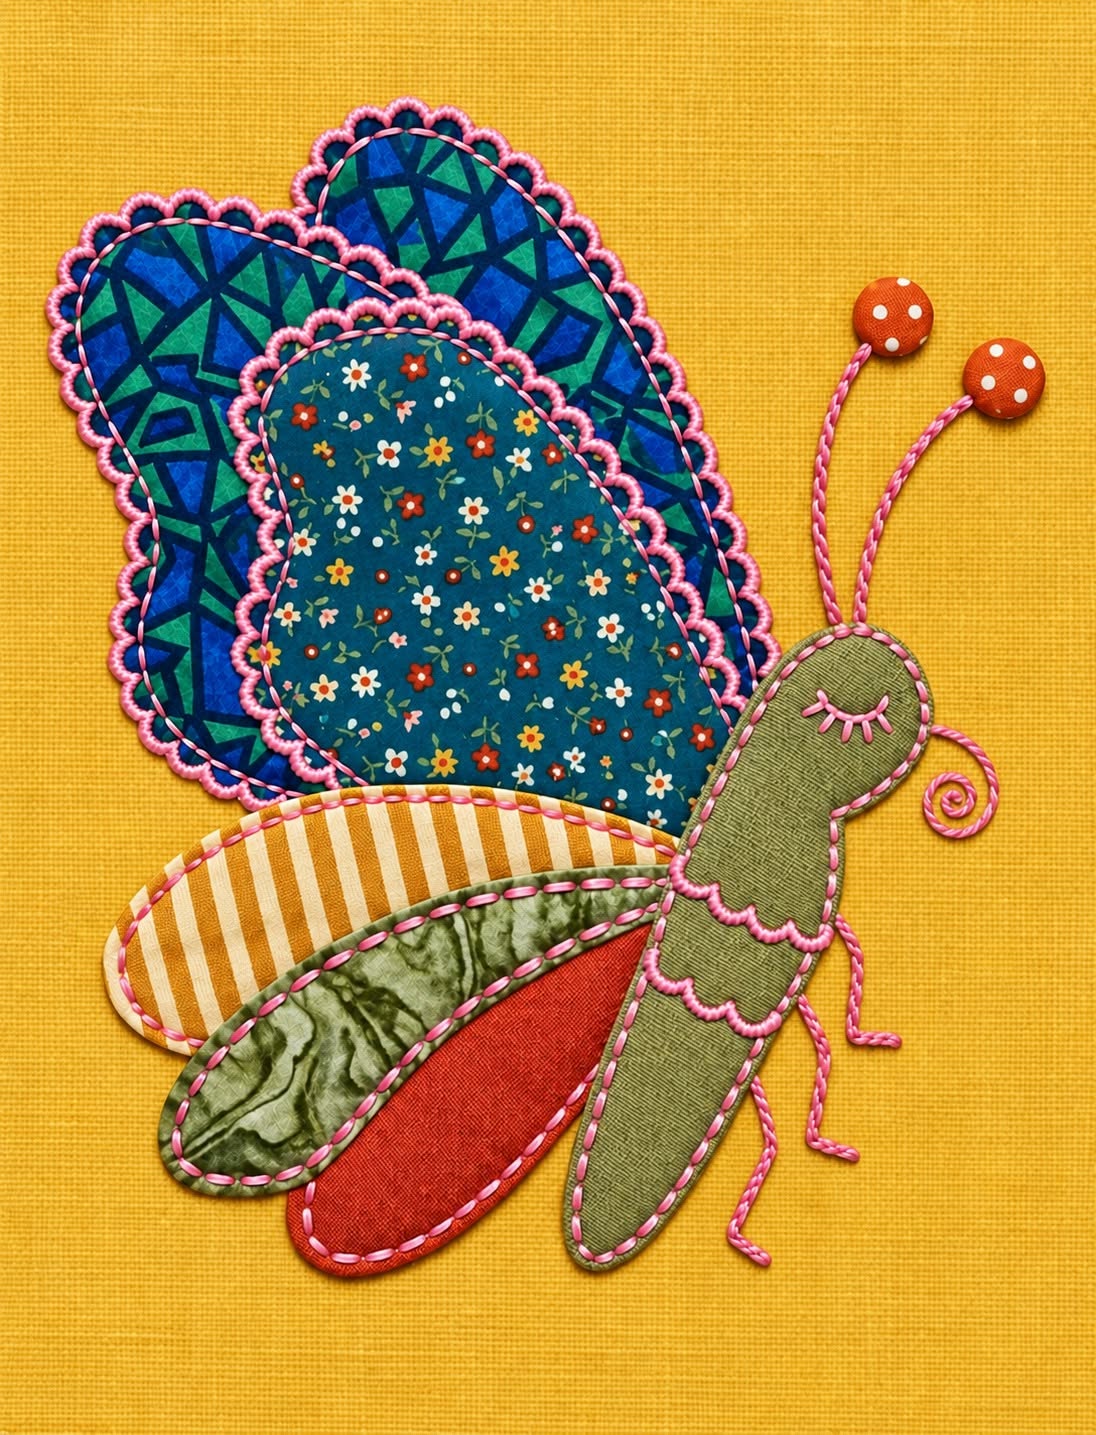
The Fabric Butterfly Appliqué Quilt Pattern is a charming sewing project that combines colorful fabric scraps, simple appliqué techniques, decorative stitching, and playful details to create a butterfly full of personality. Inspired by the handmade textile butterfly shown in the reference image, this project is especially appealing to quilters who enjoy using small pieces of patterned fabric in creative ways. The layered wings, embroidered antennae, contrasting body, and decorative edging make the finished design look detailed, even though the construction can be broken down into manageable steps. Whether you want to use the butterfly on a quilt block, wall hanging, pillow, tote bag, table runner, or nursery decoration, this pattern offers plenty of room for personalization.
One of the best qualities of a Fabric Butterfly Appliqué Quilt Pattern is that it does not require large amounts of fabric. Small scraps from previous quilting projects can become wings, body sections, and decorative accents. Floral prints, geometric fabrics, stripes, batiks, solids, and tone-on-tone cottons can all work beautifully together. The reference design demonstrates how mixing prints of different scales creates visual interest while still maintaining harmony. A larger geometric print can be used for the back wings, a small floral print for the central wings, and striped or marbled fabrics for the lower sections. By coordinating colors rather than matching every fabric exactly, you can create a butterfly that looks lively, artistic, and handmade.
This tutorial explains how to create the project from beginning to end while keeping the process approachable for both confident beginners and experienced quilters. You will learn how to prepare a butterfly template, choose fabric combinations, stabilize the appliqué pieces, layer the wings correctly, construct the body, add decorative stitching, and finish the design cleanly. The methods can also be adapted to different butterfly sizes, making the Fabric Butterfly Appliqué Quilt Pattern useful for many types of quilting and sewing projects. The goal is not to reproduce every tiny detail exactly, but to understand the construction so you can create your own polished butterfly appliqué with a similar handcrafted appearance.
Materials, Fabric Selection, and Template Preparation
Begin by gathering several small pieces of quilting cotton fabric. For a butterfly approximately 20 to 25 cm tall, scraps measuring around 15 x 20 cm are usually sufficient for each large wing section, while smaller scraps can be used for the lower wings and body. Choose at least four or five coordinating fabrics so the individual layers are easy to distinguish. In the reference-inspired version, shades of blue, teal, green, rust, mustard, and soft pink create a warm yet vibrant combination.
DISCOVER MORE FREE PATTERNS HERE!
You will also need lightweight fusible web, matching or contrasting sewing thread, an iron, sharp fabric scissors, pins or fabric clips, a pencil, embroidery floss, and a sewing machine. A piece of background fabric is necessary if the butterfly will be permanently appliquéd onto a quilt block. A square measuring around 35 x 35 cm gives you comfortable working space, although the exact size can be adjusted according to your final project.
The term Fabric Butterfly Appliqué Quilt Pattern refers to both the butterfly template and the process of attaching fabric shapes onto another textile surface. Appliqué is a sewing method in which separate fabric pieces are placed over a background and secured with stitching. This technique is widely used in quilting because it allows curved, detailed, and pictorial designs to be created without piecing every shape through traditional seams.
To make your pattern, sketch or trace a butterfly divided into separate sections. You will need two large upper wings, two middle wings, two lower wings, a body, and a head section. The upper wings should be the largest pieces, while the middle pair can overlap them slightly. Lower wings may be shaped like elongated ovals or teardrops. A finished butterfly around 22 cm tall might use upper wings approximately 13 to 15 cm long and lower wings around 9 to 11 cm long.
Because the butterfly in this style has intentionally handmade curves, absolute symmetry is not essential. In fact, slightly different wing shapes can make the finished project feel more organic. However, if you prefer a balanced look, draw one half of the butterfly first, fold the paper, and trace the same shapes onto the opposite side. Label every template piece before cutting it apart so you do not confuse the different sections during assembly.
Trace the templates onto the paper side of the fusible web. Leave approximately 1 cm between shapes. Cut roughly around each piece, fuse them to the wrong side of your selected fabrics according to the manufacturer’s instructions, and then cut directly on the traced lines. This method helps stabilize the fabric and prevents excessive fraying, especially along the curved edges of the butterfly wings.
Building and Layering the Butterfly Wings
Arrange the two largest upper wing pieces first. Place them so their inner edges angle slightly toward the center where the body will eventually sit. Do not attach them immediately. Instead, use this stage to experiment with positioning and spacing. The wing tips should spread outward, creating the recognizable butterfly silhouette while leaving enough room between the wings for the body.
Next, add the second pair of wing sections. These pieces should overlap the larger wings slightly, just as they do in the reference image. A floral print is especially effective for this layer because it contrasts beautifully with bold geometric fabrics behind it. Keep both sides visually balanced, but remember that handmade appliqué does not need mathematical precision to look attractive.
Position the lower wings underneath the middle sections. One lower wing can feature striped fabric while another may use a marbled or batik print. This variation is part of the charm of a scrap-based Fabric Butterfly Appliqué Quilt Pattern. You can even use different fabrics on the left and right sides if they share similar colors or values. The goal is visual balance rather than exact repetition.
Once you are satisfied with the arrangement, carefully remove the backing paper from the fusible web. Place all wing sections onto the background fabric and press them with an iron. Work from the lowest layers toward the highest layers so overlaps remain neat. Always follow the temperature recommendations for your fusible product and fabric type, as excessive heat can distort cotton or weaken adhesive.
After fusing, stitch around each wing piece. A narrow zigzag stitch, blanket stitch, satin stitch, or simple straight stitch can all work well. For a handmade appearance similar to the reference design, decorative stitching placed just inside or around the raw edge is particularly effective. Using contrasting thread can emphasize each wing section, while matching thread produces a softer and more traditional appliqué finish.
You may also add narrow decorative trim around selected wings. A small scalloped stitch or hand-embroidered loop can imitate the pink edging visible around the layered pieces in the inspiration image. This detail is optional, but it adds texture and gives the butterfly a whimsical personality. If you are new to decorative machine stitching, practice first on scrap fabric so you can choose an appropriate stitch width and length.
Creating the Body, Antennae, and Decorative Details
For the body of the Fabric Butterfly Appliqué Quilt Pattern, choose a fabric that contrasts with the wings while still coordinating with the overall palette. Olive green, brown, black, navy, or muted gold can all work well. Cut an elongated body shape approximately 12 to 15 cm long, depending on the size of your butterfly. The upper section can be wider for the head and thorax, while the lower end can taper to a point.
Fuse the body directly over the inner edges of the wings. This placement hides small inconsistencies where the wing pieces meet and visually connects the entire butterfly. Stitch around the body using a narrow zigzag, blanket stitch, or straight stitch. Decorative scalloped stitching around the middle can also be used to imitate the charming trim detail found in the reference project.
Create a simple eye using black embroidery thread. A closed eye with several short stitches representing eyelashes gives the butterfly a peaceful expression. You could alternatively sew on a tiny fabric circle or use a small embroidered French knot. For quilted items designed for babies or young children, embroidered details are generally preferable to loose embellishments because they remain securely attached.
The antennae can be made with embroidery floss, narrow decorative cord, or stitched fabric lines. Draw two gently curved lines extending upward from the head, then sew over them using backstitch or stem stitch. Add small fabric circles at the tips if you want the playful look shown in the reference design. Circles approximately 1.5 to 2 cm in diameter are large enough to be visible without overwhelming the butterfly.
Additional embroidered curls can be placed around the butterfly to suggest movement. A spiral line near the face or curving stitched lines near the body add personality without requiring complicated techniques. These details are especially useful if the butterfly will be displayed on a wall hanging or decorative pillow, where close-up visual texture becomes part of the overall design.
At this point, inspect the entire appliqué and reinforce any edges that appear loose. Trim stray threads and gently press the completed piece from the back. Your Fabric Butterfly Appliqué Quilt Pattern should now have clearly layered wings, a defined central body, decorative stitching, antennae, and small embroidered accents. From here, it can be incorporated into nearly any quilted project.
Quilting, Finishing, and Creative Ways to Use the Pattern
If you are making a quilt block, place batting behind the background fabric and add a backing layer. Baste the three layers together using pins, temporary spray adhesive, or your preferred quilting method. Quilt around the butterfly approximately 3 to 6 mm from the appliqué edges to emphasize the silhouette. Echo quilting is especially effective because repeated lines around the butterfly can create the impression of movement.
You can also quilt individual sections of the wings. Small curved lines, gentle waves, loops, or free-motion quilting motifs can add texture without competing with the patterned fabrics. Avoid overly dense quilting directly through delicate decorative trims. A balanced combination of stitched outlines and open background space usually highlights the appliqué more effectively.
The Fabric Butterfly Appliqué Quilt Pattern works beautifully as the centerpiece of a throw pillow. For a cushion cover, create the appliqué on a square of fabric measuring approximately 45 x 45 cm, then quilt and assemble it using your preferred pillow construction method. Because the butterfly already contains many colors and prints, a neutral background such as cream, beige, pale linen, or soft gray can help the design stand out.
For a wall hanging, add borders around the appliqué block. A narrow inner border using one of the wing fabrics can visually connect the butterfly to the frame of the quilt. A wider neutral outer border can then provide balance. Bind the finished wall hanging using coordinating cotton and add a hanging sleeve to the back if desired.
This pattern is also useful for tote bags, sewing-machine covers, table runners, children’s quilts, fabric baskets, and seasonal decorations. Smaller butterflies can be grouped together in different colors, while one oversized butterfly can become the focal point of a larger quilt. Once the original template has been created, reducing or enlarging it allows you to use the same Fabric Butterfly Appliqué Quilt Pattern in many different projects.
Most importantly, allow your fabric choices to make each butterfly unique. Scrap quilting is often most successful when fabrics are chosen intuitively rather than according to strict matching rules. Combine florals with stripes, geometric prints with batiks, and muted tones with brighter accents. The layered construction provides enough structure to keep the design cohesive, while varied fabrics give the project the handmade character that makes appliqué quilting so enjoyable.
FAQ About the Fabric Butterfly Appliqué Quilt Pattern
What is a Fabric Butterfly Appliqué Quilt Pattern?
A Fabric Butterfly Appliqué Quilt Pattern is a sewing design that uses individually cut fabric shapes to create a butterfly motif. The fabric pieces are layered or positioned on top of a background fabric and secured with fusible web, stitching, or a combination of both. The completed appliqué can then be incorporated into quilts, pillows, bags, wall hangings, and other textile projects.
Is this butterfly appliqué suitable for beginners?
Yes. The basic construction is beginner-friendly because the butterfly is made from separate shapes rather than complicated piecing. Beginners may find fusible appliqué especially approachable because the adhesive holds the pieces in position while they are stitched. More experienced quilters can add decorative stitches, hand embroidery, free-motion quilting, and additional dimensional details.
What fabric works best for butterfly appliqué?
Quilting cotton is one of the easiest fabrics to use because it is stable, easy to cut, and available in many colors and prints. Batiks can also work especially well for wings because their mottled color variations add visual depth. Avoid extremely stretchy fabrics unless they are stabilized before cutting and stitching.
Do I need fusible web for this project?
Fusible web is not absolutely required, but it makes the process much easier. It keeps curved wing pieces from shifting while you stitch and helps control raw edges. Traditional needle-turn appliqué can be used instead if you prefer a fully hand-sewn finish.
What stitch should I use around the appliqué pieces?
Blanket stitch and narrow zigzag stitch are popular choices for machine appliqué. A straight stitch placed close to the raw edge can create a more relaxed handmade appearance. Satin stitch provides complete edge coverage but requires more thread and careful machine control. Decorative scalloped stitching can also be used for a whimsical finish.
How large should the butterfly be?
There is no required size. A butterfly measuring around 20 to 25 cm from top to bottom works well for pillows, wall hangings, and medium quilt blocks. Small butterflies of approximately 10 to 15 cm are suitable for bags and smaller decorations, while oversized versions can become central quilt motifs.
Can I make the wings with different fabrics?
Absolutely. Using different fabrics is one of the main attractions of this Fabric Butterfly Appliqué Quilt Pattern. Stripes, florals, geometric prints, solids, batiks, and small-scale prints can all be combined. Try repeating one or two colors throughout the wings so the design remains visually connected.
How can I prevent the appliqué edges from fraying?
Fusible web helps stabilize the edges, while blanket stitch, zigzag stitch, or satin stitch helps secure them. If you intentionally use raw-edge appliqué, very minor fraying may occur after washing and can become part of the handmade style. For cleaner edges, stitch carefully around every shape before the project is washed.
Can the pattern be sewn completely by hand?
Yes. The fabric shapes can be prepared with fusible web or traditional turned edges and then attached using hand appliqué stitches. Embroidery can be used for the eye, antennae, decorative outlines, and small details. A completely hand-sewn butterfly may take longer but can have a beautiful heirloom appearance.
Can I wash a quilt containing this butterfly appliqué?
Yes, provided the fabrics are washable and the appliqué pieces have been securely stitched. Prewashing fabrics is optional, but it can reduce unexpected shrinkage or color bleeding. When the finished quilt requires washing, use a gentle cycle and mild detergent according to the care requirements of your chosen fabrics and batting.
Can I resize the Fabric Butterfly Appliqué Quilt Pattern?
Yes. The template can easily be enlarged or reduced before transferring it to fusible web. When resizing, keep the proportions of the body and wings consistent. Very small versions may require simplified details because narrow wing sections and tiny decorative trims become more difficult to sew accurately.
What can I make with the finished butterfly?
The design can be used on quilt blocks, pillow covers, tote bags, wall quilts, table runners, fabric organizers, children’s quilts, decorative banners, and many other sewing projects. Multiple butterflies in different fabrics can also be arranged into a larger garden-inspired quilt.
Conclusion
The Fabric Butterfly Appliqué Quilt Pattern is a wonderful project for turning small fabric scraps into a colorful and expressive quilted design. By preparing individual wing templates, combining coordinating prints, stabilizing the pieces with fusible web, layering the wings, adding the body, and finishing everything with decorative stitching, you can create a butterfly with impressive visual detail without relying on complicated construction techniques.
Throughout this tutorial, you learned how to select fabrics, prepare appliqué shapes, position overlapping wings, secure raw edges, create embroidered antennae and facial details, and incorporate the finished butterfly into different quilting projects. These same methods can also be applied to flowers, birds, insects, animals, and many other appliqué motifs.
EASILY FIND THE PDF FOR THIS PATTERN HERE!
One of the most enjoyable parts of working with a Fabric Butterfly Appliqué Quilt Pattern is the freedom to experiment. Every change in fabric, stitching, scale, or background can completely transform the finished result. Use fabrics from your scrap collection, combine unexpected prints, and adjust the decorative details until your butterfly reflects your own sewing style. If you create your own version of this project, leave your sincere opinion about the pattern and share your suggestions. It is always interesting to hear which fabric combinations, stitches, colors, and finishing ideas other quilters would choose for their own butterfly appliqué.