
If you have ever wanted to learn how to make a traditional quilt block that combines simplicity, beauty, and versatility, this Easy Log Cabin Tutorial – Quilt Pattern is the perfect place to start. The Log Cabin pattern has been one of the most loved designs in the quilting world for generations. Its timeless look and flexible layout options make it ideal for beginners and experienced quilters alike. In this tutorial, we’ll walk through everything you need to know to create your own Log Cabin quilt, from fabric selection to assembly and finishing techniques. Whether you’re quilting by hand or using a sewing machine, this guide will give you the confidence to complete a stunning project.
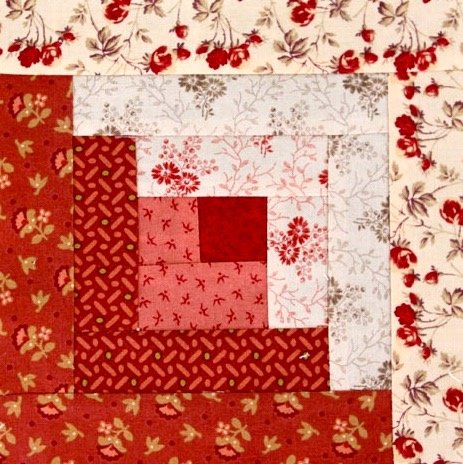
The Easy Log Cabin Tutorial – Quilt Pattern starts with a simple concept: a central square surrounded by strips of fabric that are added in sequence. Each strip, or “log,” builds outward from the center, creating a balanced design that symbolizes warmth, home, and comfort. This pattern allows endless creativity with color, size, and arrangement. You can use scraps of fabric for a rustic look or coordinated hues for a modern touch. With this guide, you’ll not only learn the steps but also the reasoning behind fabric placement and color balance.
What makes this Easy Log Cabin Tutorial – Quilt Pattern stand out is how it combines traditional craftsmanship with modern quilting techniques. The pattern’s repetitive yet relaxing process helps beginners practice accuracy while allowing experts to explore creative variations. By the end of this tutorial, you’ll understand how to cut, sew, press, and assemble your quilt blocks with precision. You’ll also gain tips on how to design your own Log Cabin variations, making your quilt as unique as your creative vision.
Understanding the Log Cabin Quilt Pattern
The Log Cabin quilt pattern dates back to the 1800s and symbolizes the hearth—the heart of a home. Traditionally, the center square was red, representing the fire or warmth of the family. Surrounding strips were arranged in light and dark values to represent sunlight and shadow. This symbolic meaning gives your quilt emotional depth as well as visual beauty.
One of the reasons the Easy Log Cabin Tutorial – Quilt Pattern remains popular is its versatility. It can be made in any size, from small wall hangings to king-sized bed quilts. You can arrange blocks in countless ways—Barn Raising, Straight Furrows, or Courthouse Steps—to achieve different effects. Each layout tells a story and gives your quilt a distinctive personality.
The pattern is also highly adaptable for color and fabric choices. Beginners can use pre-cut fabric strips, such as jelly rolls, to make cutting easier. More advanced quilters might experiment with gradients, prints, or even recycled fabrics. The Easy Log Cabin Tutorial – Quilt Pattern encourages creativity while maintaining a simple structure anyone can follow.
Another advantage of the Log Cabin quilt is its efficiency. Because the design grows outward from the center, you can work block by block, making it manageable and less overwhelming than large quilt patterns. You can complete each block individually and then assemble them together into a finished piece.
The simplicity of the Easy Log Cabin Tutorial – Quilt Pattern also makes it an excellent teaching tool. It introduces essential quilting skills such as measuring, cutting, pressing, and piecing. Each step helps quilters refine their technique while creating something beautiful and functional.
Whether you’re quilting for fun, gifting a handmade piece, or creating a family heirloom, this pattern’s charm and structure make it a timeless favorite. Once you understand the basics, you’ll see how easily it adapts to your own style and imagination.
Materials and Preparation
Before you start your Easy Log Cabin Tutorial – Quilt Pattern, it’s important to prepare your materials properly. Quilting success often depends on good preparation, from fabric selection to accurate cutting. For this project, you’ll need fabric in contrasting colors, thread, scissors, a rotary cutter, ruler, pins, and a sewing machine or needle if you prefer hand-sewing.
The fabric you choose sets the tone of your quilt. You can use light and dark color contrasts to make the design pop. Many quilters prefer cotton fabric because it’s durable, easy to sew, and comfortable to handle. Choose a center square fabric that stands out, often in red or another bold color, to create the focal point of each block.
Cutting precision is crucial in quilting. To ensure even edges, use a rotary cutter and a quilting ruler. For this Easy Log Cabin Tutorial – Quilt Pattern, your center square can measure around 2.5 inches, with strips about 1.5 inches wide. These measurements can be adjusted depending on the size of the quilt you want to create.
Before sewing, it’s helpful to lay out your strips in the order you plan to attach them. The pattern alternates between light and dark strips, so planning ahead prevents confusion. Pressing your fabric after each seam will keep your blocks flat and tidy.
Preparation also includes thread matching. Using a thread color that blends well with your fabrics will help your seams look professional. Some quilters like using neutral threads like gray or beige for versatile blending. This Easy Log Cabin Tutorial – Quilt Pattern works well with either coordinating or contrasting threads, depending on your desired effect.
Lastly, remember to test your sewing machine tension and stitch length before beginning. Even, consistent stitching will make your quilt stronger and more visually appealing. Preparation ensures your quilting process is smooth and enjoyable.
Step-by-Step Guide to Sewing Your Log Cabin Block
Now it’s time to begin sewing your Easy Log Cabin Tutorial – Quilt Pattern. Start with your center square and place it right side up. Attach the first strip to one side, aligning the edges carefully. Sew using a ¼-inch seam allowance, which is the standard for quilting. Press the seam away from the center after stitching.
Continue adding strips in a clockwise or counterclockwise direction, depending on your preferred layout. Each time you add a strip, trim any excess and press the seams. Keeping your pressing consistent helps the quilt block lay flat, which is essential for accurate assembly later.
As your block grows, you’ll notice the alternating light and dark sides forming a striking contrast. This visual balance is what gives the Easy Log Cabin Tutorial – Quilt Pattern its distinctive beauty. Focus on keeping your seams straight and your strips properly aligned.
When the block reaches your desired size, trim the edges so all sides are even. Uniform blocks will make assembling your final quilt top much easier. Typically, Log Cabin blocks are square, but you can experiment with rectangular variations for a unique look.
Once all blocks are completed, you can begin arranging them on a flat surface to decide your final layout. Try different designs—Diagonal Setting, Barn Raising, or Fields and Furrows—to find the one that best fits your taste. The Easy Log Cabin Tutorial – Quilt Pattern gives you endless creative freedom at this stage.
After finalizing your layout, join the blocks together by sewing them row by row. Press seams open or to one side according to your preference. When the quilt top is complete, you can add batting and backing before quilting the layers together.
Finishing Your Log Cabin Quilt
Finishing is the most rewarding part of the Easy Log Cabin Tutorial – Quilt Pattern. Once your quilt top is assembled, it’s time to add the batting and backing. Choose a batting thickness based on the desired warmth and texture of your quilt. Thinner batting makes for a lighter quilt, while thicker batting offers more comfort and structure.
Lay your quilt backing face down, place the batting on top, and then center your quilt top right side up. Smooth out any wrinkles and pin or baste all layers together. This sandwiching step keeps everything aligned while quilting.
Next, you’ll need to quilt the layers. You can use straight-line stitching, free-motion quilting, or even hand-quilting. For beginners following the Easy Log Cabin Tutorial – Quilt Pattern, straight-line quilting is a great start. Stitching “in the ditch” (along the seam lines) helps the quilt hold together neatly.
After quilting, trim any excess batting and backing fabric. Attach the binding strips around the edges to enclose the layers and give your quilt a finished look. Binding can be done by machine or hand, depending on your comfort level and desired finish.
Once completed, press your entire quilt to smooth it out and admire your work. The Easy Log Cabin Tutorial – Quilt Pattern results in a quilt that’s both beautiful and practical—perfect for decorating, gifting, or cozying up at home.
Taking the time to care for your quilt properly will extend its life. Wash it gently in cold water and air dry when possible. With love and attention, your handmade creation will last for years and hold treasured memories.
Frequently Asked Questions (FAQ)
1. What is the easiest way to make a Log Cabin quilt block?
The easiest way is to start with a square center and add strips one by one, sewing and pressing after each addition. Using pre-cut strips like jelly rolls can save time and ensure consistency.
2. Can I make this Easy Log Cabin Tutorial – Quilt Pattern by hand?
Yes! Hand-sewing works beautifully for this pattern. It may take longer, but it gives a charming, traditional touch to your quilt.
3. What fabrics are best for the Log Cabin quilt?
Cotton fabrics are most commonly used because they’re easy to cut, sew, and press. Avoid slippery or stretchy materials unless you have experience handling them.
4. How do I choose colors for my Log Cabin quilt?
Use a mix of light and dark tones for contrast. Traditionally, the center square is red, symbolizing the hearth, while the light and dark sides represent sunlight and shadow.
5. What size should each strip be?
A common choice is 1.5-inch-wide strips, but you can adjust based on your block size. Consistency is more important than the exact measurement.
6. How many blocks do I need for a full-size quilt?
It depends on your block size and desired dimensions. Typically, 20–36 blocks make a throw-size quilt, while larger bed quilts may require 50 or more.
7. Can I machine quilt the Log Cabin pattern?
Absolutely. Machine quilting provides durability and a modern finish. Straight-line or “stitch-in-the-ditch” quilting are great techniques for this pattern.
Conclusion
In this Easy Log Cabin Tutorial – Quilt Pattern, we explored one of quilting’s most beloved designs, from its history to practical, step-by-step instructions. You learned how to choose fabrics, prepare materials, sew accurate seams, and finish your quilt beautifully. The Log Cabin pattern’s balance of simplicity and creativity makes it perfect for both new and experienced quilters.
Now that you know how to make your own Log Cabin quilt, take your time experimenting with colors and layouts to express your unique style. I’d love to hear your thoughts—please leave your honest opinion and any suggestions on how this tutorial can help you or other quilting enthusiasts even more.