
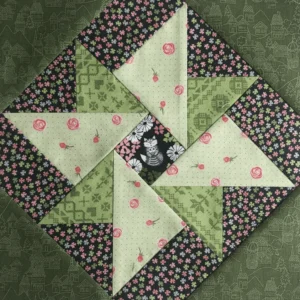
The Double Windmill Quilt Block is a dynamic and visually striking pattern that has been a favorite among quilters for its movement and symmetry.
This quilt pattern adds a sense of motion to any quilt, making it perfect for both traditional and modern designs. In this article, we will guide you through the process of creating a Double Windmill Block, with all the necessary fabric cuts and measurements.
Our focus will be on helping you achieve precision and ease in assembling this beautiful quilt block.
Understanding the Double Windmill Quilt Block
The Double Windmill Block is a variation of the classic windmill pattern, featuring interlocking shapes that create the illusion of spinning blades. Its design is made up of triangles and squares, which come together to form a symmetrical block. This quilt block is often used in quilts with a lot of negative space, allowing the bold design to stand out.
For beginners, this block is a great way to practice working with half-square triangles and flying geese units. More experienced quilters will appreciate the design’s versatility, as it can be customized with different fabrics and color schemes. Whether you prefer a traditional look with muted colors or a modern aesthetic with bold contrasts, the Double Windmill Quilt Block can be adapted to suit your style.
Additionally, this block can be scaled up or down depending on the size of your quilt. For larger quilts, you might opt for a bigger block size, while smaller blocks can be used for baby quilts or table runners. The key is to maintain the block’s symmetry and balance to achieve the desired effect.
Fabric Selection for the Double Windmill Quilt Block
When selecting fabric for the Double Windmill Quilt Block, it’s essential to choose colors that contrast well. This contrast highlights the block’s unique design and helps each windmill blade stand out. Consider using a combination of light and dark fabrics, or experiment with complementary colors to create a dynamic visual effect.
For this tutorial, we recommend using three fabric colors: Fabric A (light), Fabric B (medium), and Fabric C (dark). You’ll need enough fabric to create multiple blocks, depending on the size of your quilt. If you’re making a larger quilt, consider buying fabric in yardage, while smaller projects may only require fat quarters.
It’s also important to consider the fabric’s texture. For example, solids provide a clean, crisp look, while prints can add depth and interest. If you’re using printed fabric, make sure the pattern isn’t too busy, as it might distract from the overall design of the quilt block. Balance is key when creating a quilt that’s both visually appealing and cohesive.
Cutting Instructions for the Double Windmill Quilt Block
Now that you’ve chosen your fabrics, it’s time to move on to the cutting phase. Precision is crucial in quilting, and ensuring your pieces are cut to the exact measurements will make assembling the block much easier.
Here are the fabric cuts needed for one Double Windmill Quilt Block:
- Fabric A (light fabric):
- Cut 2 squares, 4 ½” x 4 ½”
- Cut 4 squares, 3 ½” x 3 ½”
- Fabric B (medium fabric):
- Cut 2 squares, 4 ½” x 4 ½”
- Cut 4 squares, 3 ½” x 3 ½”
- Fabric C (dark fabric):
- Cut 4 rectangles, 3 ½” x 6 ½”
Make sure to press your fabric before cutting to avoid any distortions. Additionally, using a rotary cutter and ruler will help you achieve straight, clean cuts. Once your fabric pieces are ready, you can begin assembling the block.
Assembling the Double Windmill Quilt Block
The Double Windmill Quilt Block is constructed by creating four identical units that are then joined to form the block. Each unit contains a combination of half-square triangles and flying geese. Follow these steps to assemble the block:
- Create Half-Square Triangles (HSTs):
- Take one 4 ½” square from Fabric A and one 4 ½” square from Fabric B. Place them right sides together.
- Draw a diagonal line from corner to corner on the back of one square.
- Sew ¼” on either side of the drawn line.
- Cut along the drawn line to create two HSTs.
- Press the seams open and trim each HST to measure 3 ½” x 3 ½”. Repeat this process with the remaining 4 ½” squares from Fabric A and Fabric B.
- Assemble Flying Geese:
- Take two 3 ½” squares from Fabric A and place them right sides together on one of the 3 ½” x 6 ½” rectangles from Fabric C. Ensure the squares overlap the rectangle at both ends.
- Draw a diagonal line on the back of each square, then sew along the line.
- Trim the excess fabric ¼” from the seam, and press the triangle flaps open to form the flying geese unit. Repeat this process to create a total of four flying geese units.
- Assemble the Units:
- Lay out your HSTs, flying geese, and remaining squares as shown in the diagram of the Double Windmill Quilt Block.
- Sew the units together in rows, ensuring that the seams align perfectly.
- Join the rows to complete the block. Press the seams flat for a crisp, professional finish.
Tips for Quilting the Double Windmill Block
Once your Double Windmill Quilt Block is complete, you can join it with other blocks to form a larger quilt. Here are a few tips to keep in mind as you work:
- Consistency is Key: Ensure that all your seams are consistently ¼”. This will help your blocks fit together properly when assembling the quilt top.
- Pressing Seams: Pressing your seams flat as you go will reduce bulk and make it easier to match points when sewing blocks together. You can press seams to one side or press them open, depending on your preference.
- Chain Piecing: If you’re making multiple Double Windmill blocks, consider chain piecing your units. This technique allows you to sew multiple pieces together without cutting the thread between each one, saving time and thread.
Customizing the Double Windmill Quilt Block
One of the great things about the Double Windmill Block is its adaptability. You can easily change the size of the block by adjusting the fabric cuts. For example, if you want to create a larger quilt block, simply increase the size of your squares and rectangles.
Additionally, you can experiment with different fabric combinations to create a variety of looks. Try using batiks for a bold, colorful block, or stick with solid colors for a more modern look. The possibilities are endless, and you can truly make this pattern your own.
Lastly, consider adding borders or sashing between your blocks to frame the Double Windmill design. This will create a more polished look and help separate the blocks visually. You can also play with the block layout to create different effects, such as alternating the direction of the windmills for added movement.
The Double Windmill Quilt Block is a versatile and eye-catching pattern that’s sure to impress. Whether you’re a beginner or an experienced quilter, this block offers a fun challenge with endless possibilities for customization. By following this step-by-step guide, you’ll be able to create your own Double Windmill Quilt Blocks with ease. With the right fabric choices, precise cuts, and careful assembly, your finished quilt will be a work of art that you can be proud of.
Incorporate these blocks into a larger quilt, or use them as the focal point for a wall hanging, table runner, or pillow. Whatever you choose, the Double Windmill Block is sure to add a touch of elegance and movement to your next quilting project. Happy quilting!