
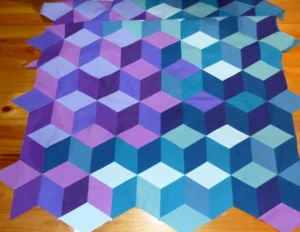
The Diamond and Trapezoid Cloth Block 3D is a captivating quilting technique that creates a stunning visual illusion of depth and dimension. This pattern combines sharp geometric shapes to craft quilts that stand out with their intricate design and texture. For quilting enthusiasts, mastering this technique not only adds variety to their projects but also showcases their skill and creativity.
Using diamonds and trapezoids to create a 3D effect may seem complex at first glance, but with a systematic approach, anyone can achieve professional results. This article will guide you through every step, ensuring you have all the tips and tricks needed to bring this quilt block to life. By focusing on fabric selection, cutting techniques, and assembly precision, you’ll learn how to create a quilt that truly wows.
Whether you’re an experienced quilter looking to expand your repertoire or a beginner eager to explore advanced patterns, this tutorial will inspire you. Let’s dive into the details of crafting a Diamond and Trapezoid Cloth Block 3D.
Understanding the Diamond and Trapezoid Design
The Diamond and Trapezoid Cloth Block 3D relies on the precise arrangement of geometric shapes to create its dimensional effect. By alternating colors and angles, the pattern tricks the eye into perceiving depth and movement.
- Key Shapes: The design consists of diamond-shaped pieces paired with trapezoid shapes. When aligned correctly, these shapes form a cohesive 3D illusion.
- Fabric Selection: Choose fabrics with contrasting shades. Light, medium, and dark tones work best to enhance the 3D effect. Solids or subtle prints are recommended for maintaining clarity in the design.
- Cutting Accuracy: Precision is crucial when cutting the diamonds and trapezoids. Invest in a quality rotary cutter and rulers to ensure your pieces fit together seamlessly.
- Layout Planning: Before sewing, arrange your pieces on a flat surface. This step helps you visualize the final pattern and make adjustments as needed.
- Color Placement: To achieve the best visual effect, alternate light and dark pieces strategically. Experiment with placements until the design “pops.”
- Practice Makes Perfect: Start with a small block to familiarize yourself with the process before tackling a full quilt.
Tools and Materials Needed for Success
Having the right tools and materials ensures your project proceeds smoothly and yields professional results.
- Fabric Choices: Select high-quality cotton fabrics. The durability of the material will enhance the longevity of your quilt.
- Cutting Tools: A rotary cutter, self-healing cutting mat, and quilting rulers are essential for precision.
- Templates: Use templates specifically designed for diamonds and trapezoids, or create your own from sturdy cardboard.
- Thread Selection: Opt for threads that blend well with your chosen fabrics. Neutral tones often work best.
- Sewing Machine: A reliable sewing machine with adjustable stitch settings will make piecing the blocks easier.
- Iron and Pressing Tools: Pressing your seams as you go ensures accuracy and a polished finish.
Step-by-Step Tutorial for Crafting the Block
Follow this detailed guide to create your Diamond and Trapezoid Cloth Block 3D.
- Prepare Your Fabrics: Wash, dry, and press your fabrics before cutting. This step prevents shrinkage and ensures even cuts.
- Cut the Shapes: Use your templates to cut diamonds and trapezoids with precision. Label each piece to keep track of color placements.
- Lay Out the Design: Arrange the shapes on a design board or flat surface. Test different color arrangements to achieve the desired effect.
- Sew the Shapes: Begin by joining smaller sections, such as pairs of trapezoids to diamonds. Use a ¼-inch seam allowance for accuracy.
- Press Seams: After sewing each section, press the seams open or to one side. This step keeps your block flat and tidy.
- Assemble the Block: Piece together the smaller sections to complete the full block. Take your time to align seams perfectly for a polished look.
Tips for Quilting with the Diamond and Trapezoid Block
These tips will help you master the Diamond and Trapezoid Cloth Block 3D and incorporate it into larger projects.
- Chain Piecing: Save time by sewing multiple blocks simultaneously. This method increases efficiency while maintaining precision.
- Experiment with Colors: Don’t be afraid to explore bold color combinations. Bright contrasts can enhance the 3D effect.
- Border Options: Frame your blocks with neutral borders to make the design stand out.
- Quilting Techniques: Highlight the 3D effect by using echo quilting or straight-line quilting around the shapes.
- Combine with Other Patterns: Mix the Diamond and Trapezoid Block with simpler designs for variety in your quilt.
- Practice Patience: Complex patterns like this require time and attention. Enjoy the process and celebrate your progress.
FAQ
Q1: What size should I cut the diamonds and trapezoids?
A: The size depends on your quilt’s dimensions. Commonly, diamonds measure 4×6 inches, and trapezoids vary to fit alongside.
Q2: How do I avoid fabric stretching during sewing?
A: Use a walking foot on your sewing machine and handle the fabric gently to prevent distortion.
Q3: Can I make this pattern without a sewing machine?
A: Yes, but it requires more time and precision. Hand sewing works well for smaller projects.
Q4: What type of batting works best for 3D quilts?
A: Choose low-loft batting to maintain the crispness of the geometric shapes.
Q5: How can I fix mismatched seams?
A: Carefully unpick the stitches and realign the pieces. Take your time to avoid fabric damage.
Q6: Is this pattern suitable for beginners?
A: While it’s more advanced, beginners can start with smaller blocks to build confidence.
The Diamond and Trapezoid Cloth Block 3D is a beautiful pattern that adds depth and sophistication to any quilt. By understanding the shapes, choosing the right tools, and following the step-by-step tutorial, you can create a masterpiece. Whether you’re crafting a quilt for personal use or as a gift, this design is sure to impress.
We hope this guide has inspired you to try this unique quilting technique. If you have any thoughts or suggestions, please leave a comment below. Your feedback helps us improve and share more valuable content. Happy quilting!