
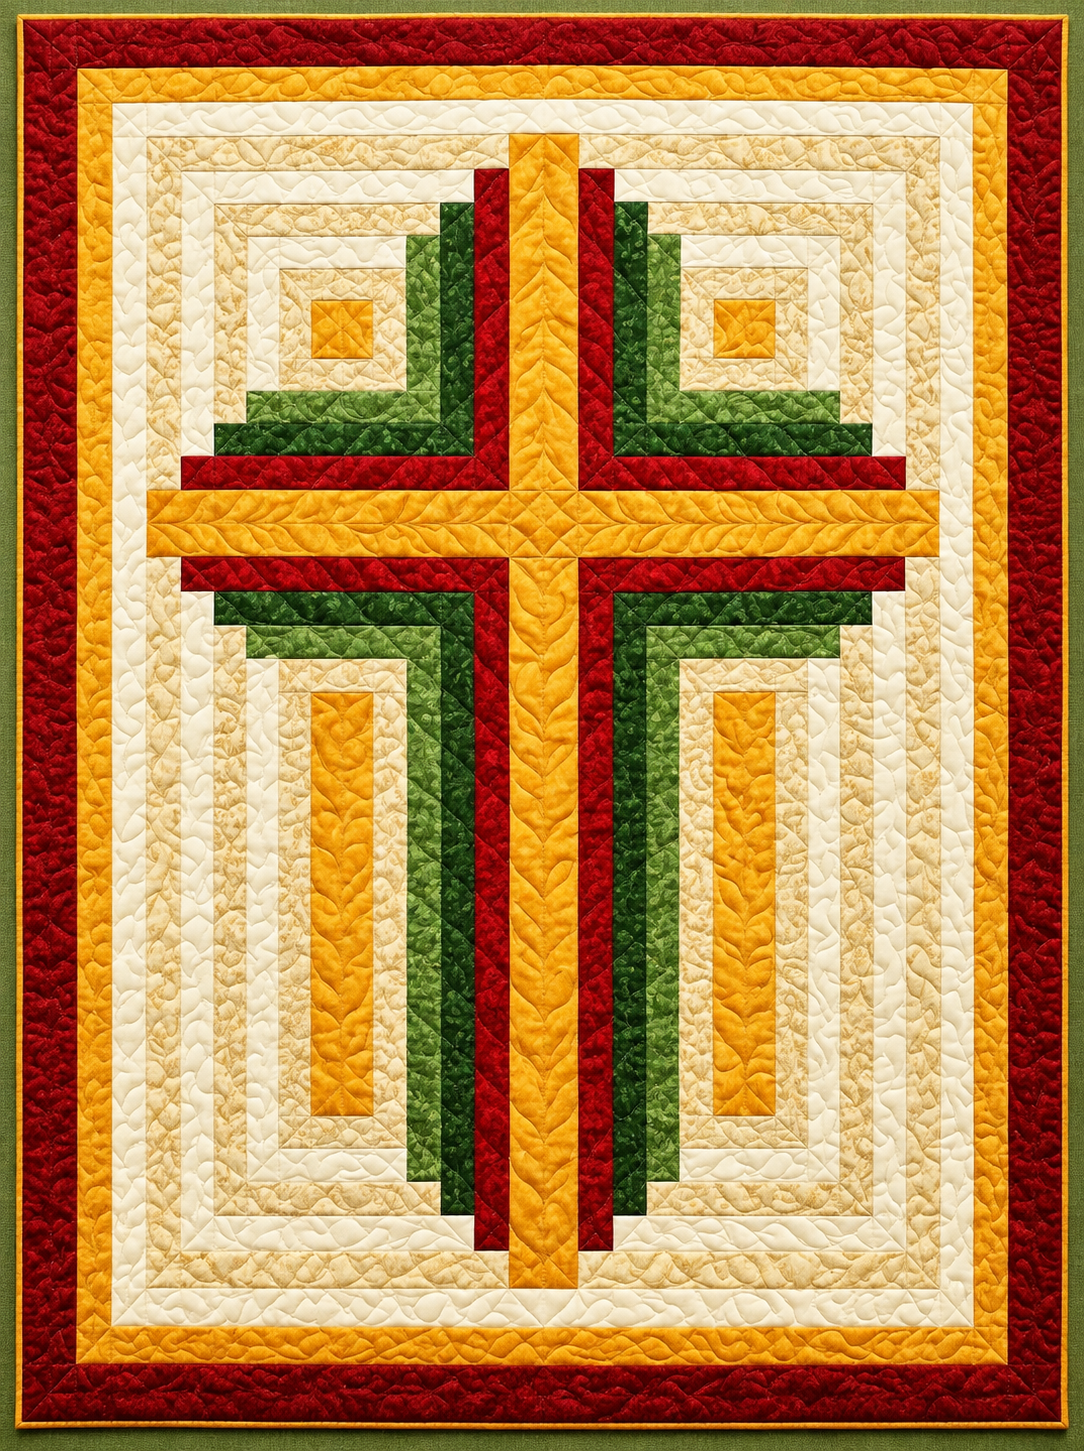
The “Crossed Log Cabin” Quilt Tutorial Pattern is a beautiful way to combine the traditional structure of a log cabin quilt with a bold crossed layout that immediately draws the eye toward the center. Inspired by the quilt shown in the reference image, this design uses carefully arranged strips in cream, ivory, green, red, and golden yellow to create a symmetrical composition with a warm, classic appearance.
The repeated rectangular strips give the project depth while keeping the construction based on straightforward sewing techniques.
A strong golden cross divides the quilt into four balanced sections and becomes the main visual feature of the finished piece.
Dark green and red strips add definition around the inner shapes, while the lighter fabrics create breathing room and contrast.
The wide red outer border frames everything and gives the quilt a polished, traditional finish.
For quilters who enjoy geometric designs, accurate piecing, and rich color combinations, this pattern offers an engaging project that can be adapted to many sizes and fabric collections.
One of the most interesting characteristics of the “Crossed Log Cabin” Quilt Tutorial Pattern is that a complicated-looking design can be created from relatively simple fabric strips and rectangles. The visual effect depends less on difficult individual pieces and more on accurate cutting, consistent seam allowances, color placement, and symmetry.
Traditional log cabin quilting builds outward around a central shape, adding strips progressively to form rings or stepped sections.
In this variation, that familiar construction is organized into four mirrored areas surrounding a prominent central cross.
Because the arrangement is geometric, taking time to measure and press each section makes a noticeable difference in the final appearance.
The project is also a good opportunity to practice strip piecing, nested seams, border construction, and decorative quilting.
Although the photograph can be used as a visual guide, the dimensions can be adjusted to create anything from a wall hanging to a lap quilt or larger decorative bed quilt.
Before beginning, it is helpful to think of this quilt as a series of layers rather than one complicated design. The center establishes the proportions, the surrounding log cabin strips build the four quadrants, the red and green sections introduce strong contrast, and the yellow cross unifies the entire composition.
After those sections are assembled, several lighter borders soften the transition toward the outside of the quilt.
A golden border repeats the central accent color, while the deep red outer border provides a strong final frame.
The quilting visible across the surface adds another decorative layer, with flowing leaf-like and feather-inspired motifs bringing texture to the otherwise angular patchwork.
Beginners can simplify this quilting with gentle curves or straight-line quilting, while experienced quilters can experiment with feathers, leaves, vines, or free-motion patterns.
The following tutorial explains how to approach the “Crossed Log Cabin” Quilt Tutorial Pattern from fabric preparation through final binding.
Materials, Fabric Selection, and Planning the Crossed Log Cabin Design
For the “Crossed Log Cabin” Quilt Tutorial Pattern, begin with quilting-weight cotton fabrics in five main color families: golden yellow, deep red, dark green, ivory, and light cream or beige print. The photograph demonstrates why value contrast matters as much as the exact colors. The dark green and red areas create strong visual boundaries, while cream fabrics establish lighter pathways. Golden yellow works as the dominant accent. You can reproduce this palette closely or substitute colors while maintaining similar light, medium, and dark values.
DISCOVER MORE FREE PATTERNS HERE!
You will also need cotton batting, backing fabric, coordinating thread, quilting rulers, a rotary cutter, cutting mat, pins or clips, an iron, and a sewing machine. A walking foot is helpful for straight or gently curved quilting, while a free-motion quilting foot can be used if you want to recreate the decorative texture seen in the reference project. Use a fresh rotary blade whenever possible because accurate strips are especially important in geometric patchwork. A square ruler is also useful for checking each section as construction progresses.
A practical starting strip width for this project is approximately 5 cm, although you can choose narrower or wider strips depending on the desired quilt size. Remember that the visible finished width becomes smaller after seam allowances are sewn. For example, strips cut at 5 cm will not remain 5 cm wide in the completed patchwork. Rather than concentrating on one mandatory finished dimension, establish a consistent strip system and use it throughout all four quadrants. This makes the pattern easier to enlarge or reduce.
Before cutting all your fabric, create a small color-placement plan. Looking at the image, notice the progression from the golden centers into light cream and beige sections, followed by green and red accents. The design relies on repetition, so each quadrant should follow the same planned color sequence in mirrored orientation. Labeling the strips by color and construction order can prevent confusion. Small paper notes such as A1, A2, B1, and B2 are often enough to keep similar-looking cream strips organized.
The central cross should be planned early because it controls the balance of the composition. In the reference design, a broad golden-yellow vertical strip and horizontal strip intersect in the middle, separating the four log cabin-inspired quadrants. Narrow red strips sit alongside portions of the cross, creating a crisp transition between the gold and surrounding patchwork. Measure the completed quadrant sections before cutting the final cross strips so small variations in piecing can be accommodated without distorting the quilt.
Prewashing fabric is optional, but consistency is important. If you prewash one fabric, consider prewashing all fabrics to reduce differences in shrinkage. Press the material before cutting rather than stretching it with the iron. Straight, flat fabric produces more reliable strips. Once everything is prepared, organize the pieces into four groups corresponding to the upper-left, upper-right, lower-left, and lower-right sections. This simple organizational step makes the actual sewing process much easier.
Step-by-Step Piecing of the Four Log Cabin Sections
Begin with the small golden center units. Cut four similarly sized golden rectangles or squares according to the proportions you want for your quilt. In the upper sections of the reference quilt, these centers appear more compact, while the lower sections develop into longer vertical golden centers. If you want a closer visual interpretation of the photographed quilt, create two compact upper units and two elongated lower units. If you prefer complete symmetry, four matching centers can also produce an attractive variation of the Crossed Log Cabin quilt.
Add the first cream or beige strip to one side of each center piece using a consistent 6 mm seam allowance, approximately 1/4 inch. Press the seam carefully before attaching the next strip. Continue around the center, adding strips in a controlled sequence. This process is the foundation of log cabin piecing: each newly attached strip extends the block and provides an edge for the next piece. Check frequently that the corners remain square and that the strips are not gradually leaning to one side.
Continue building outward with alternating ivory and subtle beige-print strips. These closely related colors create the layered appearance visible in the reference image without making the center excessively busy. Press after every seam, preferably pressing consistently toward the darker fabric when practical. Avoid aggressively moving the iron back and forth because that can distort long narrow strips. Placing the iron down, lifting it, and repositioning it helps preserve accurate geometry.
As the units grow, introduce the green strips. Use at least two green values if you want additional depth: a medium leafy green and a deeper forest green work particularly well. Position these strips so they form the strong L-shaped sections that turn toward the central cross. The green areas should mirror one another across the quilt. Lay all four sections on a flat surface after adding each major color group. Comparing them side by side makes discrepancies easier to identify before additional strips are attached.
Next, incorporate the deep red strips that visually separate the green sections from the golden cross. Red is a powerful color in this composition, so relatively narrow bands can create substantial impact. Keep these strips straight and consistent. After sewing, measure the corresponding edges of opposing quadrants. If one unit is slightly larger, determine whether a seam can be corrected rather than immediately trimming away fabric. Accurate piecing at this stage will simplify the central assembly considerably.
Finish the quadrant construction with the necessary cream and beige strips around the outside edges. Square the sections gently, removing only the minimum amount required to create straight edges. Arrange all four units on a design wall, table, or clean floor and rotate them until the log cabin pathways mirror each other correctly. You should now be able to see the basic crossed composition emerging even before the yellow center strips are installed. Photographing the arrangement can be helpful before carrying the individual sections to the sewing machine.
Creating the Golden Cross, Borders, Quilting, and Binding
Construct the central feature using golden-yellow fabric strips. First join the appropriate quadrant sections around the vertical portion of the cross, maintaining the red accent strips along its sides. Then establish the horizontal golden band across the quilt. Where the two bands intersect, carefully align the seams so the intersection appears deliberate and centered. Pinning or clipping at key matching points prevents the layers from shifting while sewing. Press these longer seams patiently to keep the quilt top flat.
The central intersection can include a subtle pieced detail, as suggested by the diamond-like quilting and seam structure visible in the reference image. You can keep the intersection as a simple golden square for easier construction or piece smaller golden shapes together for additional detail. Either approach preserves the recognizable character of the “Crossed Log Cabin” Quilt Tutorial Pattern. What matters most is that the horizontal and vertical yellow bands remain visually straight and that the four surrounding sections meet evenly.
Once the central composition is assembled, add the light inner borders. The photograph uses multiple cream and beige layers to continue the log cabin effect beyond the main blocks. Measure the quilt through its center vertically and horizontally before cutting border strips. Avoid simply cutting borders to an assumed dimension because slight differences can occur during piecing. Sew opposite borders first, press them, and then attach the remaining pair. Repeat this process for additional cream or beige frames.
Add a golden-yellow border outside the light sections to echo the central cross. Follow it with a wider deep red outer border, which provides the strong frame visible in the photograph. A narrow golden binding or accent at the very edge can complete the color repetition. Every border should be measured from the actual quilt rather than stretched to fit. Correctly measured borders help prevent waves and puckering, particularly when several concentric borders are used.
Prepare the quilt sandwich by placing the backing fabric wrong side up, followed by the batting and then the completed quilt top right side up. Smooth each layer carefully and baste with your preferred method. For quilting inspired by the photograph, use flowing leaves, feathers, gentle vines, or organic curves along the wider strips. Smaller areas can receive simpler loops or meandering stitches. Straight-line quilting is also an excellent alternative and emphasizes the geometric construction beautifully.
After quilting, trim the excess batting and backing while keeping the quilt square. Prepare binding strips, join them into one continuous length, fold and press them, and attach the binding around the perimeter. Miter the corners for a neat finish and join the final ends carefully. The binding can be completed by machine or finished by hand on the back. Give the quilt a final inspection, remove loose threads, and gently press only where necessary. Your Crossed Log Cabin quilt is now ready to display or use.
Frequently Asked Questions About the “Crossed Log Cabin” Quilt Tutorial Pattern
What is a Crossed Log Cabin quilt pattern? A Crossed Log Cabin quilt pattern combines visual elements of traditional log cabin construction with a prominent cross-shaped arrangement through the center. Instead of presenting individual log cabin blocks as completely independent units, the color placement connects them into a larger geometric composition. In this project, the golden cross acts as the central framework, while cream, green, and red strips create mirrored pathways around it. The result looks intricate even though much of the sewing consists of straight seams.
Is this quilt suitable for beginners? A confident beginner who is comfortable cutting strips and sewing straight seams can attempt this pattern. The individual techniques are not unusually complicated, but precision becomes important because four sections must align around a central cross. Beginners should work slowly, press after each seam, and measure frequently. Making a smaller wall-hanging version first is a useful way to understand the construction before committing to a larger quilt.
What fabric works best for this pattern? Quilting cotton is an excellent choice because it is stable, widely available, easy to cut, and comfortable to sew. The design benefits from fabrics with clear differences in value. Light cream and ivory fabrics create the background, medium and dark greens provide depth, red establishes strong boundaries, and golden yellow creates the focal point. Subtle tone-on-tone prints can add visual texture without hiding the geometry.
How can I keep the log cabin strips straight? Accurate cutting and a consistent 6 mm or 1/4-inch seam allowance are the most important factors. Press every seam before attaching the next strip and check the block periodically with a quilting ruler. If a strip is slightly curved or stretched, correct the problem immediately rather than hoping later strips will hide it. Small errors can multiply as additional rounds are added, especially in a design with several parallel lines.
Can I change the colors of the Crossed Log Cabin quilt? Absolutely. The structure is more important than reproducing the exact palette. A Christmas-inspired version could retain red, green, gold, and cream, while a modern version might use navy, gray, white, and mustard. A softer quilt could feature sage green, dusty rose, ivory, and beige. Whatever palette you select, preserve sufficient color contrast between neighboring strips so the central cross and log cabin shapes remain clearly visible.
How should the finished quilt be quilted? The decorative quilting can be as simple or elaborate as you prefer. The reference project features dense, flowing quilting that softens the strong geometric patchwork. Free-motion leaves, feathers, vines, loops, or gentle meandering can create a similar feeling. Beginners can use straight lines following the seams, parallel channels, or a basic walking-foot design. The important goal is to secure all three layers evenly while complementing rather than overwhelming the patchwork.
Conclusion
The “Crossed Log Cabin” Quilt Tutorial Pattern transforms simple strips of fabric into an impressive geometric quilt by relying on repetition, contrast, symmetry, and careful construction. Beginning with golden center pieces, the design grows through layers of cream and beige before introducing the dramatic green and red sections. Four carefully arranged units are then brought together around the distinctive golden central cross, creating the recognizable structure shown in the reference image.
The most important lesson throughout the project is precision. Consistent strip widths, accurate seam allowances, careful pressing, and frequent measurements help the four sections remain balanced. Taking time during the piecing stage also makes it much easier to add the central cross and surrounding borders without unwanted distortion.
The finishing stages offer plenty of room for creativity. Multiple cream borders can extend the layered log cabin effect, while gold and deep red borders repeat the strongest colors from the center. Decorative quilting with leaves, feathers, or flowing curves can reproduce the richly textured appearance of the inspiration, while straightforward walking-foot quilting provides an accessible alternative.
Whether you create a smaller decorative wall quilt or enlarge the proportions for a substantial home project, this “Crossed Log Cabin” Quilt Tutorial Pattern offers many opportunities to experiment with fabric and color while practicing essential quilting skills. Once you understand how the individual strips build the four sections, the seemingly complex pattern becomes a logical sequence of manageable steps.
EASILY FIND THE FREE PDF FOR THIS PATTERN HERE!
Most importantly, treat the photograph as inspiration rather than a restriction. You can adjust the dimensions, strip widths, prints, quilting density, and palette while maintaining the characteristic crossed log cabin arrangement. That flexibility makes this design suitable for traditional fabrics, seasonal palettes, modern solids, or treasured scraps organized by color. If you make your own version, leave your sincere opinion about the pattern and share your suggestions. It would be wonderful to know which color combination you would choose, what quilting style you would use, and what changes you would make to personalize your own Crossed Log Cabin quilt.