
Quilting is an art form that allows for endless creativity, and one of the most striking patterns is the interlocking Chevron quilt block.
This design offers a modern twist on the traditional Chevron, with interwoven shapes that create a dynamic, eye-catching result. In this tutorial, we will guide you through creating this unique quilt block, providing precise fabric measurements and cuts to help you achieve a polished finish.
Whether you’re an experienced quilter or a beginner, this guide will equip you with everything you need to make a stunning interlocking Chevron quilt block pattern.
What is an Interlocking Chevron Quilt Block Pattern?
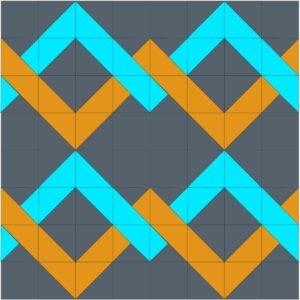
The interlocking Chevron quilt block pattern is a variation of the classic Chevron design, where V-shaped zigzags are interlaced to create a continuous flow. The pattern is bold and dynamic, often used as a central element in modern quilt designs. Unlike a standard Chevron, the interlocking version offers more complexity, making it a striking choice for quilt patterns that need movement and visual interest.
This pattern is ideal for both solid fabrics and prints, and it allows quilters to play with color placement to achieve different effects. You can opt for high contrast between the Chevron stripes or create a more subtle, blended look depending on your fabric choices. The interlocking Chevron quilt block pattern is particularly popular in quilts with geometric designs, offering both aesthetic appeal and technical challenge.
When integrated into a larger quilt project, this pattern can be repeated to create a cohesive design or paired with other blocks to add diversity. It’s a versatile and rewarding pattern that showcases the quilter’s skill and creativity.
Fabric Requirements and Cutting Instructions
To start making your interlocking Chevron quilt block, you will need a selection of fabrics in different colors. For this tutorial, we will use two contrasting fabrics, but feel free to experiment with additional colors or prints for added dimension. The fabric cuts are crucial for ensuring that your Chevron points align perfectly, so precise measurements are essential.
For a 12-inch finished block, you will need:
- Fabric A (main color): Cut two 6 ½” x 6 ½” squares.
- Fabric B (contrast color): Cut two 6 ½” x 6 ½” squares.
- Background fabric: Cut four 3 ½” x 6 ½” rectangles.
These cuts will give you the pieces needed to form the interlocking Chevron shapes. Keep in mind that for larger quilts, you will need to multiply these fabric requirements by the number of blocks you plan to use. Make sure your fabrics are ironed and straightened before cutting to ensure accuracy, which is key for achieving sharp points in your Chevron pattern.
The cutting process can be done using a rotary cutter and a quilting ruler for precision. Always double-check your measurements before cutting, as even small discrepancies can affect the alignment of your quilt block. Accurate fabric cutting is crucial for ensuring your quilt block comes together smoothly.
Step 1: Sewing Half-Square Triangles (HSTs)
To create the interlocking Chevron design, you’ll first need to make half-square triangles (HSTs) from your fabric pieces. Half-square triangles are a foundational element in many quilt patterns, and mastering them will allow you to create a variety of designs. For this block, we will use HSTs to form the Chevron points.
Take one 6 ½” x 6 ½” square from Fabric A and one from Fabric B. Place them right sides together. Draw a diagonal line from one corner to the opposite corner on the back of one of the squares. Sew a ¼” seam on both sides of the drawn line. After sewing, cut along the drawn line, and press the resulting HSTs open. You will now have two HSTs measuring 6 ½” square each.
Repeat this process for the remaining squares of Fabric A and Fabric B. In total, you should now have four HSTs. Press the seams open or to one side, depending on your preference, and trim the HSTs to ensure they measure exactly 6 ½” square. Precision is key to ensuring the points of your Chevron align correctly in the final quilt block.
Step 2: Arranging the Chevron Design
Now that your HSTs are ready, it’s time to arrange them into the Chevron pattern. Lay out your HSTs and background rectangles in a grid to visualize how the final block will look. The goal is to create an interlocking V-shaped design, where the points of the Chevron meet in the center of the block.
Arrange the HSTs so that the colored triangles form the Chevron points. The background rectangles will fill in the gaps between the HSTs, creating the negative space that allows the Chevron pattern to stand out. Play around with the placement of the HSTs until you achieve the desired look.
Once you’re satisfied with the arrangement, start by sewing the HSTs together in pairs, aligning the seams carefully to ensure the points match up. After the HSTs are sewn together, attach the background rectangles. Make sure to press your seams as you go to keep the block flat and easy to handle.
Step 3: Assembling the Block
With your HSTs and background rectangles sewn together, it’s time to assemble the final block. Begin by joining the rows of HSTs and background rectangles. Align the seams carefully to ensure that the points of the Chevron pattern match up at the center of the block. Sew each row together using a ¼” seam allowance.
Once the rows are sewn, press the seams open or to the side. Now, sew the rows together, making sure to pin at the points where the Chevron meets to ensure everything lines up perfectly. This step requires patience and attention to detail, but it’s worth it to achieve sharp points and a professional-looking finish.
After sewing the rows together, give the entire block a final press. Your completed interlocking Chevron quilt block should now measure 12 ½” square, including seam allowances. Once it’s joined with other blocks, it will finish at 12” square in the final quilt.
Tips for Achieving Perfect Chevron Points
Getting the points of the Chevron design to align perfectly can be tricky, but with a few tips, you can ensure your quilt block looks polished. First, make sure you are using a consistent ¼” seam allowance throughout the entire process. Even slight variations can throw off the alignment of the Chevron points.
Pinning is another important step. When sewing the rows together, pin at the points where the Chevron shapes meet to hold the fabric in place. This will prevent shifting as you sew and help maintain precise points in the final block. Take your time and sew slowly to ensure everything stays aligned.
Lastly, pressing your seams as you go will make a big difference in how flat and even your quilt block turns out. Some quilters prefer pressing seams open, while others press to one side. Experiment with both methods to see which gives you the best results for your interlocking Chevron quilt block pattern.
How to Use the Interlocking Chevron Block in Your Quilt
The interlocking Chevron block is a versatile design that can be used in many different ways within a quilt. You can repeat the block across an entire quilt top for a bold, geometric design, or mix it with other block patterns for added variety. The Chevron pattern can be rotated, mirrored, or rearranged to create new and interesting layouts.
This pattern works well in both modern and traditional quilts. For a more contemporary look, use solid fabrics in contrasting colors, or experiment with prints for a playful, eclectic effect. The interlocking Chevron quilt block pattern can be a stunning focal point when used in a quilt’s centerpiece or a repeating motif across the entire project.
Whatever your approach, the interlocking Chevron block offers endless possibilities for creativity and customization in your quilt patterns.