
Creating a Cathedral Window quilt block is a beautiful and intricate quilting technique that combines hand stitching with unique fabric folds to create stunning three-dimensional effects.
The block is inspired by the stained glass windows of cathedrals, making it a favorite for quilters who enjoy detailed, artful quilt patterns. In this tutorial, we will walk you through each step of making a Cathedral Window quilt block, focusing on the necessary fabric cuts, folding techniques, and sewing tips.
We’ll also use important keywords like “quilt” and “quilt patterns” to ensure this tutorial is not only helpful but also optimized for search engines.
Materials and Fabric Cuts for the Cathedral Window Quilt Block
When it comes to creating a Cathedral Window quilt block, the choice of fabric is essential. For the base, you’ll need a solid fabric, while for the window panes, small squares of patterned or colorful fabric work best. Here’s a breakdown of the necessary fabric cuts:
- Base fabric: Cut 10-inch squares for the background of your Cathedral Window blocks. You’ll need one 10-inch square for each block.
- Window fabric: Cut 4.5-inch squares for the window panes. These squares will be used to create the vibrant “windows” that pop through the folds of your block.
Having your fabric properly cut and prepared ensures a smooth sewing process and consistent results. Choosing a solid base fabric allows the window fabric to really stand out, making the design of the quilt block shine.
Step 1: Preparing the Base Fabric for Your Cathedral Window Block
Begin by folding the 10-inch base fabric square in half, wrong sides together, to form a rectangle. Press the fold firmly with an iron. Now, fold this rectangle in half again to create a square. You should now have a square that is approximately 5 inches across, and all raw edges should be aligned.
After pressing your folded fabric into a neat square, open it back up. You will see the creases that divide the fabric into four smaller squares. These creases are crucial as they will guide your folding in the next step.
For precise quilt patterns like Cathedral Windows, taking the time to properly fold and press your fabric will save you effort later. These neat creases act as templates, ensuring your final product maintains clean lines and balanced proportions.
Step 2: Creating the Folded Edges of the Window Block
Now, with your fabric square laid out, fold each corner into the center where the creases intersect. You should be creating a smaller square, as each corner meets in the middle. Press each fold firmly with your iron. At this stage, your fabric should resemble a smaller, origami-like quilt block with folded edges.
Once all four corners are folded and pressed, the next step is to sew along the edges to hold the folds in place. Use a needle and thread or your sewing machine, depending on your preference. Stitch close to the raw edge to ensure the folds stay secure.
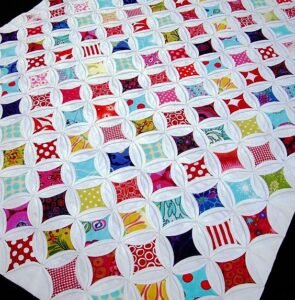
These folded edges are what give the Cathedral Window quilt block its signature look. The technique of folding the fabric creates the illusion of depth and texture, which sets this quilt pattern apart from others.
Step 3: Inserting the Window Pane Fabric
After securing the base fabric folds, it’s time to insert the window pane fabric. Take your 4.5-inch squares of patterned fabric and place one inside the center of your folded base block. Position the window fabric so that it sits neatly within the folds, with its edges just covering the center crease lines.
To secure the window pane, pin the fabric in place, making sure the edges are tucked neatly under the folds of the base fabric. You’ll now sew the window fabric along the curved edges of the folded base. This part of the process requires a bit of hand sewing, as you’ll be working with curved seams.
This step is the heart of the Cathedral Window quilt pattern. The small squares of vibrant fabric add pops of color and create the “windows” that draw the eye to the intricate design.
Step 4: Sewing the Curves to Complete the Block
With your window fabric securely in place, begin sewing along the curved edges where the base fabric meets the window fabric. Use a ladder stitch or whip stitch to sew along the curve, keeping your stitches small and neat. The goal is to sew the fabric in a way that creates a smooth, rounded window frame.
As you sew, you’ll notice that the fabric begins to take on the iconic Cathedral Window look. The curved seams give the illusion of a circular window pane, framed by the folded base fabric. Take your time during this step, as careful stitching will result in a cleaner, more polished quilt block.
Sewing the curved edges is a defining feature of the Cathedral Window quilt pattern. It adds complexity and dimension to the quilt, transforming simple fabric squares into a detailed and elegant design.
Step 5: Repeating the Process for Multiple Blocks
To create a larger quilt, you’ll need to repeat the process outlined above for each Cathedral Window block. As you sew multiple blocks, you can connect them by sewing the folded edges together. This will create a seamless, flowing quilt pattern that resembles a series of connected windows.
When connecting the blocks, align the folded edges of two completed blocks, and sew them together using small, hidden stitches. This method of connecting blocks gives your quilt a cohesive look while maintaining the individual beauty of each block.
The repetition of this process may seem tedious, but it’s essential for creating a quilt that showcases the Cathedral Window design. Each block adds to the overall effect, making your quilt a striking work of art.
Final Thoughts: Cathedral Window Quilt Patterns and Their Appeal
The Cathedral Window quilt block is more than just a quilting project—it’s a work of art that combines precision, patience, and creativity. While it may take longer to complete than other quilt patterns, the results are worth the effort. The unique folding and curved seams give the quilt a three-dimensional effect that stands out among more traditional flat quilt blocks.
Quilters who enjoy detailed, labor-intensive patterns will appreciate the Cathedral Window technique. It allows for endless customization, as each block can feature different fabrics, colors, and designs. The result is a quilt that is truly one-of-a-kind, with each “window” showcasing a unique piece of fabric art.
By following this tutorial, you’ll be well on your way to mastering the Cathedral Window quilt block. Whether you’re making a single block for a small project or an entire quilt, this pattern is sure to impress with its intricate design and timeless beauty.