
Creating a Carpenter Star quilt is a rewarding project for both beginners and seasoned quilters. This classic quilt pattern is not only beautiful but also versatile.
It can be adapted to various sizes and color schemes, making it a favorite among quilting enthusiasts.
In this tutorial, we’ll guide you through each step, from cutting the fabric to piecing the quilt top together, ensuring that you create a stunning Carpenter Star quilt with ease. Let’s dive into this timeless quilt pattern!
Materials and Fabric Requirements
Before starting, it’s crucial to gather all the necessary materials. A well-prepared quilter is a happy quilter, after all! Here’s a list of the essentials you’ll need for your Carpenter Star quilt project:
- Fabric: Choose four different fabrics – two for the star and two for the background. You will need:
- 1 yard of each fabric (if you’re making a lap-sized quilt)
- Batting: 1.5 yards of batting for a cozy, cushioned feel.
- Backing Fabric: 1.5 yards of backing fabric to cover the back of the quilt.
- Rotary Cutter and Cutting Mat: For precise fabric cuts.
- Sewing Machine and Thread: Ensure your machine is in good working order with matching or neutral thread.
Selecting your fabrics is one of the most exciting steps in creating your Carpenter Star quilt. You can use contrasting colors for a bold statement or opt for a monochromatic scheme for a more subtle, elegant design. The key to a successful quilt pattern is balance, so think about how your fabrics will work together.
The size of your quilt will also influence the amount of fabric you need. This tutorial covers a lap-sized quilt, but you can easily adjust the fabric measurements if you wish to create a larger or smaller quilt. Now that you have your materials, let’s get started with the cutting process!
Cutting the Fabric
Accurate cutting is essential to achieving crisp, clean lines in your quilt. The Carpenter Star pattern relies on Half Square Triangles (HSTs) and squares, which we’ll break down here.
- Cutting for the Star and Background Fabrics:
- Cut eight (8) 8-inch squares from each of your two star fabrics.
- Cut eight (8) 8-inch squares from each of your two background fabrics.
These 8-inch squares will be used to make the Half Square Triangles (HSTs) that form the Carpenter Star design. HSTs are an essential quilt pattern block, and they’re simple to make, but accuracy is crucial to ensure everything fits together seamlessly.
Using a rotary cutter and cutting mat will help ensure straight lines and accurate cuts. Always double-check your measurements before cutting to avoid mistakes. It’s much easier to take your time at this stage than to fix errors later!
Making Half Square Triangles (HSTs)
Now that your fabric is cut, it’s time to create the HSTs, which are the foundation of the Carpenter Star quilt pattern.
THE BEST QUILT PATTERNS
- Pair Your Fabrics: Take one square from each of your star fabrics and one square from each of your background fabrics. You should have four pairs of star-background squares.
- Draw a Diagonal Line: On the wrong side of the lighter fabric in each pair, use a fabric pen or pencil to draw a diagonal line from one corner to the opposite corner.
- Sew and Cut: Sew ¼ inch on either side of the drawn line. Once sewn, cut along the drawn line to create two HSTs from each pair of squares.
After you’ve sewn and cut all your squares, press the seams open. You’ll now have 32 Half Square Triangles, which will form the basis of your quilt pattern. Pressing the seams open helps reduce bulk and ensures your quilt lays flat, making it easier to piece the quilt top together.
One of the great things about this quilt pattern is how quickly the pieces come together. Creating the HSTs may seem repetitive, but this step ensures the geometric accuracy that makes the Carpenter Star design so striking.
Piecing the Carpenter Star Quilt Top
Now that you have all your HSTs and squares, it’s time to lay out your quilt top.
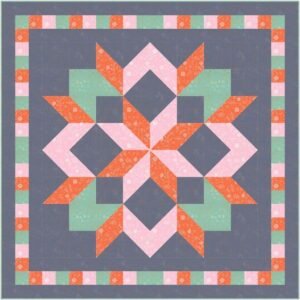
- Layout the Design: Arrange your HSTs and solid squares on a flat surface, following the Carpenter Star quilt pattern. The star will be in the center, with the background fabrics filling in around it.
- Sew the Rows: Sew your HSTs and squares together in rows. Use a ¼ inch seam allowance and press the seams as you go. Be sure to match points carefully when sewing.
- Join the Rows: After sewing the rows, join them together to complete the quilt top.
Carefully laying out your pieces before sewing is key to avoiding mistakes. Double-check that your HSTs are oriented correctly, as it’s easy to mix up the direction. Taking the time to preview your quilt top allows you to make any changes before sewing everything together.
Sewing the rows and joining them into a cohesive quilt top can be incredibly satisfying. As the star begins to take shape, you’ll see your hard work paying off. Once the quilt top is complete, it’s time to move on to the finishing touches.
Quilting and Finishing
With your Carpenter Star quilt top completed, it’s time to finish your quilt by layering, quilting, and binding.
- Layer the Quilt: Lay your backing fabric right-side down, followed by the batting, and then the quilt top right-side up. Smooth out any wrinkles to ensure an even finish.
- Baste the Layers: Baste the quilt layers together using safety pins or spray adhesive to prevent shifting while quilting.
- Quilt the Layers: Use your sewing machine or hand quilting to stitch the layers together. You can follow the seams or use a free-motion quilting design.
Quilting is where you can add extra texture and depth to your Carpenter Star quilt. You can choose a simple grid quilting pattern or something more elaborate, depending on your skill level and time available. The goal is to ensure the quilt layers are securely held together without distracting from the beauty of the star design.
Once the quilting is complete, it’s time to bind the quilt. Binding is the fabric that finishes the edges of your quilt, giving it a polished look. You can use a coordinating or contrasting fabric for the binding, depending on the aesthetic you’re aiming for.
Binding the Quilt
The final step in completing your Carpenter Star quilt is binding the edges. Binding adds a finished edge to your quilt and helps secure all the layers together.
- Prepare the Binding: Cut strips of fabric 2.5 inches wide and long enough to go around the entire perimeter of your quilt. You can piece together strips if needed.
- Attach the Binding: Starting at one corner, sew the binding strips to the front of the quilt using a ¼ inch seam allowance. Fold the binding over to the back and hand-stitch it in place.
- Finish the Quilt: Once the binding is attached, give the quilt a final press, and it’s ready for use or display!
Binding is the final touch that gives your quilt a clean, professional appearance. It’s worth taking the time to get this step right, as it will hold up the edges of your quilt through years of use. Once bound, your Carpenter Star quilt is ready to be cherished for generations.
Creating a Carpenter Star quilt is a rewarding experience that combines geometry, color theory, and careful craftsmanship. With this step-by-step tutorial, you now have all the tools and knowledge you need to create a beautiful Carpenter Star quilt of your own.
By mastering this quilt pattern, you’ll not only enhance your quilting skills but also create a timeless piece of art that you can be proud of for years to come. Happy quilting!