
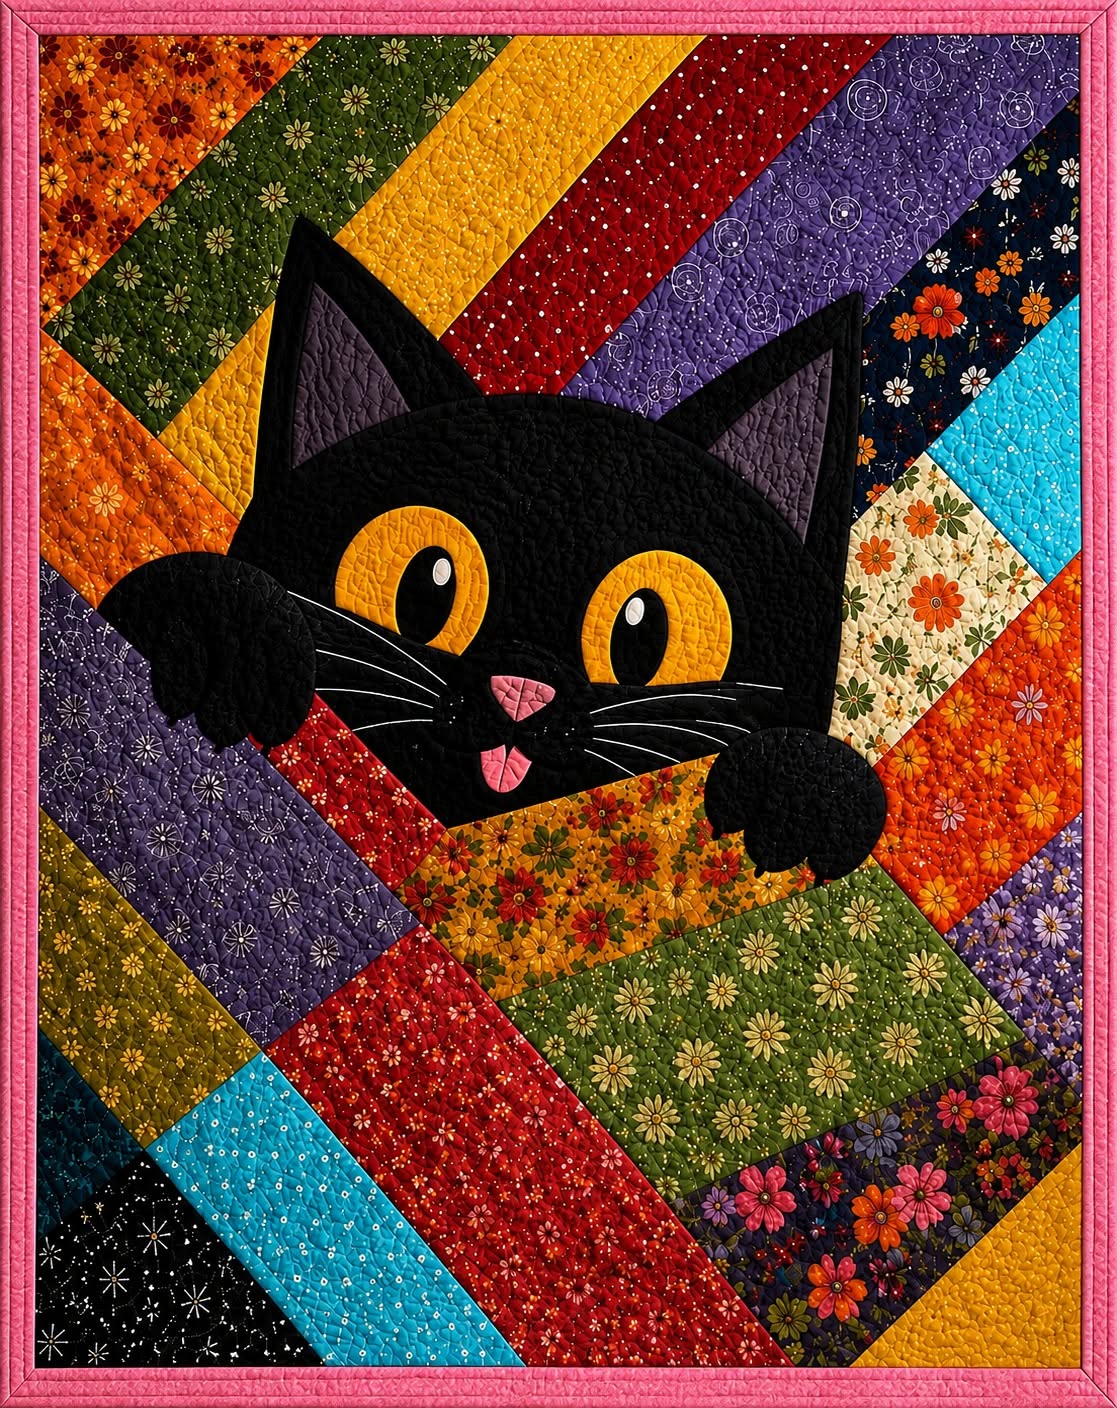
The Black Cat Quilt Tutorial Pattern is a cheerful quilting project that combines a playful cat appliqué with colorful diagonal fabric strips. Inspired by the quilt shown in the reference photo, this design features a large black cat peeking over a patchwork section, surrounded by bright floral prints, warm autumn shades, jewel tones, and contrasting black binding. The result is a decorative wall quilt that immediately becomes the focal point of a sewing room, bedroom, hallway, or creative studio. Although the finished piece looks detailed, it can be constructed gradually using familiar quilting methods such as strip piecing, appliqué, layering, quilting, and binding.
The project is especially suitable for quilters who enjoy expressive designs rather than traditional repeating blocks.
Each fabric contributes a different color, texture, and personality to the background.
The oversized cat gives the quilt a friendly and memorable character.
Simple shapes make the appliqué easier to prepare than it first appears.
Careful planning will help you recreate the visual balance of the original inspiration.
You can also personalize the colors without changing the recognizable composition.
This black cat quilt can be made as a wall hanging, a small lap quilt, or a larger decorative quilt by adjusting the dimensions of the background and appliqué pieces. The reference project uses diagonal strips in several widths, creating movement behind and below the cat. Floral cottons are ideal because they reproduce the lively garden-like appearance, but small geometric prints, batiks, polka dots, or fabric scraps can also work beautifully. For the cat, a deep black fabric provides the strongest contrast, while dark gray and purple fabrics add definition inside the ears, around the nose, and along the facial features.
Bright golden eyes create an appealing contrast against the black head.
White highlights make the pupils look lively and expressive.
A small pink tongue adds a humorous finishing detail.
The paws extending over the patchwork create the illusion of depth.
This layered composition makes the cat appear to be climbing into the quilt.
The design can therefore be both decorative and full of personality.
Before beginning the Black Cat Quilt Tutorial Pattern, read through every stage and organize the fabrics into groups. Separate the background strips by color, reserve the darkest fabrics for the cat, and select small scraps for the face. Prewashing quilting cotton is optional, but it can prevent unexpected shrinkage or color transfer. Press all fabrics before cutting and use a sharp rotary cutter to produce accurate edges. Since this project is inspired by an image rather than a fixed commercial template, the measurements below are flexible and can be adapted to the size you prefer.
A practical wall-hanging size is approximately 36 by 44 inches.
Add extra fabric around the background before trimming the quilt square.
Prepare the cat pattern on paper before cutting the final fabrics.
Label every appliqué piece to avoid confusion during assembly.
Keep the reference composition nearby while arranging the colors.
Taking time during preparation will make every later stage easier.
Materials and Fabric Preparation
For a medium Black Cat Quilt Tutorial Pattern, gather approximately two to three yards of assorted quilting cotton for the colorful background. This amount may come from yardage, fat quarters, precut strips, or a large scrap collection. Choose at least eight different colors so the diagonal layout feels varied. Good choices include orange, mustard yellow, olive green, red, purple, turquoise, navy, cream, and floral multicolor prints.
DISCOVER MORE FREE PATTERNS HERE!
You will also need about one yard of black quilting cotton for the cat, depending on the finished dimensions. Select a solid black or a subtle tone-on-tone print that will not compete with the background. For the inner ears, nose, and facial definition, prepare dark charcoal, deep purple, or muted gray scraps. These secondary dark tones help individual shapes remain visible against the main black appliqué.
Prepare golden yellow fabric for the outer eyes, black fabric for the pupils, and small white scraps for the eye highlights. A tiny pink or coral scrap can be used for the tongue. You may use white embroidery thread, narrow bias strips, fabric paint, or carefully stitched lines for the whiskers. Embroidery usually produces the softest and most durable result.
Additional supplies include quilt batting, backing fabric, fusible web, neutral piecing thread, black appliqué thread, pins or fabric clips, a rotary cutter, an acrylic ruler, a cutting mat, an iron, and a sewing machine. A walking foot is useful when quilting the finished layers. A free-motion quilting foot is optional for adding textured stitching around the cat and background sections.
To create a printable cat appliqué pattern, tape several sheets of paper together and draw the main shapes at full size. Begin with a wide rounded head, then add two tall triangular ears. Draw separate templates for the inner ears, eyes, pupils, nose, tongue, muzzle area, and front paws. The paws should overlap the patchwork section so the cat appears to be leaning over it.
Mark the placement order on every paper template. Write labels such as “head,” “left ear,” “right ear,” “left eye,” and “right paw.” Remember that fusible appliqué templates may need to be traced in reverse, especially when a shape has a specific direction. Symmetrical pieces such as eyes can usually be flipped without affecting the design.
Building the Colorful Diagonal Quilt Background
Begin the background by cutting fabric strips in several widths, generally between 3 and 6 inches. Exact uniformity is unnecessary because slight width changes contribute to the lively patchwork style. Cut some strips long enough to cross most of the quilt and prepare shorter sections for filling corners. Keep the edges straight even when the strip widths vary.
Arrange the upper background strips diagonally from the lower-left direction toward the upper-right direction. Place warm and cool colors next to one another to create contrast. For example, orange may sit beside green, followed by yellow, red, purple, navy, and turquoise. Avoid grouping too many similar colors together, because the colorful strip quilt looks strongest when each area is visually distinct.
Sew the strips together using a consistent quarter-inch seam allowance. After joining each strip, press the seam toward the darker fabric whenever possible. Continue adding strips until the pieced section is larger than the intended top half of the quilt. The outer edges will look irregular at first, but they will be trimmed after the entire quilt background is assembled.
For the lower background, create another diagonal strip arrangement that moves in a slightly different direction. The reference composition includes a patchwork barrier in front of the cat, which can be built from medium and wide strips. Combine red, purple, turquoise, green, mustard, and floral prints. Position one large green floral section near the center to create a calm resting area among the brighter colors.
Join the upper and lower patchwork sections while leaving enough space for the cat appliqué. The cat’s body does not need to be constructed separately because the head and paws cover much of the central area. Before sewing the major sections together permanently, place the paper cat pattern over the background and confirm that the important colors remain visible around the face and ears.
Press the completed quilt top carefully from both sides. Use an up-and-down pressing motion rather than sliding the iron, which could distort the diagonal seams. Square the quilt top to the planned measurement, but leave a small amount of extra fabric if you expect the quilting to cause shrinkage. The background is now ready for the central black cat appliqué.
Creating and Attaching the Black Cat Appliqué
Trace each cat template onto the paper side of fusible web. Leave a small amount of space between the pieces, then cut loosely around each traced shape. Following the fusible web manufacturer’s instructions, press the pieces onto the wrong side of the selected fabrics. Allow the materials to cool completely before cutting precisely along the traced outlines.
Start assembling the face on a pressing sheet or directly on the quilt top. Position the large black head first, keeping it centered while allowing the ears to extend into the colorful upper background. Place the inner ear pieces on top of the black ears. The darker purple or charcoal sections should be slightly smaller so a black border remains visible around them.
Create the eyes by placing two large golden oval shapes near the middle of the face. Add tall black pupils, then position small white highlights close to the upper portion of each pupil. Slightly different highlight placement can make the cat look curious and animated. Check the expression from a distance before fusing the pieces permanently.
Add the nose near the lower center of the face and place the small pink tongue underneath it. A subtle dark muzzle may be added around the nose if more definition is desired. Arrange several thin whisker lines extending toward both sides. These can be embroidered after fusing, so marking their positions lightly with a removable fabric pen is enough at this stage.
Position the front paws so they overlap the diagonal patchwork in front of the face. Each paw should have a rounded upper shape and several stitched toe divisions. One paw may sit slightly higher than the other to make the pose look natural. Once all pieces are balanced, fuse them into place according to the adhesive instructions, protecting the fabric with a pressing cloth when necessary.
Secure every appliqué edge with a narrow zigzag, blanket stitch, or small straight stitch placed close to the edge. Black thread will blend into the head and paws, while matching thread can be used around the golden eyes and inner ears. Stitch slowly around curves and stop with the needle down whenever you need to reposition the quilt. Finish the face by embroidering whiskers, mouth lines, and paw divisions.
Quilting, Binding, and Finishing the Project
Prepare the backing fabric so it is at least 3 to 4 inches larger than the quilt top on every side. Lay the backing wrong side up on a clean surface, smooth the batting over it, and place the quilt top right side up. Baste the three layers with safety pins, temporary basting spray, or long hand-basting stitches.
Begin quilting near the center and work outward. Stitching in the ditch along the diagonal strip seams is an accessible option for beginners. This method secures the layers while emphasizing the background construction. You can then add additional lines inside wider strips for improved stability and visual texture.
For a more detailed finish, use free-motion quilting within the individual fabrics. Loops, flowers, gentle swirls, or small meandering lines complement floral prints. Keep the quilting density relatively consistent across the project. Areas with extremely dense quilting may shrink more than lightly quilted areas, potentially distorting the finished wall hanging.
Quilt the cat separately to enhance its shape. Echo stitch around the head, ears, paws, eyes, and facial pieces. A soft meandering texture inside the black fabric can help the cat stand out from the straighter background strips. Avoid stitching directly across the eyes, nose, tongue, or whiskers unless that effect is intentional.
After quilting, trim the excess batting and backing so all edges are straight. Prepare black binding by joining 2½-inch fabric strips with diagonal seams. Press the long binding strip in half with wrong sides together. Sew it around the front of the quilt, mitering the corners, then fold it to the back and secure it by hand or machine.
Add a hanging sleeve to the upper back if the quilt will be displayed on a wall. Include a fabric label with the project name, maker’s name, and completion date. Give the quilt a final gentle press and remove any visible marking lines. Your Black Cat Quilt Tutorial Pattern is now complete and ready to bring warmth, color, and playful charm to the room.
Frequently Asked Questions About the Black Cat Quilt Tutorial Pattern
Is the Black Cat Quilt Tutorial Pattern suitable for beginners?
A confident beginner can complete this project by dividing it into manageable stages. Basic experience with straight seams, pressing, and simple appliqué is helpful. Beginners may simplify the design by using fewer background strips and a raw-edge appliqué stitch.
What is the best fabric for a black cat quilt?
High-quality quilting cotton is the easiest material to cut, press, fuse, and stitch. A solid black fabric gives the cat a bold silhouette, while a subtle black-on-black print adds texture. Avoid very large prints on the face because they may make the features harder to see.
Can I make the quilt from fabric scraps?
Yes. This design is an excellent scrap quilt project because the diagonal background can include many colors and print styles. Small pieces are also useful for the eyes, inner ears, nose, highlights, and tongue. Longer scraps can be joined to form larger strips.
How can I enlarge or reduce the cat appliqué pattern?
Draw the cat on a grid and transfer it to a larger or smaller grid while maintaining the proportions. A copy or print enlargement function can also resize paper templates. Test the paper pattern on the quilt top before cutting fabric to ensure the new scale fits correctly.
Do I need fusible web for the appliqué?
Fusible web is recommended because it prevents the large cat shapes from shifting during stitching. However, traditional needle-turn appliqué can also be used. That method creates smooth folded edges but requires additional seam allowance around each appliqué template.
Which stitch should I use around the cat pieces?
A narrow blanket stitch provides a decorative finish, while a small zigzag offers strong edge coverage. A straight stitch near the raw edge creates a relaxed modern look. Choose a stitch based on your experience and the amount of handling the quilt will receive.
How do I stop the black fabric from showing lint?
Wash dark fabric separately before sewing and keep the work surface clean. A lint roller can remove loose fibers before final display. Dark thread and carefully trimmed appliqué edges also help the black sections look neat and polished.
Can this project be used as a bed quilt?
Yes, but the pattern will need to be enlarged or surrounded by additional borders and patchwork sections. For a bed quilt, secure all appliqué edges thoroughly and use washable materials. Balanced quilting across the entire surface will improve durability.
How should I wash the finished black cat quilt?
Wash it gently in cold water using mild detergent, preferably on a delicate cycle. A color-catching sheet may be helpful when the project includes strong reds, purples, or black fabrics. Dry it flat or tumble dry on low heat, following the care requirements of the chosen materials.
Can the whiskers be made with fabric instead of embroidery?
Narrow bias strips, thin ribbon, or carefully cut fused fabric may be used, but embroidery generally produces cleaner and more flexible whiskers. Machine stitching with white or light gray thread is another practical choice. Test the line width on scrap fabric before stitching the quilt.
Conclusion
The Black Cat Quilt Tutorial Pattern combines colorful diagonal patchwork, expressive appliqué, creative quilting, and a clean black binding in one memorable project. You learned how to select fabrics, construct the strip-pieced background, design the oversized cat templates, assemble the facial details, attach the paws, quilt the layers, and finish the edges professionally. The pattern can be adapted to available scraps, preferred colors, and different quilt sizes, making every version unique.
EASILY FIND THE PDF FOR THIS PATTERN HERE!
The most important part of this project is enjoying the creative process. Small changes in the eyes, paws, fabrics, or quilting texture will give your cat an individual personality. After completing your quilt, please leave your sincere opinion about the tutorial and share suggestions for future quilting projects. Your ideas can inspire new color combinations, appliqué themes, and imaginative patterns for other sewing enthusiasts.