
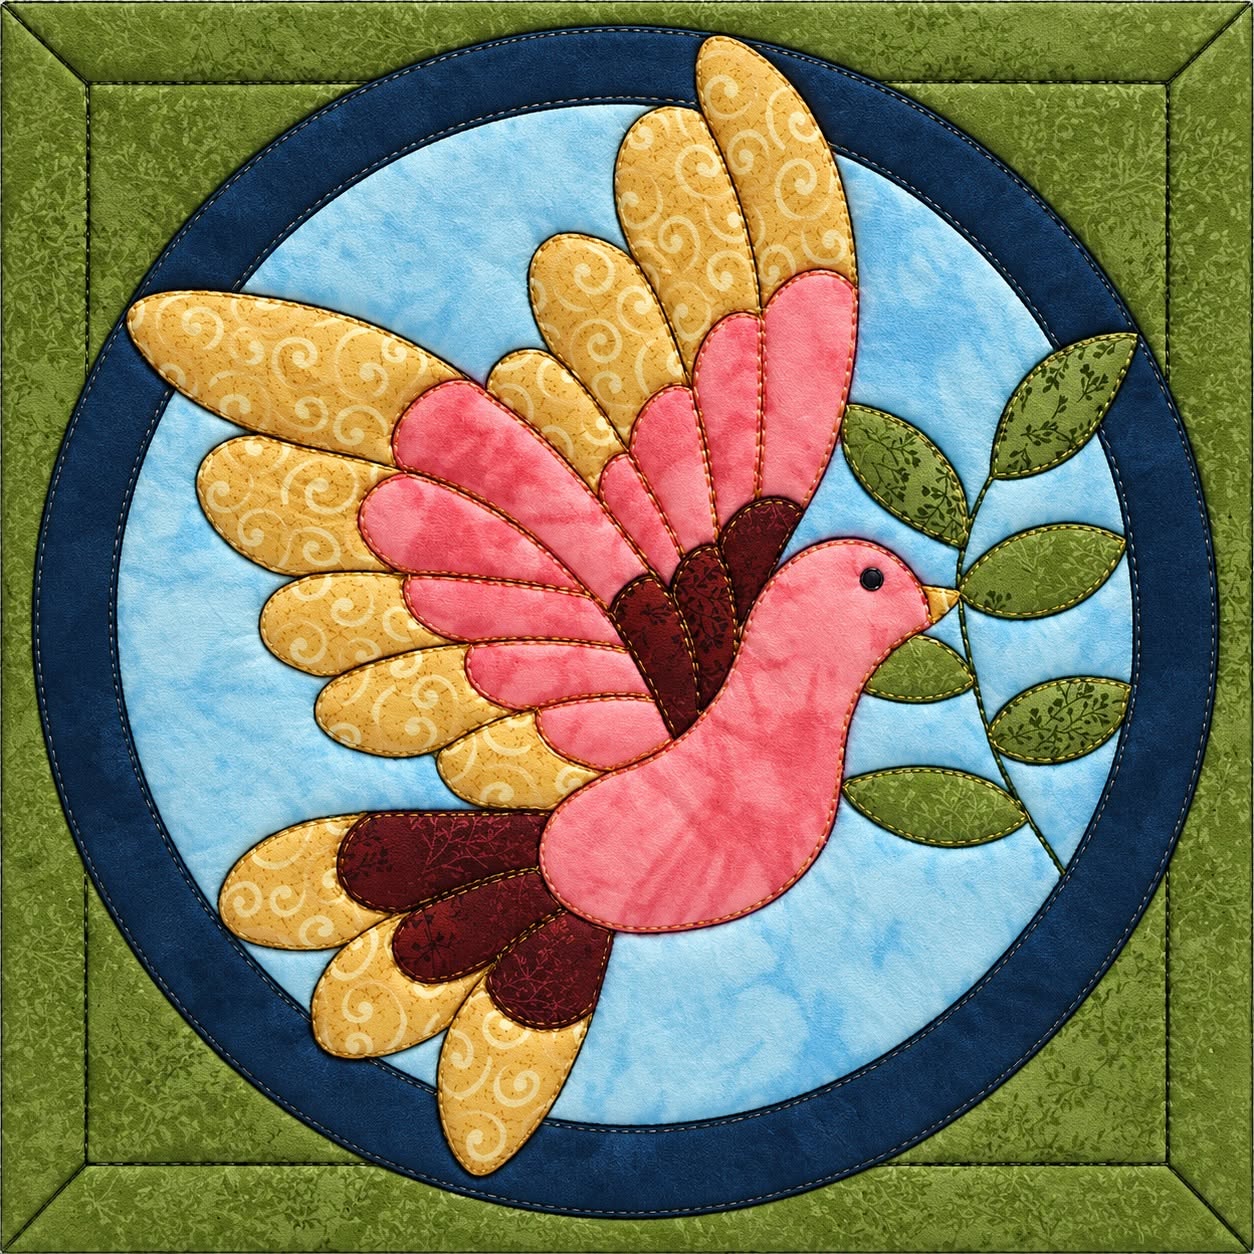
Creating the Wall Panel with a Bird in Circle Appliqué Fabric Pattern is a rewarding quilting and appliqué project that combines creativity, color harmony, and traditional sewing techniques into a decorative piece that can brighten any room. This beautiful design features a graceful bird framed inside a circular composition surrounded by a decorative border, making it suitable for living rooms, craft rooms, hallways, or even as a thoughtful handmade gift. Whether you are an experienced quilter or someone discovering fabric appliqué for the first time, this project offers the perfect balance between artistic freedom and structured construction.
One of the greatest advantages of the Wall Panel with a Bird in Circle Appliqué Fabric Pattern is its versatility. By changing the colors, prints, and background fabrics, every maker can create a completely unique interpretation while following the same pattern. Floral fabrics, textured cottons, batiks, and tone-on-tone prints work beautifully together, allowing the finished wall hanging to reflect different decorating styles, from rustic farmhouse to modern country décor. Because every fabric contributes to the overall composition, careful color selection is just as important as precise stitching.
This tutorial explains each stage of making the Wall Panel with a Bird in Circle Appliqué Fabric Pattern in a clear, beginner-friendly way while also including useful techniques appreciated by advanced quilters. Throughout the project, you will learn how to prepare the background, organize appliqué pieces, assemble the circular centerpiece, attach decorative borders, quilt the layers, and finish the panel professionally. By following these detailed steps, you will gain confidence in fabric appliqué while creating a timeless handmade decoration that can be proudly displayed for many years.
Preparing Your Fabrics and Planning the Design
Before cutting any fabric, carefully study the pattern and identify every individual appliqué piece. Separating the bird, wings, leaves, circle, and border elements beforehand helps prevent mistakes later during assembly.
DISCOVER MORE FREE PATTERNS HERE!
Choose high-quality quilting cottons because they are easy to cut, stable while sewing, and provide crisp edges after pressing. Coordinating prints create visual depth without overwhelming the overall composition.
Wash and press every fabric before tracing the pattern pieces. Prewashing minimizes future shrinkage and helps maintain the finished panel’s appearance after cleaning.
Transfer each template onto fusible web following the manufacturer’s instructions. Label every piece clearly so similar shapes are not confused during assembly.
Prepare the background square first before adding any appliqué. A smooth, wrinkle-free background makes positioning easier and produces a more polished final result.
Arrange all pieces on a flat surface without ironing them immediately. This allows you to experiment with spacing, balance, and color placement before permanently fusing the design.
Step-by-Step Construction of the Bird Appliqué
Begin by creating the circular background that frames the bird. This large element serves as the focal point and should be centered carefully on the panel before any smaller pieces are attached.
Fuse the bird body into position first. Since every other appliqué component relates to the body, this establishes the correct proportions for the remaining pieces.
Add the layered wings one section at a time. Slightly overlapping the feathers creates dimension while maintaining the soft appearance that characterizes the Wall Panel with a Bird in Circle Appliqué Fabric Pattern.
Continue by placing the tail feathers underneath the bird body. Alternate lighter and darker fabrics to create movement and emphasize the elegant shape of the bird.
Position the leafy branch so it aligns naturally with the bird’s beak. The leaves should curve gently to reinforce the circular flow of the overall composition.
After confirming every piece is correctly positioned, permanently fuse the entire design. Stitch around each appliqué shape using your preferred technique, such as a narrow satin stitch, blanket stitch, or fine machine appliqué stitch, depending on the finish you want to achieve.
Choosing Fabrics That Enhance the Finished Panel
The charm of the Wall Panel with a Bird in Circle Appliqué Fabric Pattern comes from the thoughtful combination of colors and prints. Soft floral fabrics, subtle tone-on-tone prints, and gentle textures work together to create a harmonious design that feels both elegant and welcoming.
Select a light fabric for the circular background to help the bird become the visual focal point. Pale blues, soft creams, or delicate sky-inspired fabrics provide excellent contrast while maintaining a calm appearance.
For the bird, combine complementary shades instead of using identical fabrics throughout the wings. Mixing warm pinks, golden yellows, rich browns, and subtle accents adds realistic depth and gives every feather its own personality.
Leaves look especially attractive when made with several shades of green rather than a single fabric. Combining light olive, moss green, and darker botanical prints creates a natural effect that complements the bird beautifully.
The outer border frames the entire artwork, so choose fabrics that coordinate without competing for attention. A floral print paired with a solid or lightly textured border often produces a balanced and sophisticated result.
Before sewing permanently, photograph your layout from above. Looking at the arrangement through a picture often reveals small adjustments that improve symmetry, spacing, and overall visual harmony.
Quilting, Finishing, and Displaying Your Wall Panel
Once the appliqué stitching has been completed, prepare the quilt sandwich by layering the quilt top, batting, and backing fabric. Smooth every layer carefully to eliminate wrinkles before securing them with safety pins or temporary spray adhesive.
Choose quilting lines that complement rather than overpower the appliqué. Gentle echo quilting around the bird and circular background enhances the design while allowing the appliqué to remain the primary focus.
Quilting inside the background sections with soft curved lines can create additional texture that resembles movement in the sky. Meanwhile, simple stitching around the leaves helps define their individual shapes without making the project appear too busy.
After quilting, trim the panel evenly using a rotary cutter and quilting ruler. Straight, square edges are essential for applying the binding neatly and ensuring the finished wall hanging looks professional.
Attach the binding using your preferred quilting method, taking extra care at the corners for crisp mitered finishes. A coordinated binding fabric completes the design and provides durability for long-term display.
Finally, sew a hanging sleeve onto the back of the panel if you intend to display it on a wall. This simple addition allows the Wall Panel with a Bird in Circle Appliqué Fabric Pattern to hang evenly while keeping all hardware hidden from view.
Frequently Asked Questions (FAQ)
Is the Wall Panel with a Bird in Circle Appliqué Fabric Pattern suitable for beginners?
Yes. Although the project includes multiple appliqué pieces, each component is relatively simple to assemble. Beginners who work patiently and follow the pattern step by step can achieve beautiful results.
What fabrics work best for this project?
High-quality quilting cotton is the most recommended choice. It is stable, easy to cut accurately, presses well, and provides excellent durability for decorative wall panels.
Which appliqué stitch should I use?
A blanket stitch, satin stitch, or narrow zigzag stitch are all excellent options. The best choice depends on your preferred style and the appearance you want for the finished project.
Should I use fusible web?
Yes. Fusible web helps stabilize every appliqué piece before stitching, making positioning much easier and reducing the chance of pieces shifting during sewing.
Can I customize the colors?
Absolutely. One of the greatest strengths of the Wall Panel with a Bird in Circle Appliqué Fabric Pattern is its flexibility. You can create seasonal versions, modern color palettes, vintage-inspired combinations, or coordinated home décor collections simply by changing the fabrics.
Can I resize the pattern?
Yes. The pattern can be enlarged or reduced using a photocopier or printer settings, provided that all pieces are scaled proportionally. Remember to adjust the background, borders, and batting dimensions accordingly.
What batting is recommended?
A low-loft cotton or cotton-blend batting is generally preferred because it produces a smooth finish while allowing the appliqué details to remain crisp and well defined.
How long does this project usually take?
Depending on experience and sewing speed, most quilters complete the project over several sessions. Taking your time with fabric selection, appliqué placement, and quilting usually produces the best final result.
Conclusion
The Wall Panel with a Bird in Circle Appliqué Fabric Pattern is much more than a decorative quilt project—it is an enjoyable opportunity to combine traditional appliqué techniques with creative fabric selection and thoughtful quilting. Throughout this guide, you learned how to prepare materials, organize the appliqué pieces, assemble the bird and circular centerpiece, select harmonious fabrics, quilt the finished panel, and apply professional finishing techniques that result in a beautiful handmade wall decoration.
EASILY FIND THE PDF FOR THIS PATTERN HERE!
By practicing careful cutting, precise placement, and consistent stitching, you can confidently create a timeless fabric artwork that reflects your personal style and sewing skills. Every completed panel becomes a unique expression of creativity, making it a wonderful addition to your home or a meaningful handmade gift for someone special. If you found this tutorial helpful, we would truly appreciate your sincere opinion about the project. Feel free to share your experience, your favorite fabric combinations, and any suggestions you may have. Your feedback and ideas help inspire future sewing and quilting enthusiasts while encouraging even more beautiful handmade creations.