
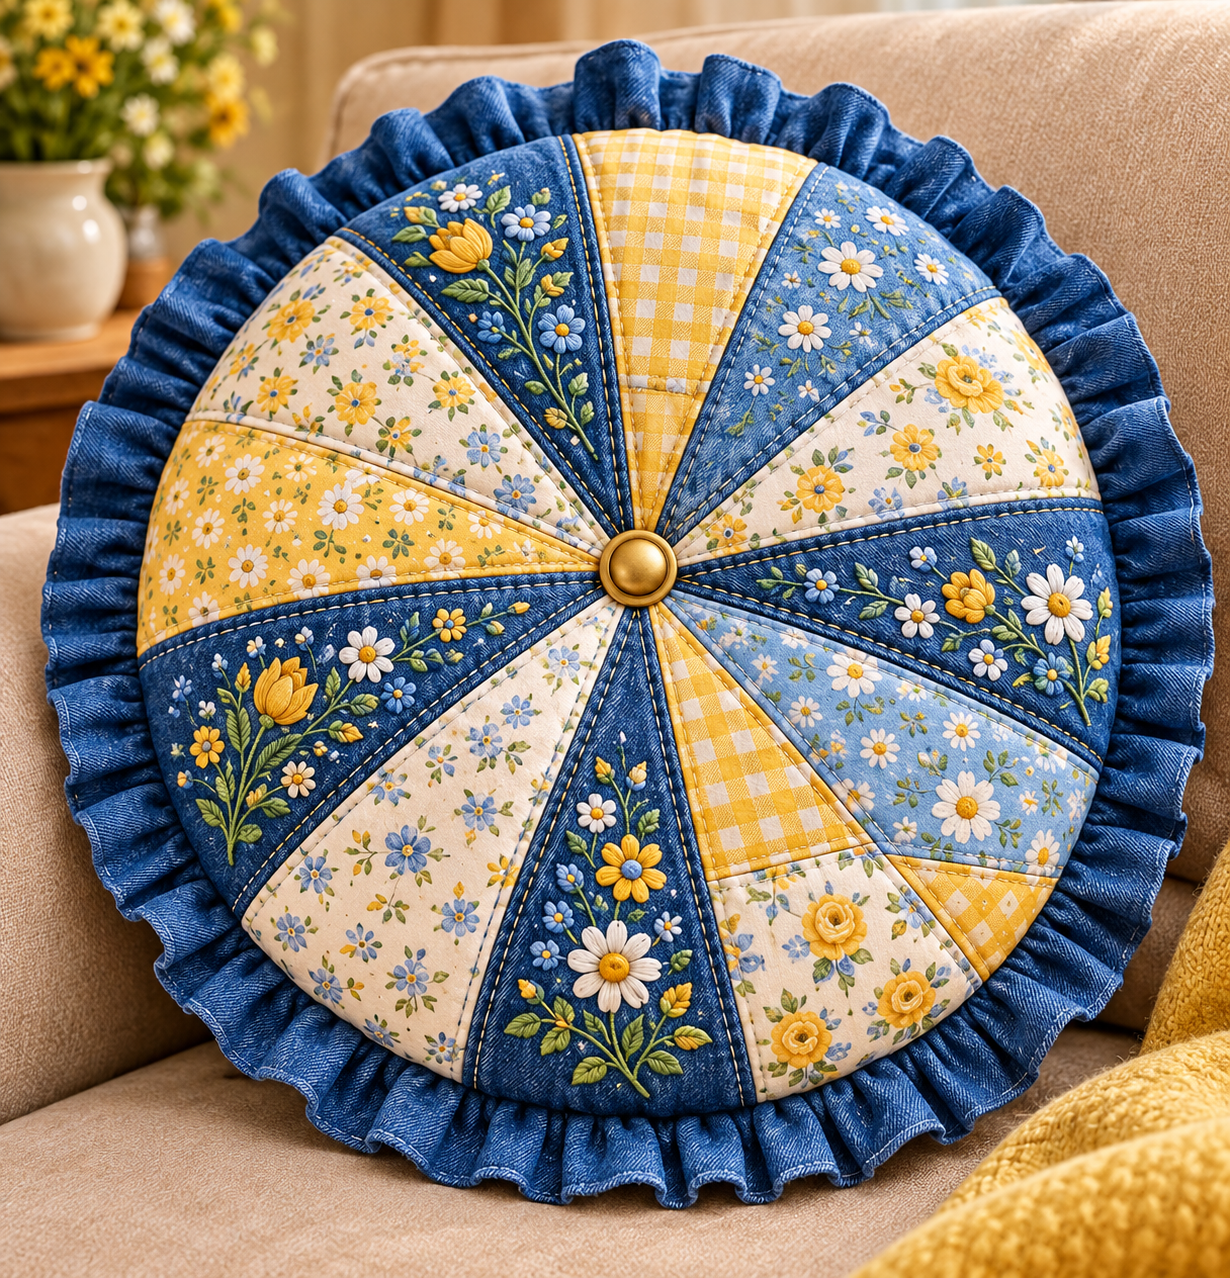
The Round Patchwork Cushion Pattern is a charming sewing project that combines traditional patchwork techniques with the comfort and decorative appeal of a soft round pillow. The design shown here uses wedge-shaped fabric sections arranged around a central point, creating a beautiful radial effect similar to flower petals or a fabric wheel. Blue, yellow, cream, gingham, and floral fabrics work together to give the cushion a cheerful country-inspired personality. A gathered ruffle around the outside adds volume and frames the patchwork beautifully, while the covered or decorative center button provides a polished finishing touch.
One of the best features of this Round Patchwork Cushion Pattern is the opportunity to combine several fabrics without making the finished project look overly busy. The repeated blue and yellow palette creates visual consistency even though the individual prints are different. Floral fabric, small-scale prints, gingham, and denim-look cotton can all work together when their colors relate to one another. The radial construction also makes this project useful for leftover fabric from previous quilting projects, although each scrap should be large enough to accommodate a complete wedge plus the required seam allowance.
Making a round patchwork cushion may appear complicated at first because every wedge needs to meet near the center, but the construction becomes much easier when the project is divided into clear stages. Accurate cutting, consistent seam allowances, careful pressing, and gradual assembly are the main techniques involved. You do not need highly specialized equipment, but patience is important because even small differences between wedge pieces can affect the final circle. The following tutorial explains the process from choosing fabrics and creating the wedge template to assembling, stuffing, ruffling, and finishing the cushion.
Materials, Fabric Selection, and Preparing the Round Cushion Pattern
Begin by deciding how large you want your finished cushion to be. A practical decorative size is approximately 45 to 50 cm (18 to 20 inches) in diameter, measured across the main patchwork body before adding the ruffle. You can make the cushion smaller or larger, but remember that changing the diameter also changes the dimensions of every wedge. Keeping the project around this size provides enough room to showcase floral prints while still creating a comfortable accent pillow.
DISCOVER MORE FREE PATTERNS HERE!
For a design inspired by the photograph, choose several coordinating quilting cottons in navy blue, medium blue, golden yellow, cream, and white. Try mixing floral prints with gingham and small-scale patterns. A medium-weight cotton or denim-look quilting fabric is especially attractive for the darker wedges and outer ruffle. Avoid combining extremely lightweight fabric with very heavy material unless you stabilize the lighter pieces, because inconsistent fabric weights can make the circle difficult to assemble smoothly.
You will also need polyester fiberfill, coordinating sewing thread, a hand-sewing needle, fabric scissors or a rotary cutter, an iron, pins or sewing clips, a ruler, paper for making the template, and a sewing machine. A decorative button approximately 3 to 4 cm (1¼ to 1½ inches) wide can be used in the center. Alternatively, you can make a fabric-covered button that coordinates with your chosen palette.
The characteristic wheel effect of the Round Patchwork Cushion Pattern is created with wedge-shaped pieces. For a beginner-friendly version, divide the circle into 12 equal wedges, giving each section an angle of approximately 30 degrees at the center before accounting for construction details. Create a full-size paper template rather than attempting to cut the pieces by eye. The wedge should extend from the cushion’s center to its outer circumference.
Remember that your template needs a seam allowance. A standard quilting seam allowance of approximately 6 mm (¼ inch) works well, provided you use it consistently throughout the entire project. If you prefer a larger sewing allowance, approximately 1 cm can also be used, but the template must be drafted accordingly. Consistency matters more than the particular allowance you choose because all twelve sections must eventually form a balanced circle.
Before cutting your best fabric, make one or two test wedges from inexpensive cotton. Arrange the paper templates in a complete circle to check their proportions, and then sew several test sections together. This simple preparation can prevent wasted fabric later. Once you are satisfied with the template, label it Round Patchwork Cushion Wedge, mark the seam allowance, center point, outer edge, and grain direction, and you are ready to begin the decorative patchwork.
Cutting and Sewing the Patchwork Wedges into a Complete Circle
Press all fabrics before cutting. Wrinkles can distort measurements, particularly along the angled sides of the wedges. Place the template on the fabric while respecting the grain direction whenever possible, trace around it carefully, and cut the required pieces. For a twelve-section cushion, cut 12 wedge pieces from your selected fabrics. Alternate dark, light, floral, and geometric fabrics to create a balanced composition.
Lay all twelve pieces on a large table or clean floor before sewing anything. Arrange them into the finished circle and experiment with their positions. Try not to place too many similar fabrics beside one another. In a blue-and-yellow patchwork cushion, for example, a dark blue floral wedge can sit beside yellow gingham, followed by cream floral fabric, another blue print, and so on. Photographing your final arrangement can help you remember the order while sewing.
Take the first two neighboring wedges and place them right sides together. Match their long angled edges, pin carefully, and stitch using your predetermined seam allowance. Do not stretch the fabric while sewing. Press the seam after stitching, following the same pressing direction throughout the project where practical. Pressing is especially important in radial patchwork because bulky or twisted seams can accumulate near the center.
Continue joining wedges into manageable groups instead of immediately constructing the entire circle in one continuous chain. For example, make four groups containing three wedges each. Check each group against your original layout. The outer edges should form a smooth curve, while the narrow tips should approach the same central point. If one section appears noticeably longer than its neighbors, correct the seam before proceeding.
Next, join the smaller groups together to form two semicircles. Place the semicircles on a flat surface and inspect their edges. When everything aligns correctly, sew the two halves together along the final seams. Press carefully and check the overall shape. Minor variations can often be corrected when trimming the outer circumference, but significant puckering near the middle usually indicates inconsistent seams or inaccurate wedge cutting.
For an especially polished Round Patchwork Cushion Pattern, optional decorative topstitching can be added beside each radial seam. A contrasting golden-yellow thread against dark blue fabric can highlight the wheel construction, while neutral thread creates a subtler result. Stitch slowly and maintain an even distance from each seam. Decorative stitching is optional, so beginners can omit it without affecting the structural construction of the cushion.
Adding the Ruffled Border, Cushion Back, and Three-Dimensional Shape
The generous gathered border is one of the most distinctive elements of this round cushion. To create it, cut fabric strips approximately 8 to 12 cm (3 to 4¾ inches) wide, depending on how deep you want the finished ruffle. Join the strips end to end until the total length is roughly 1.7 to 2 times the circumference of the patchwork circle. Extra length creates fuller gathers, while less fabric produces a softer ruffle.
Fold the long strip in half lengthwise with the wrong sides together and press it. Sew two parallel rows of long gathering stitches close to the raw edge without backstitching at the ends. Gently pull the bobbin threads to create gathers. Work gradually around the strip so the fabric gathers evenly instead of forming large clusters. The finished gathered edge should match the circumference of your cushion front.
Pin or clip the ruffle around the outer edge of the patchwork circle with the raw edges aligned and the folded edge pointing toward the center. Distribute the gathers evenly before sewing. Baste the ruffle to the cushion front and inspect it from the right side. This extra basting step takes a few minutes but makes final assembly considerably easier because the gathered fabric is less likely to shift.
For the back, cut a circle matching the size of the completed front. A coordinating solid blue, floral cotton, or sturdy quilting fabric works well. If you want a simple permanently stuffed cushion, use one complete back circle. If you prefer a removable cover, you can adapt the back by adding a concealed zipper, although this introduces an additional construction step and requires careful measurement.
Place the front and back right sides together, making sure the ruffle is sandwiched safely between them and pointing inward. Pin around the circumference and stitch slowly. Leave an opening approximately 12 to 15 cm (5 to 6 inches) long for turning and stuffing. Reinforce the beginning and end of the stitching around the opening because those areas experience additional stress while the cushion is being turned.
Turn the cushion right side out and gently shape the circumference with your fingers. Add polyester fiberfill gradually rather than pushing a large amount into the cover at once. Distribute the filling toward the outside edges first and then build fullness through the center. The goal is a plump cushion without excessive tension on the seams. Once satisfied with the shape, close the opening securely using a ladder stitch or another neat hand-sewing technique.
Finishing the Center and Styling Your Round Patchwork Cushion
The center of a radial cushion deserves special attention because all the patchwork lines naturally lead the eye toward it. A decorative or fabric-covered button hides minor irregularities where the wedge points meet and also gives the cushion its characteristic tufted appearance. Choose a button that complements the fabrics without overwhelming the surrounding prints. Gold, navy, cream, or matching fabric can all work effectively.
Use strong upholstery thread, doubled heavy-duty sewing thread, or another thread appropriate for tufting. Insert a long needle through the cushion from the center front to the center back. If you are using buttons on both sides, pass through the back button before returning through the cushion. Repeat several times until the connection feels secure. Take care when working with the long needle and keep your fingers away from its path.
Pulling the center slightly inward creates the attractive rounded shape seen in this style of Round Patchwork Cushion Pattern. The tension should be firm enough to form a gentle depression but not so strong that the fabric puckers excessively or the button damages the patchwork. Tie the thread securely. If the back does not have a decorative button, secure the thread carefully so the knot remains unobtrusive.
Inspect the entire cushion after tufting. Adjust the filling by gently massaging it through the fabric so the round shape is symmetrical. Straighten the ruffle and distribute any gathered sections that look uneven. Trim loose threads and check every seam. If you used decorative topstitching, look for skipped stitches or thread tails that may need to be secured before the cushion is placed on furniture.
Your finished cushion can be used as an accent on an armchair, reading chair, bed, window seat, or sofa. A blue-and-yellow palette has a cheerful cottage character, but the same round patchwork pattern can look completely different in autumn colors, Christmas fabrics, pastel nursery prints, farmhouse neutrals, or modern monochromatic cottons. The basic construction method remains unchanged, making the pattern easy to personalize.
Once you understand the construction, you can also experiment with variations. Use scraps from a favorite quilt, embroider selected wedges, add simple appliqué before assembly, or create several cushions in complementary palettes. The key is preserving accurate wedge construction and even seam allowances. Those fundamentals keep the radial design balanced regardless of how creative you become with fabric, stitching, and embellishment.
Frequently Asked Questions About the Round Patchwork Cushion Pattern
What is a Round Patchwork Cushion Pattern?
A Round Patchwork Cushion Pattern is a sewing design that uses multiple pieces of fabric to construct a circular cushion. In this version, wedge-shaped pieces radiate outward from the center, creating a wheel or flower-like arrangement. The method combines traditional patchwork sewing, cushion construction, gathering, stuffing, and optional decorative tufting.
Is this round patchwork cushion suitable for beginners?
Yes, especially for someone who already knows how to operate a sewing machine and sew a consistent seam allowance. The most challenging part is getting the wedge points to meet neatly in the center. Beginners should make a test section first and avoid rushing the cutting stage.
What fabrics are best for a patchwork cushion?
Good-quality quilting cotton is one of the easiest choices because it cuts cleanly, presses well, and is available in many coordinating prints. Cotton-linen blends and some lightweight denim fabrics may also work. Fabrics with similar weights generally produce the most predictable results.
How many fabric wedges are needed?
This tutorial uses 12 wedge sections to create the circular front. Twelve sections provide enough variety for mixing prints while keeping assembly manageable. A different number of wedges can be used, but changing the number requires redrafting the wedge template so all sections still form a complete circle.
Do I have to add the ruffled border?
No. The ruffle is decorative rather than essential. Without it, you can join the cushion front directly to the backing for a cleaner and more modern silhouette. You could also substitute piping, binding, or another edge treatment if you are comfortable adapting cushion patterns.
How much fabric is needed?
The amount depends on the cushion diameter, number of different prints, and width of the ruffle. This design is particularly useful for coordinating fabric remnants because individual wedges do not require large pieces. However, the backing and long ruffle usually require more continuous yardage than the patchwork front.
Why do my wedge points not meet perfectly in the middle?
The most common causes are inaccurate cutting, inconsistent seam allowances, stretching along angled fabric edges, or small alignment errors accumulating as the sections are joined. Constructing smaller groups first and checking their alignment before joining the full circle can help minimize these problems.
Should I prewash the fabric?
Prewashing is a personal construction choice, but it can be useful when you expect the finished cushion cover to be washed later. Washing fabrics beforehand allows potential shrinkage to occur before sewing. Whatever method you choose, treating all the main fabrics consistently helps avoid uneven behavior later.
Can I make the cushion cover removable?
Yes. Instead of permanently closing a stuffed cushion, the backing can be designed with a zipper or another removable-cover construction. Keep in mind that a strongly tufted center button may make a removable insert less practical, so decide whether you want tufting or easy removal before completing the back.
How do I make the center look professional?
Accurate sewing is the first step, but the center button is also extremely useful. It visually covers the narrow meeting point of the wedges and creates a deliberate focal point. Gentle tufting further emphasizes the radial design while helping the cushion develop its rounded, dimensional shape.
Can I use fabric scraps for this project?
Absolutely. A scrap fabric cushion is an excellent way to use leftover quilting cotton. For the most cohesive appearance, select scraps that share several colors or a common visual theme. Press each piece before cutting and make sure every scrap is large enough for the complete wedge template.
How can I keep the ruffle evenly gathered?
Divide both the ruffle and cushion circumference into quarters and mark each section. Match those quarter marks first, then distribute the gathers evenly within each section. Using two rows of gathering stitches instead of one also provides better control and helps prevent the gathers from twisting during assembly.
Can the cushion be made in other colors?
Certainly. Blue, yellow, cream, and floral prints recreate the cheerful appearance of the example, but the construction is not dependent on those colors. Red and green can create a holiday version, soft pink and sage can produce a romantic style, and neutral beige, cream, and brown fabrics can create a farmhouse-inspired cushion.
Conclusion
Completing Your Round Patchwork Cushion Pattern
The Round Patchwork Cushion Pattern brings several useful sewing skills together in one decorative project. You begin by selecting coordinating fabrics and preparing an accurate wedge template, then cut and arrange the sections before joining them into a balanced circular patchwork front. Careful pressing and consistent seam allowances are essential throughout these stages because the radial construction makes alignment especially visible.
After completing the patchwork circle, the gathered fabric border adds the dramatic ruffled finish that gives this cushion so much personality. The front and backing are then assembled, turned, filled gradually, and hand-stitched closed. Finally, the center button and gentle tufting bring the entire composition together and emphasize the beautiful wheel-shaped arrangement of the fabrics.
EASILY FIND THE FREE PDF FOR THIS PATTERN HERE!
The project is also highly adaptable. You can change the colors, floral prints, ruffle fullness, button style, cushion diameter, or decorative stitching while keeping the same fundamental Round Patchwork Cushion Pattern construction. Once you have successfully completed one cushion, the technique can become a useful foundation for creating personalized patchwork pillows for different rooms, seasons, and decorating styles. Most importantly, take your time with the cutting and alignment rather than trying to make every handmade detail absolutely identical. Thoughtful fabric selection, secure construction, and careful finishing are what make a handmade cushion attractive and durable. If you make your own version, leave your sincere opinion about the project and share any suggestions or creative ideas you would use to personalize this round patchwork cushion.