
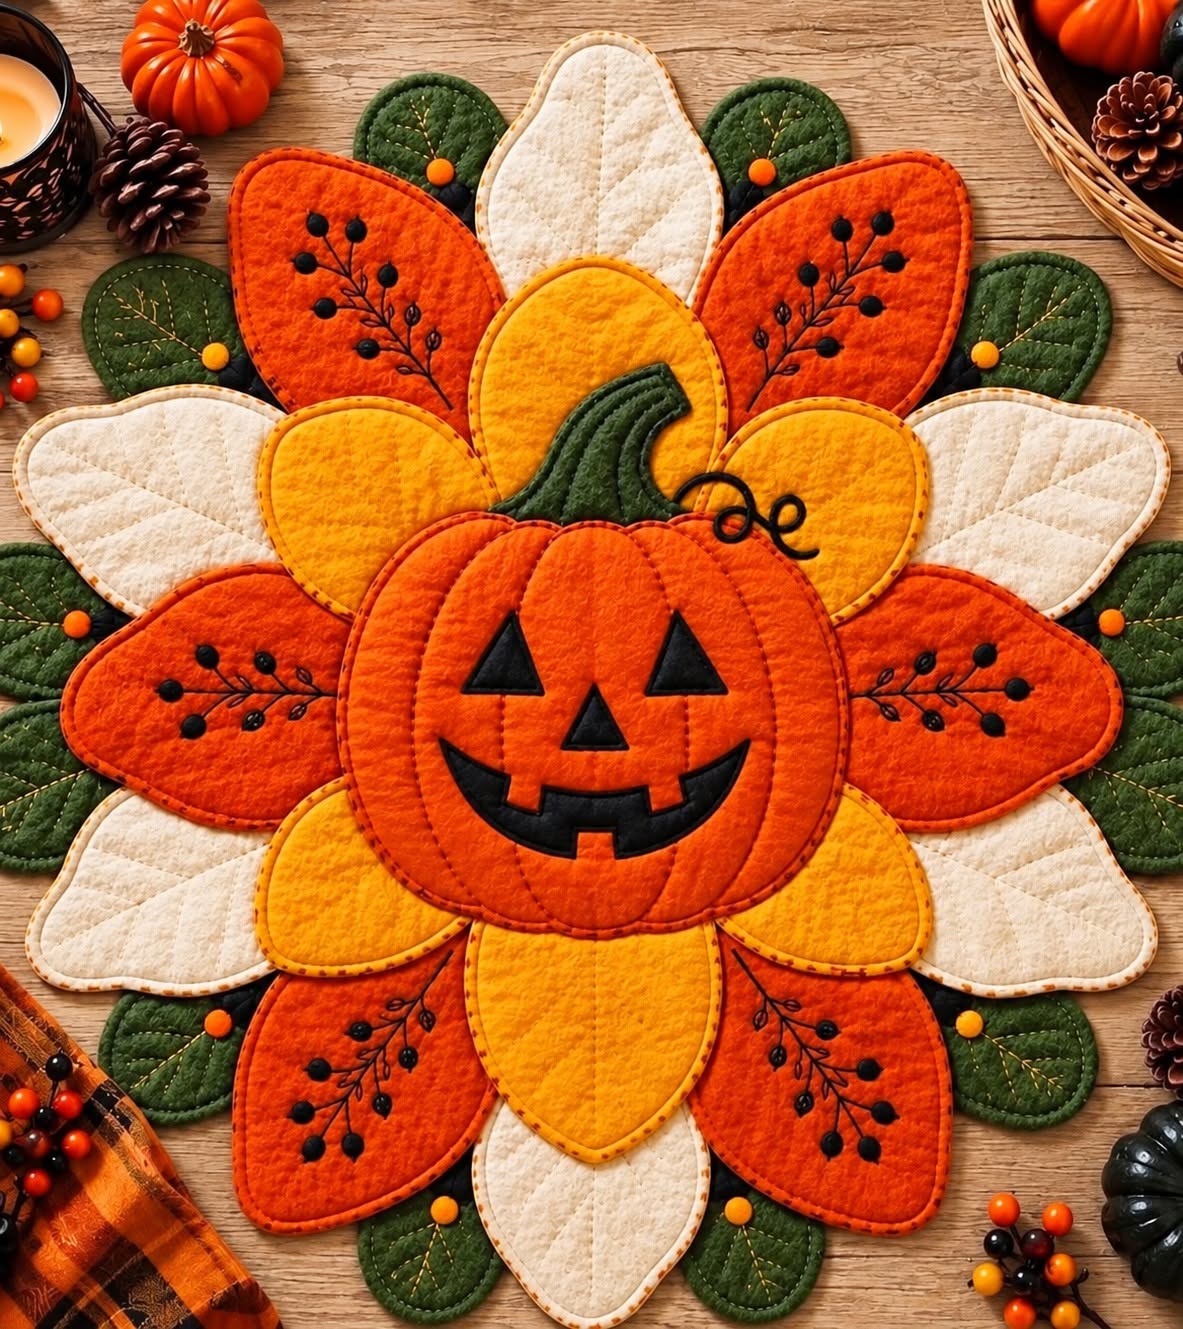
The Pumpkin Blossom Print Placemat Pattern is a warm, playful sewing project that brings together the best elements of autumn decorating, appliqué, quilting, and seasonal table décor. Inspired by the project shown in the image, this design features a cheerful jack-o’-lantern pumpkin positioned in the center of a large layered blossom made with orange, golden yellow, cream, and deep green fabrics. Decorative botanical stitching on several petals adds another level of detail, while the dimensional layering makes the finished piece look almost like a fabric flower arrangement. Although the design appears elaborate at first, it can be created gradually by preparing simple petal shapes and assembling them in organized layers. This makes the project approachable for confident beginners while still offering enough creative detail to interest experienced quilters. The finished placemat can become a memorable centerpiece for an autumn table, Halloween gathering, Thanksgiving setting, or seasonal kitchen display.
One of the most attractive features of the Pumpkin Blossom Print Placemat Pattern is the way basic sewing techniques are combined to create an impressive finished appearance. Instead of relying on complicated traditional quilt blocks, the pattern can be constructed from individual appliqué-style pieces, including rounded petals, leaves, a pumpkin, a stem, and facial features. Each section may be lightly quilted before final assembly, which helps create the softly padded texture visible in the inspiration image. The orange and cream petals radiate outward like a large flower, while the dark green leaves create contrast around the outer edge. A bright pumpkin occupies the center, making the project unmistakably autumnal. Choosing fabrics with subtle texture, tonal prints, or a slightly rustic appearance can enhance the handcrafted personality of the placemat without making the design visually overwhelming.
This tutorial explains a practical way to recreate the look of the Pumpkin Blossom Print Placemat Pattern using common quilting and sewing methods. Because handmade projects may vary according to fabric thickness, seam allowance, batting, and preferred finished dimensions, the measurements below can be adjusted rather than treated as rigid requirements. A finished diameter of approximately 48 to 55 cm works well for a decorative placemat or table centerpiece. Cotton quilting fabric is particularly suitable because it presses easily and holds appliqué shapes clearly. You will also need lightweight batting, backing fabric, coordinating sewing thread, dark thread for the decorative branches, basic cutting tools, pins or fabric clips, and your sewing machine. With careful preparation and a little patience, the project can be completed one layer at a time while maintaining a neat and professional-looking result.
Choosing Fabrics and Preparing the Pumpkin Blossom Pieces
Begin your Pumpkin Blossom Print Placemat Pattern by selecting a balanced autumn color palette. The inspiration design uses several shades of orange, golden yellow, cream, forest green, and black. Rather than choosing completely solid fabrics, consider tonal cotton fabrics with subtle variations in color because they can give the petals greater visual depth. Two or three orange shades are especially useful for creating separation between the flower and the central pumpkin.
DISCOVER MORE FREE PATTERNS HERE!
For a placemat measuring about 50 cm across, prepare approximately twelve to sixteen large outer petals, depending on how closely you overlap them. A practical petal size is around 15 to 18 cm long and 8 to 10 cm wide. Draw one symmetrical petal template on paper or lightweight cardboard, cut it out carefully, and use it to trace the remaining shapes. Slight variation is acceptable because handmade appliqué often looks more natural when the shapes are not mechanically identical.
Create several petals from orange fabric and several from cream fabric. The inspiration image alternates these colors around the composition, helping the flower remain bright without becoming overly orange. You can also prepare six to eight smaller golden petals measuring approximately 12 to 14 cm long. These pieces will form an inner flower layer behind the pumpkin and give the project its recognizable blossom structure.
The green leaves are equally important because they establish the outer silhouette of the Pumpkin Blossom Print Placemat Pattern. Cut approximately twelve rounded or oval leaves from deep green cotton. A finished leaf measuring roughly 8 to 10 cm is usually large enough to remain visible between the petals. If desired, use two different shades of green so the border has a more organic appearance.
Every petal and leaf can be constructed as a miniature quilted unit. Place the decorative fabric right side up over a small piece of batting and backing fabric. Stitch around the outline, trim the excess material, and finish the edge with a narrow satin stitch, zigzag stitch, blanket stitch, or close straight stitching. Another option is to sew the pieces right sides together, turn them through a small opening, press them flat, and topstitch the perimeter.
Before assembling anything permanently, place all the pieces on a large table. Arrange the cream and orange petals in a circular formation, positioning the green leaves behind them. Then place the smaller golden petals closer to the center. This dry arrangement is an essential step because it allows you to adjust spacing and symmetry before sewing. Photographing the layout before moving the pieces can also help you remember their ideal positions during construction.
Quilting the Petals, Leaves, and Decorative Botanical Details
The softly padded appearance of the inspiration project comes largely from quilting. Quilting simply means stitching together the fabric top, batting, and backing so the layers behave like one unit. For this project, the quilting does not need to be complicated. Straight lines, gentle curves, or stitched veins can create plenty of texture without competing with the overall design.
On the cream petals, quilt several curved or diagonal lines extending from the lower portion toward the outer edge. These stitches can imitate the natural vein structure of a leaf or flower petal. Use thread that is only slightly darker than the fabric if you want the quilting to remain subtle. Keeping the quilting understated allows the brighter orange sections to become the visual focus.
For the green leaves, stitch one central vein and several smaller branches extending toward the edges. This detail is especially effective on dark green fabric because the stitching catches the light and prevents the leaf sections from disappearing visually. If your sewing machine has decorative stitches, you may experiment with simple leaf-like patterns, although basic straight stitching works perfectly well.
Several orange petals in the Pumpkin Blossom Print Placemat Pattern feature small black botanical branches. These can be created with free-motion sewing, machine embroidery, hand embroidery, or carefully controlled straight stitching. Begin by drawing a thin curved branch using an erasable fabric marker. Add smaller branches and tiny circles resembling berries or flower buds.
If you prefer hand embroidery, use black embroidery floss and a simple backstitch for the branches. Small French knots can represent the berries. This technique takes longer than machine stitching but creates a beautiful handmade character. For beginners, the branch motif does not have to be identical on every petal. Small differences can make the finished design feel more natural and artisanal.
After quilting and decorating the individual shapes, press them carefully on an appropriate heat setting. Avoid flattening thick batting too aggressively. Arrange all the components again and check that the decorative branches point outward rather than being hidden beneath the center. At this stage, your Pumpkin Blossom Print Placemat Pattern should already begin to resemble a large dimensional autumn flower.
Creating the Central Jack-o’-Lantern Pumpkin Appliqué
The pumpkin is the main focal point of this pattern, so it deserves careful preparation. Draw or trace a rounded pumpkin approximately 22 to 26 cm wide. Instead of making it perfectly circular, create gentle curves along the upper and lower edges. You can divide the pumpkin visually into five sections to imitate the natural ribs seen on a real pumpkin.
Cut the pumpkin shape from rich orange fabric. Place it over lightweight batting and backing, then quilt several slightly curved vertical lines from the top toward the bottom. These lines create the segmented appearance visible in the inspiration image. Using dark orange or brown thread for the quilting can add definition while keeping the result softer than black stitching.
Next, prepare the pumpkin face from black fabric. Cut two triangular eyes and a small triangular nose. The smiling mouth can be drawn first on paper so you can establish the proportions before cutting the fabric. Create a wide curved smile with small rectangular openings resembling the playful carved teeth of a traditional jack-o’-lantern.
Secure the facial appliqué shapes with fusible web if you like working with raw-edge appliqué. Follow the instructions supplied with your fusible product and press carefully. Stitch around the eyes, nose, and mouth with a narrow zigzag, satin stitch, or straight stitch close to the edge. Black thread helps create a clean outline and gives the face the bold graphic appearance seen in the Pumpkin Blossom Print Placemat Pattern.
For the pumpkin stem, cut a curved piece from dark olive or forest green fabric measuring approximately 9 to 12 cm long. Add batting if you want the stem to have the same padded quality as the pumpkin. Quilt several curved lines across the stem to imitate natural ridges. You can also add a thin black curling vine beside the stem using fabric cord, embroidery, narrow appliqué, or dense machine stitching.
Place the finished pumpkin over the central golden petals and check the proportions before attaching it. The pumpkin should cover the inner ends of the petals while allowing their rounded outer sections to remain visible. Pin or clip the pumpkin securely, then stitch around its perimeter. At this stage, the central motif becomes firmly connected to the flower, and the characteristic look of the Pumpkin Blossom Print Placemat Pattern becomes clearly recognizable.
Assembling and Finishing the Pumpkin Blossom Print Placemat Pattern
Final assembly should be completed gradually instead of attempting to sew all the layers at once. Start with the green leaves. Position them in a circular arrangement with part of each leaf extending beyond the future petal layer. Baste them together temporarily or attach them to a lightweight circular foundation fabric. A foundation can make the placemat easier to handle, particularly if you are using many overlapping pieces.
Place the large orange and cream petals over the leaves. Alternate colors where possible and overlap neighboring petals slightly so there are no large gaps. Stitch each petal securely near its inner edge. Because these seams will eventually be hidden beneath the golden inner petals and pumpkin, they do not need to be visually decorative, but they should be strong enough to withstand regular handling.
Add the golden yellow petals as the next layer. Arrange them evenly around the center and allow portions of the orange and cream petals to remain visible. This layering creates the dimensional flower appearance that distinguishes the Pumpkin Blossom Print Placemat Pattern from an ordinary rectangular placemat. Make small adjustments as you sew so the design stays visually balanced.
Position the completed jack-o’-lantern over the center and attach it using a secure topstitch. If the project feels bulky, reduce the machine speed and use a quilting or walking foot if available. Never pull the fabric strongly while sewing because stretching the layers may distort the circular shape. Rotate the project gradually as you stitch around curved sections.
Inspect the entire placemat and trim any loose threads. If a foundation fabric is visible from the back, finish its edge neatly with binding, an additional backing layer, or close edge stitching. Press the placemat lightly and allow it to cool on a flat surface. The padded petals may need to be shaped gently by hand after pressing so they lie smoothly around the centerpiece.
Your finished Pumpkin Blossom Print Placemat Pattern can be used beneath a centerpiece, seasonal bowl, decorative tray, or simply displayed by itself. Because of the dimensional edges, it can also work beautifully as a small table topper. The combination of appliqué, quilting, embroidery-style decoration, and layered construction transforms ordinary cotton fabric into an inviting handmade autumn decoration that can be enjoyed year after year.
FAQ: Frequently Asked Questions About the Pumpkin Blossom Print Placemat Pattern
Is the Pumpkin Blossom Print Placemat Pattern suitable for beginners?
Yes. A beginner with basic knowledge of straight stitching and simple appliqué can complete this project successfully. The most important strategy is to work on one component at a time instead of thinking about the placemat as one complicated design. Start with the leaves and petals, practice the decorative stitching on fabric scraps, and construct the pumpkin after you feel comfortable. Free-motion quilting is optional, so beginners can use normal straight stitches for most details.
What fabric works best for this placemat?
Quality quilting cotton is one of the most convenient choices because it is easy to cut, press, appliqué, and quilt. Tonal fabrics can create subtle visual texture, while solids provide a clean modern appearance. Cotton batting works well when a softly padded result is desired. Avoid extremely thick upholstery fabric because multiple overlapping layers may become difficult to sew.
How large should the finished placemat be?
A finished width of approximately 48 to 55 cm works well for a decorative table mat based on the proportions of the inspiration image. However, the Pumpkin Blossom Print Placemat Pattern can easily be resized. For individual place settings, reduce the petals and central pumpkin proportionally. For a table centerpiece, enlarge the pieces while maintaining enough space for your sewing machine to handle the assembled layers.
Do I need an embroidery machine for the black branches?
No. The decorative branches can be made with a standard sewing machine, free-motion quilting, or hand embroidery. You can sketch the design lightly with a removable fabric pen before stitching. A basic backstitch and French knots are excellent options when working by hand. The botanical details are decorative rather than structural, so they can even be simplified if preferred.
Can I use fusible appliqué for the pumpkin face?
Yes. Fusible web makes the small black facial pieces easier to position before sewing. Once fused, stitch around the edges to make the appliqué more durable. A narrow zigzag or satin stitch creates a strong graphic outline, while a straight raw-edge stitch produces a more casual handmade appearance.
Can the placemat be washed?
Washability depends largely on the materials used. If all fabrics, batting, thread, and fusible products are washable, gentle cleaning should generally be possible. Prewashing cotton fabrics can reduce unexpected shrinkage and color bleeding. Because the design contains multiple dimensional pieces, gentle washing and air drying are usually better choices than aggressive machine cycles.
Can I make this pattern without the Halloween face?
Absolutely. Removing the eyes, nose, and mouth transforms the project from a Halloween decoration into a general autumn or Thanksgiving table topper. You could add more quilted pumpkin ribs, leaves, vines, or embroidered details instead. This versatility makes the Pumpkin Blossom Print Placemat Pattern useful throughout the entire fall season.
What is the best way to keep all the petals symmetrical?
Use one reusable template for each petal size and mark the center of your working surface before arranging the pieces. Position petals in opposite pairs rather than placing them consecutively around the circle. For example, place one petal at the top, another directly opposite at the bottom, then add pieces on the left and right. This method makes maintaining symmetry much easier.
How can I make the placemat look more professional?
Consistent seam allowances, careful pressing, smooth curves, secure appliqué edges, and evenly spaced quilting have a significant effect on the final appearance. Take extra time when positioning the layers, and avoid rushing through decorative stitching. Testing thread tension and stitch length on scraps before sewing the actual pieces is also a simple way to achieve cleaner results.
Can the Pumpkin Blossom Print Placemat Pattern be used for other projects?
Yes. The same construction idea can be adapted into a wall hanging, oversized pot holder, seasonal table centerpiece, decorative chair mat, or fabric wall decoration. Individual pumpkin and petal elements can also be reused for smaller projects such as mug rugs, cushions, tote bag panels, or appliqué blocks.
Conclusion
Creating a Pumpkin Blossom Print Placemat Pattern is a wonderful way to combine autumn colors with practical sewing and quilting techniques. Throughout this project, we explored how to select coordinating orange, cream, golden yellow, green, and black fabrics; prepare reusable petal templates; construct quilted leaves; add decorative botanical stitching; create a padded jack-o’-lantern; and assemble every element into a balanced layered flower. The project demonstrates that an intricate-looking seasonal design can be created from relatively simple shapes when they are carefully planned and layered.
The most important lesson is to enjoy the process rather than aiming for absolute mechanical perfection. Handmade quilting gains much of its character from small variations in stitching, fabric texture, and appliqué placement. You can follow the suggested measurements closely or personalize your Pumpkin Blossom Print Placemat Pattern with different colors, additional embroidery, alternative pumpkin expressions, or a more traditional fall design without the Halloween face. Once finished, the project can become a charming handmade detail for your autumn home décor and a useful example of how appliqué and quilting can work beautifully together.
EASILY FIND THE FREE PDF FOR THIS PATTERN HERE!
If you decide to create this Pumpkin Blossom Print Placemat Pattern, leave your sincere opinion about the project and share your suggestions. Which colors would you choose for your version, and would you keep the cheerful jack-o’-lantern face or transform the centerpiece into a classic autumn pumpkin? Your ideas can inspire even more creative variations of this colorful seasonal sewing project.