
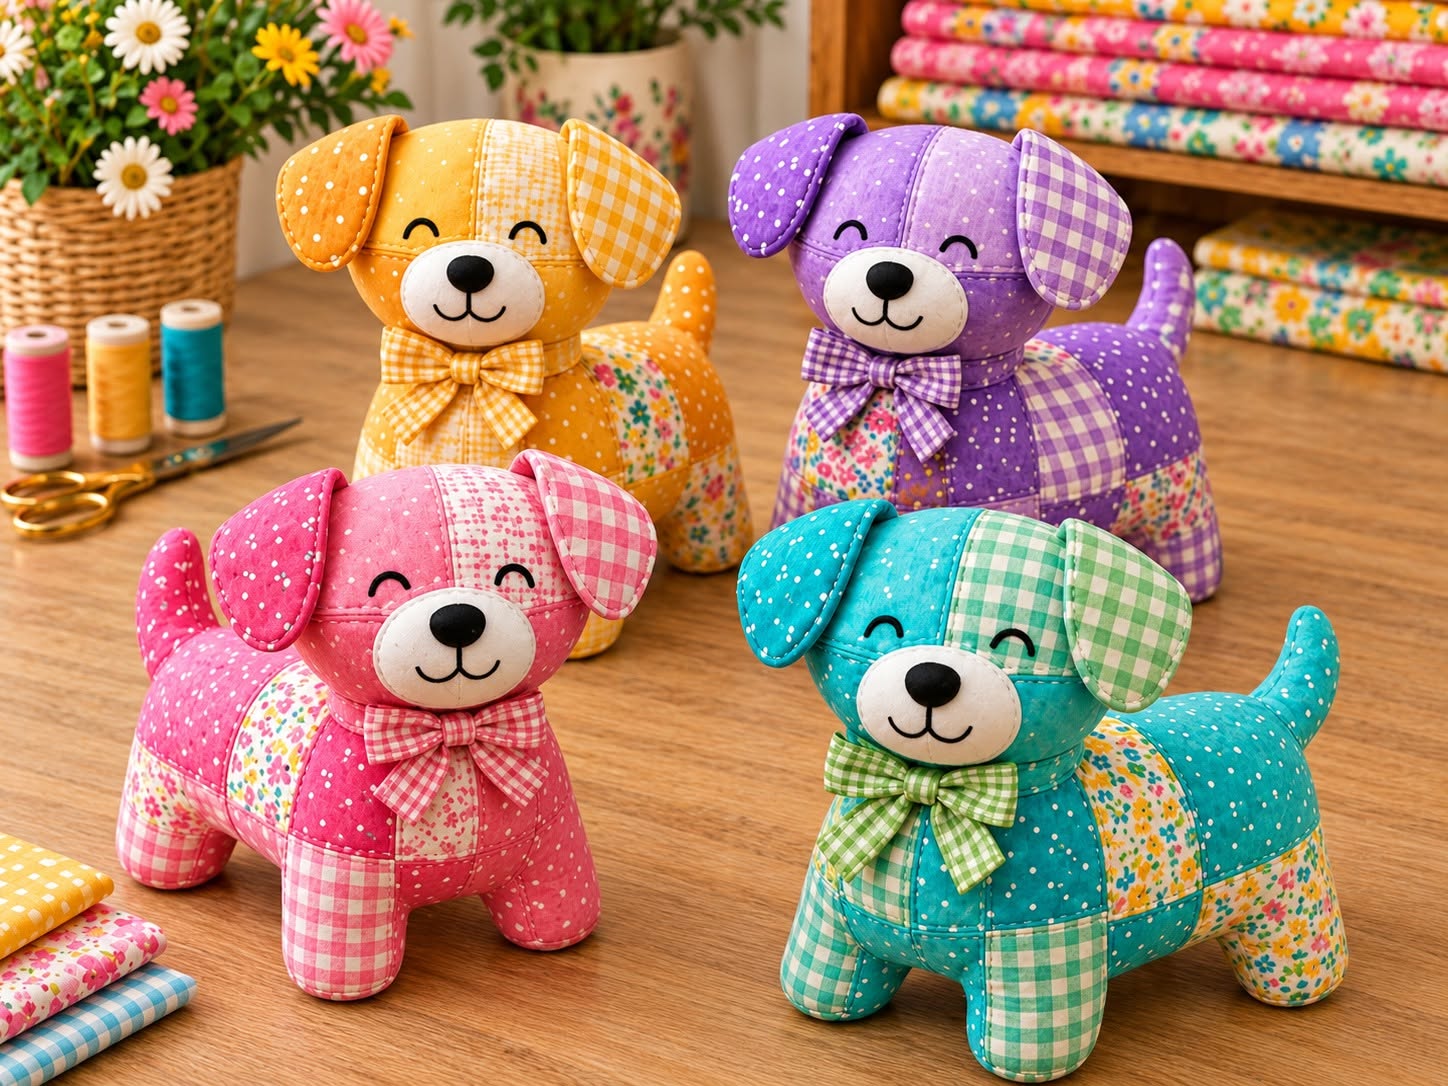
Patchwork Puppy Fabric Pattern is a charming sewing project that transforms colorful fabric scraps into a soft, decorative puppy filled with personality. Inspired by the cheerful handmade dogs shown in the photo, this project combines patchwork sewing, simple shaping, gentle stuffing, and small embroidered details. The finished puppy can be used as nursery decoration, a handmade gift, a shelf ornament, or a playful addition to a sewing room. Because each section can be cut from a different print, the project is also an excellent way to reuse leftover cotton fabrics from previous crafts. Even beginners can complete the design successfully when they work slowly, label every pattern piece, and follow the construction order carefully.
The beauty of a Patchwork Puppy Fabric Pattern comes from its combination of colors, textures, and familiar shapes. Floral fabric can be placed beside gingham, polka dots can be mixed with tiny geometric prints, and solid colors can be added to balance the composition. Although the puppy looks detailed, it can be divided into manageable components: body, head, muzzle, ears, legs, tail, and bow. Each component is sewn separately or assembled in stages before being joined to the main structure. This method makes the project easier to control and helps produce a balanced stuffed animal with a stable stance.
Before cutting any fabric, read the complete tutorial and decide how the puppy will be used. A decorative puppy can include buttons or other embellishments, while a puppy intended for a young child should use securely embroidered facial features and carefully reinforced seams. Always choose clean, durable materials and inspect the finished project before gifting it. The following guide explains the essential materials, the preparation of the fabric pattern, the sewing sequence, the stuffing process, and the finishing techniques needed to create a colorful puppy similar to the ones in the reference image.
Materials and Preparation for the Patchwork Puppy Fabric Pattern
The first step is selecting fabrics that work well together. Medium-weight cotton fabric is usually the easiest material to cut, sew, press, and stuff. Choose approximately four to eight coordinating prints, including gingham, floral, polka-dot, and small-scale patterns. Avoid fabrics that are extremely stretchy because they can distort during stuffing. Prewashing the cotton is optional for a decorative project, but it is recommended when the finished puppy may need to be washed later.
DISCOVER MORE FREE PATTERNS HERE!
You will also need polyester fiberfill, matching sewing thread, a hand-sewing needle, fabric scissors, pins or sewing clips, a marking pencil, and a sewing machine. A turning tool or blunt wooden stick is useful for shaping the legs, muzzle, and tail. For the face, prepare black embroidery floss and a small amount of white, cream, or beige fabric for the muzzle. A narrow fabric strip or ribbon can be used to create the bow around the puppy’s neck.
Create the Patchwork Puppy Fabric Pattern by drawing or printing the necessary templates. The basic set should include two body sides, a center body gusset if desired, two head sides, one head gusset, four ear pieces, two muzzle pieces, eight leg pieces, two tail pieces, and fabric strips for the bow. Add a consistent seam allowance of approximately 6 millimeters or ¼ inch around every piece unless the allowance is already included in the templates.
To achieve the patchwork effect, join small pieces of fabric before cutting the larger body and head sections. Arrange two, three, or four fabric rectangles with their right sides together, sew them using a straight stitch, and press the seams to one side. Continue joining pieces until the patchwork panel is large enough for the selected template. Place the body or head pattern on top of the completed panel and cut around it carefully.
Color placement can change the puppy’s entire appearance. Use a brighter color for the central face area and softer prints for the side panels. The ears may match the body or feature contrasting fabrics. For a look similar to the photo, create each puppy around one main color family, such as turquoise, pink, yellow, or purple, and add complementary floral and gingham accents.
Before sewing, transfer all pattern markings to the wrong side of the fabric. Mark the leg positions, tail placement, ear attachment points, turning openings, and center lines. Labeling every piece prevents confusion when several patchwork sections look similar. Place the pieces in separate groups so that the head, body, legs, ears, and accessories remain organized throughout the project.
Sewing the Puppy’s Head, Face, Ears, and Bow
Begin with the muzzle because it helps establish the expression of the puppy. Place the two muzzle fabric pieces with their right sides together and sew around the curved edge, leaving the back or lower section open. Clip small notches into the seam allowance without cutting through the stitches. Turn the muzzle right side out, add a small amount of fiberfill, and shape it into a soft oval.
Position the muzzle on the lower front portion of the head. Pin it securely and use a neat hand stitch to attach it around the edges. Create the nose with dense satin embroidery stitches or a securely sewn fabric appliqué. Embroider a short vertical line below the nose and two gentle curves to form the smiling mouth. Keep the stitches even and avoid pulling the thread so tightly that the fabric puckers.
The closed eyes shown in the photo can be made with black embroidery floss. Draw two shallow curved lines above the muzzle using a removable fabric marker. Stitch over the lines with a backstitch or stem stitch, adding a tiny upward curve at the outer corner if desired. Embroidered eyes give the puppy a sweet expression and are often more suitable than loose plastic pieces for handmade projects intended for children.
To sew each ear, place two ear pieces with their right sides facing. Stitch around the outer edge while leaving the straight attachment edge open. Clip the seam allowance around the curves, turn the ear right side out, and press it gently. Topstitching close to the edge is optional, but it can help the ears stay flat and give them a polished finish.
Baste the ears to the marked positions on the right side of the head pieces. Make sure the ears point inward so they will turn outward after the head is assembled. Sew the head sides to the head gusset, matching the center points and working gradually around the curves. Leave the neck area open, turn the head right side out, and check that both ears are positioned evenly.
Make the bow by cutting one rectangle for the bow loops, one smaller rectangle for the center band, and two optional strips for the tails. Fold the main rectangle lengthwise with the right sides together, sew around it, and leave a turning opening. Turn, press, close the opening, and gather the center. Wrap the narrow band around the gathered area and secure it by hand to complete the fabric bow.
Constructing the Patchwork Body, Legs, and Tail
Place the two body pieces with their right sides together and align all marked points. If the design uses a belly gusset, pin the gusset between the body sides from the chest to the lower back. Sew slowly around the curves, but leave the leg openings, neck opening, and a generous turning gap unstitched. Reinforce the seams near every opening because these areas receive additional pressure during assembly and stuffing.
Each leg is made from two matching or contrasting pieces. Place the pairs right sides together, sew around the sides and rounded foot, and leave the top edge open. Clip the curved seam allowances and turn the legs right side out. Add fiberfill in small portions, keeping the legs firm enough to support the puppy but soft enough to remain flexible.
Place the completed legs inside the body so that their raw upper edges align with the marked leg openings. Check that all feet point in the same direction and that the front legs are positioned evenly. Pin or baste each leg before sewing it to the body. A second row of stitching can be added inside the seam allowance to improve durability.
For the tail, place the two tail pieces with their right sides together and sew around the long curved edge, leaving the base open. Clip the narrow curves carefully and turn the tail using a small turning tool. Add a light amount of stuffing, concentrating it near the outer end while keeping the base relatively flat. A loosely stuffed tail is easier to insert and sew into the body seam.
Position the tail at the marked point on the back of the body, with the finished portion directed inside. Align the open base with the raw edge and baste it securely. When the body seam is completed and turned right side out, the tail should extend naturally upward or slightly to one side. Adjust its angle before reinforcing the attachment seam.
Turn the entire patchwork puppy body right side out through the opening. Gently push out the chest, back, belly, and leg seams. Place the body on a flat surface and evaluate its balance before adding more filling. Small adjustments at this stage are much easier than trying to correct an uneven shape after the puppy has been fully stuffed.
Stuffing, Assembly, and Professional Finishing Techniques
Stuffing should be added gradually in small pieces. Begin with the feet and legs, using a blunt tool to guide the fiberfill into narrow areas. Continue filling the chest, back, and belly while distributing the material evenly. Large handfuls of stuffing may create lumps, so use smaller amounts and massage the exterior fabric as you work.
The body should feel firm but not rigid. Overstuffing can strain the patchwork seams and make the legs spread apart, while insufficient stuffing may cause the puppy to collapse. Place the project on the table repeatedly to check whether all four feet touch the surface. Add or remove fiberfill until the body maintains a stable and attractive position.
Fill the head in the same gradual manner, beginning around the muzzle and forehead. Keep the embroidered facial area smooth and avoid placing a large lump directly behind the muzzle. Shape the cheeks with your fingers and compare both sides of the face. A symmetrical head gives the finished Patchwork Puppy Fabric Pattern a more refined appearance.
Insert the open neck section of the head over or inside the body’s neck opening, depending on the pattern design. Pin the pieces together and check the direction of the face. Attach the head with small ladder stitches using strong matching thread. Sew around the neck twice if needed, especially when the puppy will be handled frequently.
Close the body’s turning opening with a nearly invisible ladder stitch. Take small, evenly spaced stitches and pull the thread gently after every few passes. Hide the final knot inside the stuffed body. Inspect the leg attachments, tail seam, neck, muzzle, and ears to make sure that no raw edges or loose threads remain visible.
Tie or hand-sew the completed bow around the neck. Make final adjustments to the ears and tail, then lightly press any flat areas with your fingers rather than placing a hot iron on the stuffed project. The result should be a cheerful fabric puppy, combining balanced patchwork, soft shaping, secure embroidery, and a handmade character that makes every finished piece unique.
Frequently Asked Questions About the Patchwork Puppy Fabric Pattern
What fabric is best for making a patchwork puppy?
Quilting cotton is one of the best choices because it is stable, widely available, and easy to sew. Small floral prints, checks, dots, and coordinating solids work especially well for a patchwork stuffed animal. Lightweight denim, linen blends, and soft corduroy may also be used, although thicker materials can make small curves more difficult to turn.
How much fabric is needed for one puppy?
The amount depends on the size of the templates, but small fabric pieces are usually sufficient. Several fat-eighth pieces or a selection of scraps can make one medium decorative puppy. Prepare a larger piece of fabric for the belly or main body if you do not want every section to be pieced.
Should seam allowance be added to the pattern?
Yes, unless the templates clearly state that seam allowance is included. A 6-millimeter or ¼-inch allowance is practical for small stuffed projects. Use the same allowance consistently so that the head, legs, body, and gussets fit together correctly.
Can the puppy be sewn entirely by hand?
Yes. Use a small backstitch for the structural seams because it is stronger than a simple running stitch. Hand sewing will take longer, but it provides excellent control around tight curves and small pattern pieces. Secure every beginning and ending with firm knots.
How can I make all four legs stand evenly?
Cut the leg pieces accurately, use the same seam allowance, and add equal amounts of stuffing to matching legs. Before closing the body, place the puppy on a flat surface and redistribute the filling. Slightly firmer stuffing near the top of each leg can improve support.
Why does the fabric pucker around curved seams?
Puckering usually occurs when the seam allowance has not been clipped or notched. Make several small cuts along concave and convex curves without cutting the stitching. Turning the piece carefully and smoothing the seams will help the fabric lie flat.
Can plastic safety eyes be used instead of embroidery?
They can be used for a decorative item intended for adults, provided they are installed correctly before the head is assembled. However, embroidered features are generally a better choice for items that may be handled by babies or small children. Always prioritize secure construction and inspect the finished puppy regularly.
How can I resize the Patchwork Puppy Fabric Pattern?
Enlarge or reduce every template by the same percentage. Remember that very small pieces are more difficult to turn and stuff, while very large puppies require additional fabric, stronger seams, and more filling. Keep the seam allowance unchanged after resizing unless the project becomes exceptionally large.
Is it necessary to quilt the patchwork panels?
No. The fabric scraps can simply be joined and pressed before the pattern pieces are cut. For extra structure, you may place lightweight fusible interfacing behind the patchwork panels. Avoid heavy interfacing because it can make the stuffed puppy stiff and difficult to shape.
How should the finished fabric puppy be cleaned?
For decorative puppies, gentle spot cleaning is usually the safest method. Use a slightly damp cloth and mild soap, then allow the project to air-dry completely. Machine washing may distort the stuffing and embroidered features unless all selected materials are washable and the seams have been strongly reinforced.
Conclusion
The Patchwork Puppy Fabric Pattern is a rewarding project that combines scrap-friendly sewing with creative color coordination. Throughout this tutorial, you learned how to prepare patchwork panels, cut the pattern pieces, embroider a friendly face, sew the ears and muzzle, construct the body and legs, attach the tail, add stuffing evenly, and finish the puppy with a handmade bow.
EASILY FIND THE PDF FOR THIS PATTERN HERE!
By choosing coordinated cotton prints and working carefully around curved seams, you can create a colorful puppy inspired by the photo while still giving it your own personality. Every combination of floral, gingham, dotted, and solid fabric will produce a different result, making this an excellent project for gifts, decoration, and thoughtful use of leftover materials. Please leave your sincere opinion about this Patchwork Puppy Fabric Pattern and share any suggestions, favorite color combinations, or creative details you would add to your own fabric puppy.