
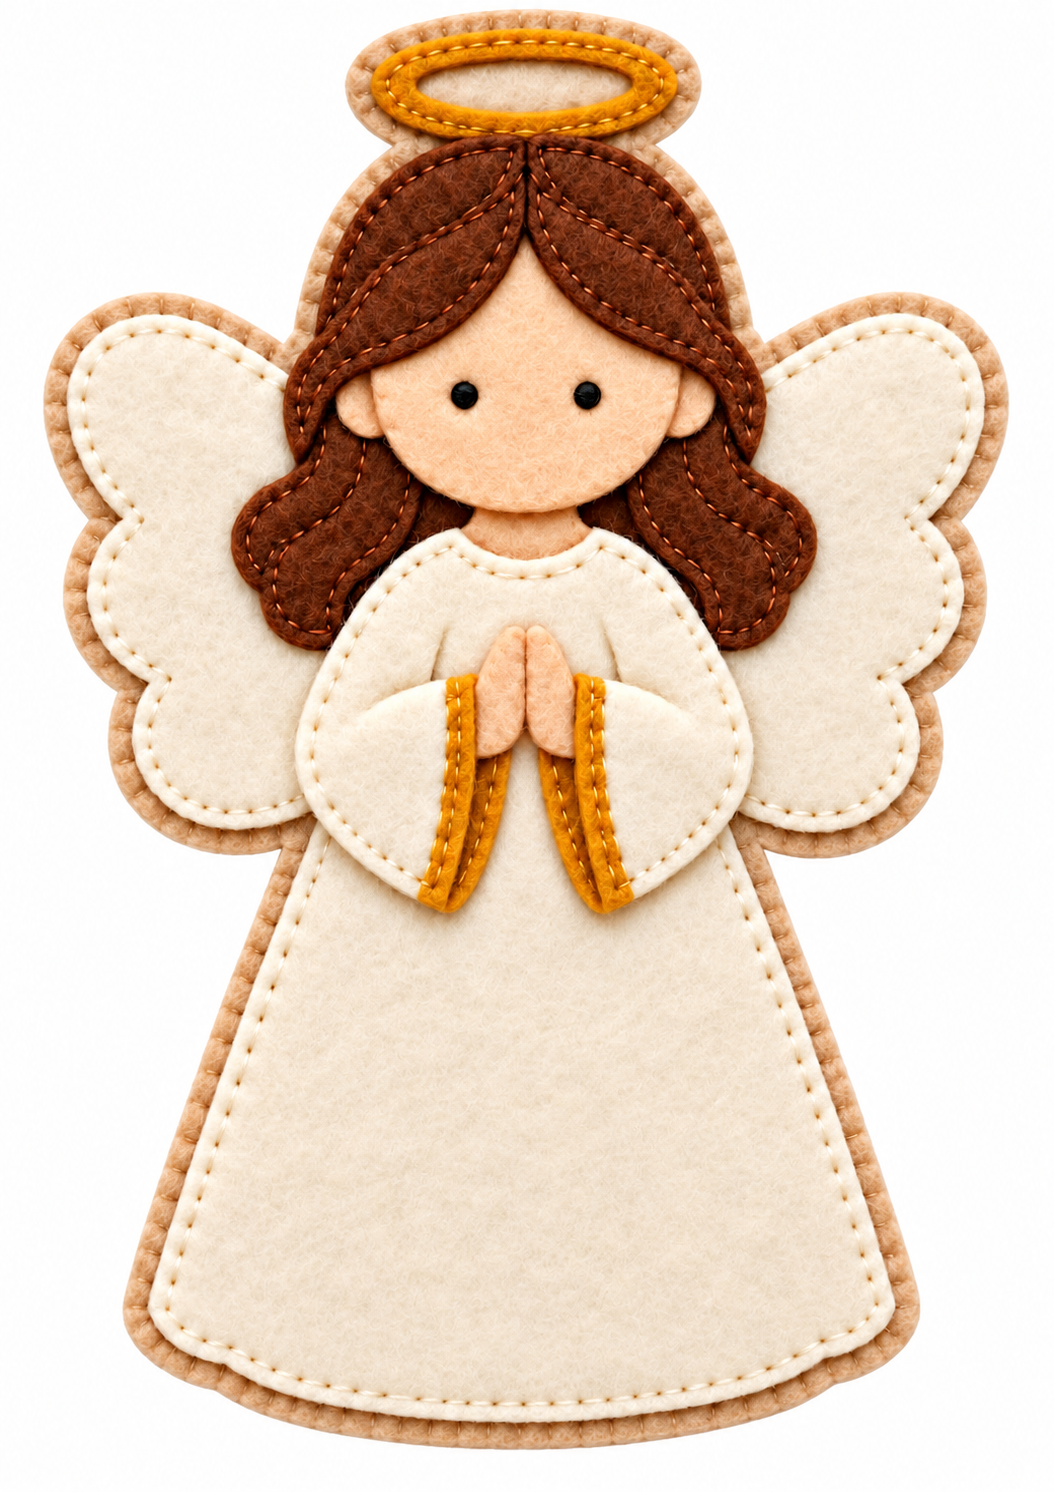
The Handmade felt Christmas angel pattern Pattern is a charming Christmas sewing project that combines soft felt fabric, delicate embroidery, and beautiful handcrafted details. This adorable angel features a flowing ivory dress, graceful white wings, warm brown hair, a golden halo, and tiny hands joined in prayer. Its peaceful expression and traditional Christmas colors make it a wonderful decoration for the holiday season. Whether you enjoy creating handmade ornaments for your Christmas tree or prefer making meaningful gifts for family and friends, this felt Christmas angel pattern offers an enjoyable opportunity to explore the art of felt sewing. With a few affordable materials, simple stitches, and a little patience, you can transform ordinary pieces of felt into a beautiful keepsake. The finished angel has a soft, layered appearance that makes it suitable for Christmas wreaths, decorative wall hangings, nursery decorations, and handmade holiday collections.
One of the most appealing aspects of this DIY felt Christmas angel is its beginner-friendly construction. Unlike complicated sewing projects that require advanced equipment or professional experience, this angel can be assembled almost entirely by hand. The design uses familiar sewing techniques, including the blanket stitch, running stitch, and appliqué stitching, to connect the different felt pieces and create attractive decorative outlines. Each element has an important role in the overall appearance, from the rounded wings positioned behind the body to the carefully shaped hair framing the angel’s face. The golden trim on the sleeves and the embroidered halo provide small but beautiful finishing touches. Because felt does not fray easily, beginners can work with it comfortably without worrying about unfinished fabric edges. This makes the project especially suitable for anyone interested in learning Christmas felt crafts, improving hand-sewing skills, or creating personalized decorations.
Creating your own Handmade felt Christmas angel pattern Pattern also allows you to experiment with colors, textures, and decorative details while preserving the original design. The angel shown in the reference image uses a soft, elegant palette of cream, beige, brown, peach, and golden yellow. These colors complement one another beautifully and give the ornament a warm, traditional appearance. You can reproduce the design closely by following the measurements and instructions in this tutorial, or introduce subtle variations to match your Christmas decorating style. The process begins with preparing the felt templates and cutting the individual pieces, followed by assembling the wings, dress, face, hair, hands, and halo. Finally, the decorative stitching brings everything together into a coordinated handmade ornament. This complete tutorial explains the materials, construction methods, assembly order, and finishing techniques so that even someone making a felt angel ornament for the first time can confidently complete the project.
1. Materials and Preparation for the Handmade Felt Christmas Angel Pattern
Before beginning your felt Christmas angel sewing project, gather all the materials and arrange them on a clean, well-lit work surface. Choosing good-quality felt is important because the fabric should maintain its shape while remaining soft enough for hand stitching. Wool-blend felt is an excellent option because it offers a smooth texture and attractive finish, although quality polyester craft felt can also produce lovely results. For an angel similar to the reference image, prepare ivory felt for the dress and wings, light beige felt for the outer backing, peach felt for the face and hands, dark brown felt for the hair, and golden yellow felt for the halo and sleeve decorations. Using felt with a thickness of approximately 1–2 mm makes the small pieces easier to handle.
DISCOVER MORE FREE PATTERNS HERE!
You will also need several basic hand-sewing supplies to assemble the ornament. Prepare embroidery floss in cream, brown, peach, beige, and golden yellow, along with a sharp embroidery needle, small fabric scissors, sewing pins or fabric clips, and a washable fabric marker. A small amount of polyester fiberfill can be used to give the finished angel a gently padded appearance. Black embroidery floss is suitable for creating the eyes, although small black beads may be used for ornaments intended only for decorative adult use. Keep a ruler, paper, pencil, and cardboard nearby for preparing the templates. If you prefer a slightly firmer ornament, lightweight felt interfacing or an additional backing layer can provide extra support without making the project unnecessarily bulky.
For this tutorial, the suggested finished size of the angel is approximately 25 cm tall and 18 cm wide, including the wings. These measurements are an estimated working size inspired by the proportions of the reference image rather than dimensions taken from an original printed template. Begin by drawing a large, gently flared dress shape measuring approximately 17 cm from the neckline to the bottom hem and 14 cm across its widest point. The upper section should be narrower than the bottom, creating the classic flowing silhouette of an angel’s robe. Draw a rounded head approximately 7 cm wide and 6.5 cm tall, allowing the chin to taper slightly. These proportions can be adjusted during assembly to achieve the soft, balanced appearance shown in the photograph.
Next, prepare the felt angel wings pattern by drawing two matching wing shapes, each approximately 8 cm wide and 11 cm tall. The wings should have softly scalloped outer edges, with rounded curves resembling small overlapping feathers. Avoid sharp corners because smooth curves create the gentle appearance associated with traditional Christmas angels. You will also need two sleeve pieces approximately 7 cm long, two praying-hand pieces, several hair sections, and an oval halo approximately 9 cm wide and 3 cm tall. The hair should include two upper sections that curve around the forehead and two lower sections that fall beside the face. Making separate templates for these pieces allows you to layer them neatly during assembly.
Once the paper templates are ready, transfer them to the corresponding felt colors using a removable fabric marker. Cut slowly along the outlines, keeping the scissors perpendicular to the fabric for clean, consistent edges. For the main body and wings, prepare both front and backing pieces so the ornament can be lightly stuffed if desired. The dress front should be ivory, while the outer backing can be beige to create the subtle contrasting border visible around the original angel. Cut two ivory wing fronts and two beige wing backs, making the beige pieces approximately 0.3 cm larger around the outer edges. This small difference creates a decorative outline that enhances the handmade appearance without requiring complicated construction.
Before sewing, arrange all the felt angel pattern pieces on your work surface in their approximate final positions. Place the wings behind the body, the hair behind and around the face, and the sleeves across the upper portion of the dress. Position the hands at the center of the chest, where they will appear joined in prayer. The halo should sit directly above the head, centered between the upper hair sections. Check that both sides look balanced and that the wings extend evenly beyond the shoulders. Taking a few minutes to organize the pieces now will make the sewing process much easier and help prevent alignment problems later.
2. How to Sew the Angel’s Wings, Dress, and Main Body
Begin the construction of your handmade felt Christmas angel with the wings, since these pieces form the decorative background of the finished ornament. Place one ivory wing front over its matching beige backing, leaving the narrow beige border visible around the outside. Secure the layers with small fabric clips or a few pins positioned away from the stitching line. Thread an embroidery needle with cream-colored floss and work a neat running stitch approximately 0.4 cm inside the ivory edge. Use stitches around 0.3 cm long, keeping the spacing as consistent as possible. Repeat this process for the second wing, making sure the stitching follows the rounded scallops smoothly. The decorative seam will emphasize the wing shape while holding the felt layers together.
If you want the wings to have a slightly raised appearance, insert a very thin layer of polyester fiberfill between the felt pieces before completing the stitching. Distribute the filling evenly, concentrating on the central areas rather than the scalloped edges. Too much stuffing can distort the wing shapes and make them difficult to attach behind the dress. For a flatter ornament, simply stitch the layers together without filling. Both approaches work well, but the lightly padded version gives the Christmas angel felt decoration a soft dimensional quality. Once both wings are finished, place them side by side and compare their shapes. Trim any uneven backing edges carefully, maintaining the narrow beige border around each wing.
Now prepare the main dress using the ivory front piece and the slightly larger beige backing. The dress should have a gently curved neckline and a wide rounded hem, closely resembling the silhouette in the reference image. Position the ivory front over the beige backing and secure the layers temporarily. Using cream embroidery floss, sew a running stitch approximately 0.4 cm inside the ivory edge, following the neckline, sides, and lower hem. For additional dimension, you may add a thin layer of fiberfill between the pieces, but keep the stuffing light. The dress should remain relatively flat so the sleeves, hands, and other decorative elements can sit comfortably on its surface without creating excessive bulk.
The blanket stitch is another useful technique for finishing the outer edges of the angel. To create this stitch, bring the needle through the felt near the edge, pass the working thread under the needle before tightening, and repeat at regular intervals. This forms a series of small loops that wrap neatly around the fabric edge. Use beige or cream embroidery floss to coordinate with the backing felt. The blanket stitch is especially attractive around the outer silhouette because it creates a textured border while securing the layers. However, if you want to reproduce the reference image more closely, use running stitches on the ivory appliqué sections and reserve blanket stitching for the exposed outer backing edges.
With the dress prepared, position the two finished wings behind the upper body. The wings should extend outward from the shoulders and remain visible on both sides of the dress. Adjust their placement until the angel appears symmetrical, then secure them to the back of the dress with small hand stitches. Work through the overlapping felt layers, keeping the stitches hidden from the front whenever possible. For additional strength, sew a short reinforcing line where each wing meets the dress. This connection is particularly important if the angel will be used as a hanging Christmas decoration. Make sure the wings remain flexible and do not pull the dress out of shape.
After attaching the wings, inspect the entire felt angel body assembly before adding the smaller decorative pieces. Check the lower hem, wing placement, and stitching tension. If any sections appear uneven, adjust them while the front is still accessible. Avoid pulling the embroidery floss too tightly because this can create puckering in the felt. The goal is to produce a smooth, gently padded ornament with visible handmade stitching. At this stage, the project should already resemble the basic silhouette of the angel in the reference image. The next steps will transform this simple felt structure into a recognizable Christmas character by adding the face, hairstyle, halo, and praying hands.
3. Creating the Angel’s Face, Hair, Halo, and Praying Hands
The face is one of the most important elements of the Handmade felt Christmas angel pattern Pattern because it gives the ornament its peaceful personality. Begin with the peach-colored felt head, shaping the upper portion into a gentle curve and the lower portion into a softly rounded chin. Position the head above the dress neckline, allowing the bottom of the face to overlap the upper body slightly. Before attaching it, mark the eye positions with two tiny dots approximately 2.5 cm apart. The eyes should sit slightly below the center of the face, leaving enough space above for the hairline. Embroider each eye using several small black satin stitches or secure a small black bead firmly in place. For decorations that may be handled by young children, embroidered eyes are the safer choice.
Next, create the angel’s distinctive brown hairstyle using the prepared felt sections. The reference design features a center-parted hairstyle with two curved upper sections and longer wavy locks framing the face. Begin by placing the lower hair pieces behind the head, allowing them to extend toward the shoulders. Attach these sections with small brown stitches, following the natural curves of the felt. Position the upper hair pieces over the forehead so they meet near the center and sweep outward toward the sides. Use a running stitch approximately 0.3 cm from the edges to create the decorative outlines visible in the original design. A few additional curved embroidery lines can suggest individual strands and make the hair appear more dimensional.
Once the hair is positioned correctly, attach the completed face and hair assembly to the upper portion of the dress. The head should sit centrally between the wings, with the lower hair sections resting over the shoulders. Secure the pieces using small, evenly spaced stitches that blend into the surrounding felt. If you want a slightly padded face, insert a small amount of fiberfill behind the peach felt before closing the edges. Be careful not to overfill this section because the face should remain smooth and rounded rather than excessively raised. The finished head should look gentle and balanced, with the dark brown hair creating a beautiful contrast against the ivory dress and white wings.
The golden felt angel halo adds the unmistakable finishing detail that identifies the character as a Christmas angel. Cut a beige oval approximately 9 cm wide and 3 cm tall, then prepare a smaller golden yellow oval ring to sit inside it. To create the ring, cut an oval opening from the center of the golden felt, leaving a border approximately 0.6 cm wide. Place the golden ring over the beige backing and secure it with matching golden embroidery floss. Work small running stitches along both the inner and outer edges of the ring, maintaining consistent spacing. Position the completed halo above the head and attach it discreetly to the back of the upper hair or head assembly. The halo should appear centered and slightly elevated.
The praying hands are another defining feature of this DIY Christmas angel ornament. Cut two small peach-colored felt pieces, each approximately 3 cm long, with softly tapered ends representing the fingertips. Position them vertically at the center of the chest so the inner edges meet, creating the appearance of hands joined in prayer. You can add a small line of peach-colored embroidery to suggest the separation between the palms. Secure the hands with tiny stitches around the edges, keeping the thread as close as possible to the felt color. If desired, place a very small amount of stuffing beneath the hands to create a subtle raised effect. Avoid oversized hands because they should remain delicate in proportion to the face and sleeves.
Finally, prepare the angel’s flowing sleeves using two ivory felt pieces with rounded outer edges. Position one sleeve on each side of the praying hands, allowing the fabric shapes to curve inward toward the center. Add narrow strips of golden yellow felt along the sleeve openings to imitate the decorative trim visible in the reference image. Secure the golden strips with yellow embroidery floss, using small running stitches for a coordinated finish. Attach the sleeves to the dress, leaving the praying hands clearly visible between them. The sleeves should appear full and softly curved, as though the angel is wearing a traditional long-sleeved robe. Once these details are complete, the felt Christmas angel appliqué should closely resemble the original design.
4. Final Assembly, Decorative Finishing, and Christmas Display Ideas
With all the major components assembled, the next step is to inspect the handmade felt angel ornament and refine the finishing details. Place the ornament on a flat surface and check that the halo, face, wings, sleeves, and dress are properly aligned. Look closely at the embroidery around the hair, wings, and robe to make sure the stitches are evenly spaced and securely fastened. If you notice loose threads, gently pull them toward the back and tie small knots before trimming the excess. Avoid cutting threads too close to the knots, as this can weaken the stitching over time. A well-finished ornament should feel secure while maintaining the soft appearance of handmade felt.
For a more polished result, add subtle decorative stitching to emphasize the angel’s layered construction. Cream-colored running stitches can highlight the dress neckline and lower hem, while brown embroidery can define the curves of the hairstyle. Golden stitches around the halo and sleeve trim will make these details stand out beautifully against the neutral felt colors. Keep the embroidery delicate rather than overly elaborate because the original design relies on simple shapes and balanced colors. If you enjoy experimenting with hand-sewing techniques, you can also add tiny French knots or short satin stitches to selected areas. However, these embellishments are optional and should not distract from the peaceful expression and elegant silhouette of the angel.
If you plan to hang your felt Christmas angel decoration on a tree, wreath, or wall, prepare a small hanging loop before completing the back. Cut approximately 15 cm of thin satin ribbon, embroidery cord, or decorative thread. Fold the material in half to form a loop and position the ends behind the halo or upper head section. Secure the ends with several strong hand stitches, making sure the attachment can support the ornament’s weight. For additional reinforcement, cover the stitched ribbon ends with a small felt patch on the back. Test the loop gently before hanging the decoration. A securely attached hanger will help prevent the ornament from falling or becoming damaged during holiday celebrations.
The completed Handmade felt Christmas angel pattern Pattern can be displayed in several creative ways. For a traditional Christmas tree, choose a ribbon color that coordinates with the angel’s ivory dress and golden halo. The ornament also works beautifully as part of a handmade Christmas wreath, especially when surrounded by evergreen branches, pinecones, and soft golden decorations. Another lovely option is to use the angel as a decorative accent on a wrapped Christmas gift. Simply attach it to a wide fabric ribbon so the recipient can remove and keep the ornament after opening the present. Handmade decorations like this often become treasured keepsakes because they reflect the time, care, and creativity invested in making them.
You can also personalize the felt angel sewing pattern by experimenting with different colors and materials. For a classic Christmas appearance, keep the ivory dress and golden halo while introducing deep red or forest green sleeve details. For a softer winter-inspired version, use pale blue, silver, and white felt. A rustic angel might feature oatmeal-colored wool felt, natural linen ribbon, and warm brown embroidery. You could even create several angels with different hairstyles and dress colors to represent family members or form a coordinated Christmas ornament collection. When making variations, preserve the original proportions of the wings, face, and dress so the finished pieces maintain the gentle appearance of the reference design.
Proper storage will help your handmade felt Christmas decorations remain beautiful for many holiday seasons. After Christmas, place the angel in a clean, dry storage box away from direct sunlight and excessive moisture. Wrap it loosely in acid-free tissue paper to protect the felt surface and prevent the wings or halo from bending. Avoid placing heavy decorations on top of the ornament because prolonged pressure can flatten the padded sections. If the felt collects dust, use a soft brush or gently dab the surface with a clean, dry cloth. With careful handling and storage, your finished angel can remain a meaningful part of your holiday traditions for years, reminding you of the creativity and care that went into every stitch.
Frequently Asked Questions About the Handmade Felt Christmas Angel Pattern
1. Is the handmade felt Christmas angel pattern suitable for beginners?
Yes. This beginner-friendly felt sewing pattern is suitable for anyone with basic hand-sewing skills. The project uses simple felt shapes and common embroidery techniques, including running stitches and blanket stitches. Beginners may need additional time to cut the smaller hair and hand pieces accurately, but the construction does not require advanced sewing knowledge. Working slowly and assembling one component at a time will make the process easier.
2. What type of felt is best for making Christmas angel ornaments?
Wool-blend felt is often preferred for handmade felt ornaments because it has a soft texture, holds its shape well, and provides a beautiful finished appearance. However, polyester craft felt is a practical and affordable alternative. Choose felt approximately 1–2 mm thick for the smaller decorative pieces. Slightly thicker felt can be used for the backing if you want a firmer ornament.
3. Can I make this felt Christmas angel without a sewing machine?
Absolutely. The entire felt Christmas angel pattern can be completed using hand-sewing techniques. In fact, visible hand stitching is one of the most attractive features of the reference design. A simple embroidery needle and matching floss are sufficient for attaching the different layers, creating decorative outlines, and finishing the edges.
4. How long does it take to make one felt Christmas angel?
The time required depends on your sewing experience and the level of detail you choose. A beginner may need approximately three to five hours to prepare the templates, cut the felt, sew the individual pieces, and complete the ornament. Someone experienced with felt appliqué may finish the same project in approximately two to three hours. These are estimates, and careful stitching is more important than working quickly.
5. Can I resize the handmade felt Christmas angel pattern?
Yes. You can enlarge or reduce the templates to create different ornament sizes. For example, a smaller angel measuring approximately 12–15 cm tall would work well as a Christmas tree ornament, while a larger version measuring 30 cm or more could become a wall decoration. When resizing the pattern, adjust all components proportionally so the face, wings, sleeves, and dress remain balanced.
6. Is stuffing necessary when making a felt angel ornament?
No. Stuffing is optional. A flat felt angel appliqué is ideal for lightweight decorations, greeting card embellishments, or fabric panels. Adding a small amount of polyester fiberfill creates a softly padded ornament with more dimension. If you choose to add stuffing, distribute it evenly and avoid overfilling the smaller pieces.
7. What stitches should I use for this Christmas felt sewing project?
The most useful stitches are the running stitch, blanket stitch, satin stitch, and small securing stitches. Running stitches create decorative outlines around the wings, hair, and dress. Blanket stitches finish exposed edges and connect felt layers. Satin stitches work well for embroidered eyes, while small securing stitches help attach delicate details without creating visible knots.
8. Can I use fabric glue instead of sewing the felt pieces?
Fabric glue can help temporarily position small decorative elements, but stitching provides a stronger and more traditional finish. If you decide to use glue, choose a product specifically designed for felt and apply it sparingly. Too much glue can stiffen the fabric or leave visible marks. For ornaments intended to last several years, hand stitching is generally the better option.
9. How can I make the angel safe for homes with young children?
Use embroidered eyes instead of beads, avoid detachable decorations, and secure every felt component with strong stitching. Keep hanging cords and small ornaments away from babies and toddlers. This pattern is intended as a decorative craft rather than a toy, and adult supervision is recommended whenever children participate in the sewing process.
10. Can I use this pattern to make handmade Christmas gifts?
Yes. A handmade felt Christmas angel makes a thoughtful holiday gift, especially when personalized with different colors, embroidered initials, or a small decorative ribbon. You can create individual angels for friends, relatives, teachers, and neighbors. Adding a handwritten gift tag can make the finished ornament feel even more personal.
11. How do I keep the wings symmetrical?
Fold a piece of paper in half and draw one wing template, then use it as the basis for a mirrored pair. Cut the felt pieces carefully and compare them before stitching. During assembly, position both wings behind the dress and check their height and outward extension. Pinning them temporarily will help maintain symmetry while you sew.
12. Can this felt angel be used in other sewing projects?
Certainly. The design can be adapted into a Christmas quilt appliqué, decorative pillow, fabric wall hanging, holiday banner, or seasonal table decoration. For appliqué projects, omit the stuffing and use a flat felt construction. The angel can then be stitched onto a fabric background using matching embroidery floss.
13. How should I clean a handmade felt Christmas angel?
For routine care, gently remove dust with a soft brush or dry cloth. If the ornament becomes stained, test a small hidden area before carefully spot-cleaning with a slightly damp cloth and mild soap. Avoid soaking the ornament because moisture may distort the felt, affect the stuffing, or cause embroidery colors to bleed. Allow it to air-dry completely before storing.
14. What makes this felt Christmas angel pattern different from other holiday ornaments?
The combination of layered felt, visible embroidery, flowing sleeves, praying hands, and a golden halo gives this design a distinctive handcrafted appearance. Its gentle facial expression and traditional color palette create a timeless Christmas decoration. The pattern also offers flexibility for beginners and experienced crafters, allowing each person to personalize the finished angel while preserving its original charm.
15. Do I need an exact printable template to complete this project?
An exact printable template can make cutting faster, but it is not essential. The measurements and shape descriptions in this tutorial provide a practical starting point for drawing your own pattern pieces. Because the dimensions are estimated from the reference design, you should arrange the paper templates together and adjust their proportions before cutting the felt. This preparation will help produce a more consistent finished ornament.
Conclusion: Create a Beautiful Handmade Felt Christmas Angel
The Handmade felt Christmas angel pattern Pattern is a rewarding holiday craft that combines creativity, traditional sewing techniques, and the beauty of handmade decorations. Throughout this tutorial, you learned how to choose the appropriate felt materials, prepare the pattern pieces, cut and assemble the wings and dress, create the angel’s delicate face and hairstyle, and add the golden halo and praying hands. You also explored useful embroidery techniques, decorative finishing methods, and practical ideas for displaying and storing your completed ornament.
One of the most enjoyable parts of this DIY felt Christmas angel project is the freedom to make each decoration unique. Whether you follow the traditional ivory, brown, and golden color palette or experiment with different fabrics and embellishments, every angel can reflect your personal creativity. The combination of soft felt, carefully placed stitches, and thoughtful details transforms a simple sewing project into a meaningful Christmas keepsake that can be enjoyed year after year. Handmade ornaments bring a special warmth to holiday decorating because they carry the memories of the people who created them. This felt Christmas angel sewing tutorial offers a wonderful opportunity to develop your crafting skills while making something beautiful for your home or someone you love.
EASILY FIND THE FREE PDF FOR THIS PATTERN HERE!
Now we would love to hear from you! Have you ever made a handmade felt Christmas angel? Which part of this pattern did you enjoy the most, and what colors would you choose for your own creation? Please leave your honest opinion, creative suggestions, and sewing tips in the comments. Your experience and ideas can inspire other craft lovers to discover the joy of making their own Christmas decorations. 🎄🧵✨