
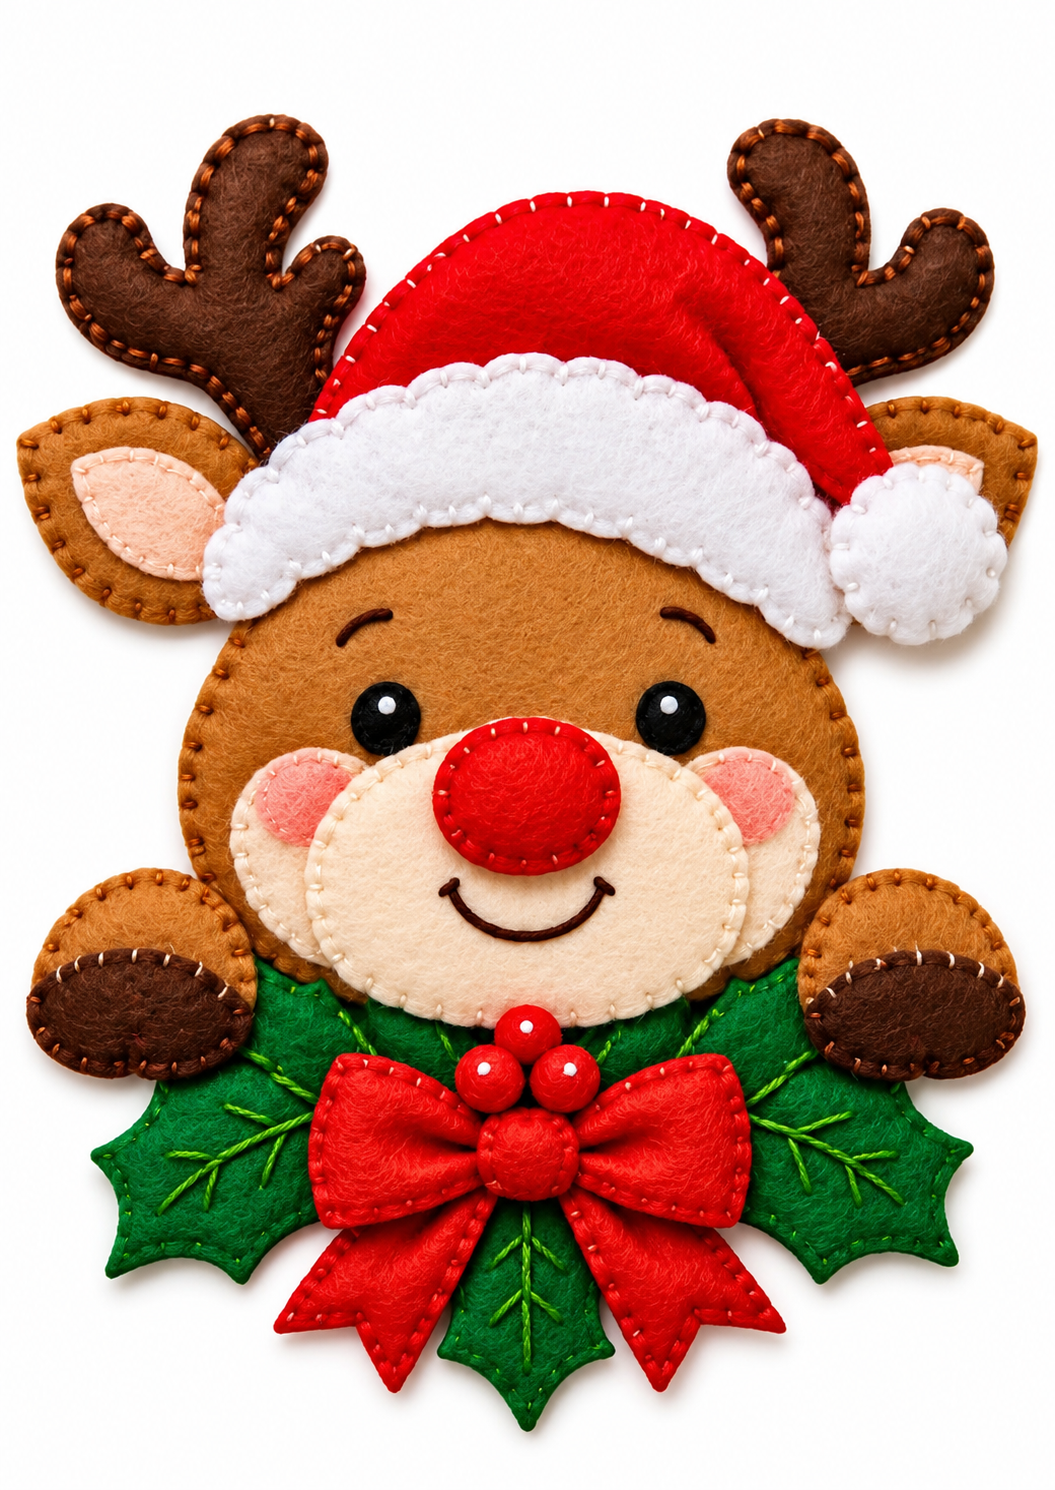
The Felt Reindeer Christmas Ornament Pattern is a delightful holiday sewing project that combines cheerful Christmas colors, soft felt textures, and charming handmade details. Featuring an adorable reindeer wearing a red Santa hat, surrounded by green holly leaves, a decorative red bow, and bright Christmas berries, this ornament brings warmth and personality to seasonal decorations. Whether you enjoy making handmade gifts, decorating your home, or exploring creative sewing projects, this DIY felt Christmas ornament offers a wonderful opportunity to create something memorable. The combination of simple shapes, colorful felt pieces, and decorative embroidery makes this design especially appealing to crafters who appreciate traditional Christmas decorations. With patience and a few basic sewing techniques, you can transform ordinary felt sheets into a beautiful festive ornament.
One of the most attractive qualities of this Felt reindeer Christmas ornament Pattern is its versatility. Although the finished decoration looks detailed, the construction process can be divided into manageable steps suitable for beginners and experienced sewing enthusiasts alike. The reindeer’s rounded face, expressive eyes, soft muzzle, brown antlers, and festive Santa hat create a friendly character that works beautifully with classic Christmas decorations. The green holly leaves and bright red bow add an elegant finishing touch, making the ornament suitable for Christmas trees, wreaths, decorative wall hangings, and handmade holiday gift packages. Another advantage of working with felt is that its edges generally do not fray, allowing crafters to create detailed shapes without complicated finishing techniques. This makes felt particularly convenient for small decorative projects.
Creating a handmade felt reindeer ornament is also a meaningful way to enjoy the holiday season while developing practical sewing skills. Every stitch contributes to the finished appearance, from the carefully embroidered facial expression to the decorative blanket stitching around the outer edges. This tutorial explains how to recreate the ornament inspired by the reference image, including the materials, suggested measurements, pattern preparation, cutting techniques, assembly process, and decorative finishing details. The project uses traditional Christmas colors such as red, green, brown, cream, and white, but you can personalize the design with your favorite combinations. By following the instructions carefully, you will learn how to create a layered felt ornament with a dimensional appearance, a cheerful expression, and attractive handmade details that can be enjoyed throughout the Christmas season.
1. Materials and Preparation for the Felt Reindeer Christmas Ornament Pattern
Before beginning your Felt Reindeer Christmas Ornament Pattern, gather all the materials needed to complete the project comfortably. The main material is craft felt, preferably with a thickness of approximately 1–2 mm. Wool-blend felt is an excellent choice because it has a soft texture, holds its shape well, and provides a polished appearance. Polyester craft felt is another practical option, especially for beginners who want an affordable and widely available material. For a design similar to the reference image, prepare medium-brown felt for the reindeer’s head, dark brown for the antlers, caramel brown for the ears and hooves, cream for the muzzle, pale pink for the inner ears and cheeks, bright red for the Santa hat, nose, bow, and berries, white for the hat trim, green for the holly leaves, and black for the eyes.
DISCOVER MORE FREE PATTERNS HERE!
In addition to felt, you will need several basic sewing supplies. Prepare embroidery needles, sharp fabric scissors, small detail scissors, sewing pins or clips, and embroidery floss in colors that coordinate with your felt pieces. Brown thread works well for outlining the head, antlers, and hooves, while white thread creates attractive stitching around the Santa hat. Green embroidery floss is useful for adding decorative veins to the holly leaves, and dark brown floss is ideal for the eyebrows and smiling mouth. You may also use a fabric marking pencil, removable fabric marker, or tailor’s chalk to transfer the pattern shapes. A small amount of polyester fiberfill can be added to selected pieces to give the ornament a softly padded appearance.
For this DIY Christmas reindeer decoration, a finished size of approximately 24 cm wide and 29 cm tall is a practical starting point, including the antlers and bottom holly leaf. These are suggested measurements for a handmade interpretation of the photographed design rather than dimensions taken from an existing printable template. The main reindeer head can measure approximately 17 cm wide and 16 cm tall, while each antler can extend about 8 cm above the head. The Santa hat should be wide enough to cover the upper forehead and overlap the base of the antlers slightly. The holly arrangement can extend beyond the lower sides of the head, helping create the balanced festive silhouette visible in the reference.
Preparing the felt ornament pattern pieces is an important step because accurate shapes make assembly easier. Begin by drawing the main head as a large rounded shape with a slightly narrower lower section. Next, create separate templates for the antlers, outer ears, inner ears, muzzle, cheeks, eyes, nose, Santa hat, white hat brim, pom-pom, front hooves, holly leaves, bow loops, ribbon tails, and berries. Fold paper in half when drawing symmetrical pieces, such as the head or bow, to achieve balanced proportions. You can also trace the shapes onto sturdy cardstock so the templates remain useful for future projects. Label every piece with its name, quantity, and felt color before cutting.
When cutting the felt, work slowly and keep the scissors perpendicular to the fabric for clean edges. For a layered ornament, cut two matching head shapes if you want to add stuffing between the front and back. Cut two layers for each antler and ear when a padded or reinforced finish is desired. Smaller appliqué details, including the eyes, nose, cheeks, and inner ears, usually need only one visible layer. The Santa hat can be made from a front and back layer, while its white brim and pom-pom can be attached separately. For the holly decoration, cut three prominent green leaves with pointed edges and slightly curved sides, matching the arrangement shown beneath the reindeer’s face.
Finally, organize the pieces on a clean work surface before sewing. Position the antlers behind the upper head, place the ears on both sides, and arrange the Santa hat over the forehead. Set the cream muzzle in the lower center of the face, with the pink cheeks extending slightly to either side. Place the red nose above the embroidered smile, and arrange the holly leaves beneath the head with the red bow centered over them. This temporary arrangement helps you understand the layering order and adjust the proportions before attaching anything permanently. Taking time to prepare the pieces carefully will make the remaining stages of your Christmas felt sewing project much more enjoyable.
2. Step-by-Step Instructions for Sewing the Reindeer Face and Antlers
Begin assembling the felt reindeer Christmas ornament by creating the main face. Place the front brown head piece on your work surface and identify the positions for the eyes, eyebrows, muzzle, and cheeks. A balanced facial arrangement is essential because the expression gives the ornament its personality. Position the eyes approximately 5–6 cm apart, adjusting their placement according to the size of your head template. Use small black felt circles measuring about 1.2 cm in diameter, with tiny white felt dots or embroidery stitches to create highlights. Attach the eyes with small, evenly spaced stitches or a neat running stitch. Secure all threads on the reverse side so the front remains smooth and attractive.
Next, prepare the felt reindeer muzzle using cream-colored felt. Cut a softly rounded shape approximately 10 cm wide and 6 cm tall, adjusting it to fit the lower portion of the head. For a layered appearance similar to the photograph, you can create two overlapping cream muzzle sections or use one broad shape with subtle embroidered contour lines. Position pale pink cheek patches on either side, allowing them to remain partially visible behind the muzzle. Attach the cheeks first with small running stitches, then sew the cream muzzle over their inner edges. White or cream embroidery floss creates a delicate handmade outline that complements the soft texture of the felt.
The reindeer’s red nose is one of the most recognizable features of this Christmas reindeer ornament pattern. Cut an oval from bright red felt measuring approximately 4 cm wide and 3 cm tall. Place it near the upper center of the muzzle, making sure it overlaps the cream felt naturally. For extra dimension, cut a matching backing piece and add a very small amount of polyester fiberfill before closing the edges with blanket stitches. Alternatively, use a single felt layer for a flatter design. Below the nose, embroider a curved smile using dark brown embroidery floss and a backstitch. Add two short upward curves at the ends of the mouth to create the friendly expression shown in the reference image.
Once the muzzle is complete, embroider the eyebrows above the eyes. Use two or three strands of dark brown embroidery floss and form short, gently curved lines. A backstitch works particularly well because it produces a smooth, continuous appearance. Avoid making the eyebrows too thick, as the ornament should retain its soft and cheerful expression. After completing the facial embroidery, inspect the front piece and secure any loose thread ends on the reverse. If you plan to pad the head, wait until the antlers and ears are attached before sewing the front and back head layers together.
To make the felt reindeer antlers, cut four dark brown felt shapes, creating two matching pairs. Each antler should have a gently curved central branch with two rounded side projections, similar to the shape visible in the photograph. Place the matching pieces together and sew around their edges using brown or caramel embroidery floss. A blanket stitch is ideal because it strengthens the edges while adding decorative contrast. If you want softly raised antlers, insert a small amount of fiberfill before closing each piece. Keep the stuffing light so the antlers retain their shape. Attach them behind the upper head, positioning one on each side with the branches extending upward and outward.
Complete this stage by preparing the ears and joining the main head layers. Cut two caramel-colored outer ears and two smaller pale pink inner ears. Attach each pink piece to its corresponding outer ear using small running stitches. If desired, reinforce the ears with a second caramel felt layer. Position the finished ears behind the sides of the head, slightly below the antlers. Secure the antlers and ears to the head backing, then place the decorated front head piece over the backing. Sew around the head using a blanket stitch, leaving a small opening for stuffing if you want a padded ornament. Add a modest amount of fiberfill, close the opening, and check that the facial features remain centered.
3. Creating the Santa Hat, Holly Leaves, and Decorative Christmas Bow
The red Santa hat gives the Felt Reindeer Christmas Ornament Pattern its unmistakable holiday character. Begin by cutting a curved red felt hat shape approximately 17 cm wide at the base and 11 cm tall at its highest point. The hat should curve toward one side, creating the relaxed, playful appearance seen in the reference image. Cut a matching backing piece if you want a padded finish. Sew the two red pieces together with white embroidery floss, leaving a small opening for a light layer of fiberfill. Close the opening carefully and position the hat over the upper portion of the reindeer’s head. Make sure the lower edge covers the base of the antlers without hiding the ears completely.
To create the fluffy-looking white brim, cut a gently scalloped strip of white felt approximately 18 cm long and 4 cm wide. The scalloped edge adds softness and helps reproduce the decorative appearance of the photographed ornament. Position the brim across the lower edge of the red hat, allowing it to curve naturally around the reindeer’s forehead. Attach it using small white blanket stitches around the visible edges. Next, cut two white felt circles approximately 4 cm in diameter for the pom-pom. Sew the circles together, add a little fiberfill, and close the opening. Attach the finished pom-pom to the curved tip of the Santa hat, overlapping the right side of the brim.
The lower decoration is built around three green felt holly leaves, which create a beautiful contrast against the brown reindeer and red Christmas accessories. Cut two large side leaves measuring approximately 11 cm long and one central leaf measuring about 9 cm long. Each leaf should feature pointed tips and gently indented edges, resembling traditional Christmas holly foliage. For a more substantial finish, cut two layers for each leaf and sew them together with matching green thread. You can add a thin layer of felt interfacing between the pieces if extra firmness is needed. Avoid overstuffing the leaves because their pointed shapes should remain clearly defined.
Decorative embroidery makes the holly leaves especially attractive. Use bright green embroidery floss to create a central vein running from the base toward the tip of each leaf. Add smaller diagonal branches extending toward the pointed edges. A stem stitch or backstitch works well for these details, while a few longer straight stitches can create a more natural leaf pattern. Arrange the leaves beneath the reindeer’s head, with one extending to the left, one to the right, and the third pointing downward. Overlap their bases slightly so the arrangement looks like a single festive cluster. Secure the leaves together with several small stitches before attaching them to the back of the head.
The large red bow is another important feature of this handmade Christmas felt decoration. Cut two rounded triangular shapes for the bow loops, two pointed ribbon tails, and one small circular or oval piece for the center knot. Each loop can measure approximately 6 cm wide and 4 cm tall, while the ribbon tails can extend about 6 cm below the center. For a dimensional effect, create matching front and back layers for the loops and add a very small amount of stuffing. Sew the edges with red embroidery floss, using neat blanket stitches. Attach the ribbon tails behind the loops, then position the center knot over the joining point to conceal the attachment stitches.
Finish the decorative arrangement by adding three small red felt berries above the bow. Cut circular pieces approximately 1.5–2 cm in diameter and create slightly rounded berries using paired felt circles with minimal stuffing or small gathered felt shapes. Attach them in a triangular cluster between the reindeer’s chin and the upper edge of the bow. Add tiny white embroidery stitches to suggest highlights, similar to the glossy appearance shown in the photograph. Position the completed bow beneath the berries and sew it securely to the holly arrangement. At this point, the main elements of your DIY felt reindeer Christmas ornament should be complete and ready for final assembly.
4. Final Assembly, Decorative Stitching, and Creative Ways to Display Your Ornament
With all the individual components prepared, begin the final assembly of your Felt Reindeer Christmas Ornament Pattern. Lay the completed reindeer head face down on a soft, clean surface and position the holly arrangement beneath its lower edge. The leaves should extend outward on both sides, while the central leaf points downward. Adjust the placement until the decoration looks symmetrical and balanced. Use small hand stitches to attach the holly leaves securely to the back of the head. If you prefer additional reinforcement, place a small matching felt patch over the attachment area on the reverse side and stitch around it. This helps distribute tension and keeps the layered decoration stable.
Next, attach the front hooves, which provide another charming detail inspired by the reference image. Cut two rounded caramel-colored felt shapes approximately 5 cm wide and 4 cm tall. Add smaller dark brown oval patches to represent the lower portions of the hooves. Sew the dark brown patches onto the caramel pieces with matching embroidery floss, then add a second backing layer if you want a padded appearance. Position one hoof on each side of the reindeer’s lower face, slightly overlapping the upper edges of the holly leaves. Sew the hooves securely in place, keeping their positions balanced so they appear to rest naturally over the festive foliage.
The decorative stitching is one of the most important elements of a beautiful hand-sewn felt Christmas ornament. A blanket stitch creates a traditional handcrafted appearance while protecting the edges of layered felt pieces. To make this stitch, bring the needle through the felt near the edge, pass the thread around the edge, and guide the needle through the loop before tightening gently. Repeat at even intervals of approximately 3–4 mm, depending on the size of the piece. Maintain consistent tension so the felt does not wrinkle or stretch. Running stitches are useful for smaller appliqué details, while backstitches are ideal for facial embroidery and leaf veins. Using these techniques consistently will create a harmonious finished design.
If you plan to hang the ornament on a Christmas tree, add a sturdy hanging loop to the upper back. Cut a piece of satin ribbon, cotton cord, or decorative twine approximately 18 cm long. Fold it in half and position the ends behind the upper center of the ornament, ideally between the antlers and beneath the Santa hat backing. Sew the ribbon ends securely to a reinforced felt area using several small stitches. Test the loop gently before hanging the ornament. Because the design includes several layered pieces, the finished decoration may be heavier than a simple flat felt ornament. A reinforced loop helps support the weight and reduces the risk of the ornament becoming detached.
There are many creative ways to personalize this Christmas reindeer felt pattern. You can replace the traditional red Santa hat with burgundy, forest green, or soft pastel colors for a different holiday style. Small embroidered snowflakes, metallic thread accents, or decorative felt stars can be added to the hat or surrounding foliage. For a rustic Christmas theme, use muted brown felt, cream-colored stitching, and natural cotton twine. For a more playful design, experiment with rosy cheeks, a larger red nose, or patterned fabric accents. Personalization is especially enjoyable when making several ornaments as gifts because each reindeer can have its own expression and decorative details.
Once the ornament is fully assembled, inspect the stitching, remove any visible marking lines, and trim loose threads carefully. Check that the antlers, ears, hat, hooves, and holly leaves are firmly attached. If necessary, gently reshape the padded pieces with your fingers to distribute the stuffing evenly. Your finished Felt Reindeer Christmas Ornament Pattern can now be displayed on a Christmas tree, attached to a decorative wreath, used as a seasonal wall ornament, or added to a handmade gift package. For storage, place it flat in a clean box with tissue paper between delicate sections. Keep it away from moisture and excessive pressure so the felt retains its shape and the embroidery remains attractive for future Christmas celebrations.
Frequently Asked Questions About the Felt Reindeer Christmas Ornament Pattern
1. Is the Felt Reindeer Christmas Ornament Pattern suitable for beginners?
Yes. This felt Christmas sewing pattern is suitable for motivated beginners who have basic hand-sewing skills. Although the ornament contains several decorative pieces, the construction process uses accessible techniques such as running stitch, blanket stitch, and backstitch. Beginners can simplify the project by using single-layer felt shapes instead of padded pieces. Working on one component at a time also makes the process easier to manage.
2. What type of felt is best for making Christmas ornaments?
Wool-blend felt is an excellent choice because it is durable, soft, and easy to cut into detailed shapes. Polyester craft felt is also suitable and often more affordable. For this particular ornament, felt measuring approximately 1–2 mm thick provides a good balance between flexibility and structure. Avoid extremely thin felt for large unsupported pieces, as it may lose its shape over time.
3. Can I make this felt reindeer ornament without a sewing machine?
Absolutely. The entire handmade felt reindeer ornament can be completed with basic hand-sewing techniques. In fact, visible hand stitching contributes to the traditional handcrafted appearance of the design. A sewing machine is not necessary, and hand sewing often provides better control when attaching small decorative pieces such as the nose, cheeks, berries, and hat pom-pom.
4. How long does it take to complete the ornament?
The time required depends on your sewing experience and the amount of decorative detail you choose to include. A beginner may need approximately four to six hours to prepare the pattern, cut the felt, embroider the facial features, and assemble the ornament. Experienced crafters may complete a similar project more quickly. Preparing all the felt pieces before sewing can help make the process more efficient.
5. Can I use fabric glue instead of sewing?
Fabric glue can be used for selected decorative details, but sewing generally produces a stronger and more traditional finish. Small felt accents may be attached with a suitable craft adhesive, while larger structural pieces such as the antlers, holly leaves, and hanging loop should be secured with stitching. Always allow adhesives to dry completely according to the manufacturer’s instructions before handling or displaying the ornament.
6. How can I make the reindeer ornament look more dimensional?
To create a dimensional felt reindeer Christmas decoration, use two layers of felt for the main head, antlers, Santa hat, and bow loops. Insert small amounts of polyester fiberfill before closing the edges. The goal is to create gentle volume without distorting the shapes. Layered appliqué pieces, slightly raised berries, and a padded nose also help reproduce the dimensional appearance of the reference design.
7. Can I resize the Felt Reindeer Christmas Ornament Pattern?
Yes. The suggested measurements can be increased or reduced to create different ornament sizes. For a smaller Christmas tree ornament, reduce all the pattern pieces proportionally while keeping the facial features balanced. For a larger wall decoration, enlarge the templates and consider reinforcing the backing with additional felt or lightweight interfacing. Remember that very small details may need to be simplified when reducing the overall size.
8. What is the best way to attach the antlers securely?
The antlers should be positioned between the front and back head layers whenever possible. Secure their bases with several small stitches before closing the head seam. This construction method creates a stronger connection than attaching the antlers only to the surface. If the antlers are particularly large, you can reinforce their bases with an extra piece of felt hidden inside the ornament.
9. How should I clean and store handmade felt Christmas ornaments?
Most handmade felt ornaments should be cleaned gently rather than placed in a washing machine. Remove loose dust with a soft brush or dry microfiber cloth. For small marks, carefully spot-clean with a slightly damp cloth, provided the felt and embroidery threads are colorfast. Allow the ornament to air-dry completely before storage. Store it flat in a dry location, away from direct sunlight and heavy objects that could flatten the decorative details.
10. Can this pattern be used to create handmade Christmas gifts?
Yes. The Felt Reindeer Christmas Ornament Pattern is an appealing choice for personalized holiday gifts. You can add an embroidered name, a small date, or a decorative ribbon to make each ornament unique. Handmade ornaments can be presented individually or included in festive gift sets. If making ornaments for young children, avoid loose beads, detachable decorations, and other small parts that could present a choking hazard. The ornament is intended for decoration rather than use as a toy.
11. What colors work best for a traditional Christmas reindeer ornament?
Classic Christmas colors are particularly effective for this design. Medium brown and dark brown create the reindeer, while bright red and white give the Santa hat its familiar appearance. Green holly leaves and red berries add a festive botanical element. Cream and pale pink soften the facial features, creating a friendly expression. You can also experiment with gold, burgundy, ivory, or sage green for a more understated seasonal palette.
12. How can I keep the felt pieces from shifting while sewing?
Use fine sewing pins, small fabric clips, or a few temporary basting stitches to hold larger pieces in place. For small appliqué details, a tiny amount of washable fabric glue or temporary fabric adhesive may help prevent movement before stitching. Always check that the pieces remain aligned as you work. Sewing slowly and using short, consistent stitches will improve accuracy and produce a neater finished ornament.
Conclusion: Create a Charming Handmade Felt Reindeer Christmas Ornament
The Felt Reindeer Christmas Ornament Pattern is a rewarding holiday craft that brings together creativity, traditional sewing techniques, and cheerful seasonal design. Throughout this tutorial, you learned how to choose suitable felt materials, prepare the pattern pieces, cut the reindeer’s head and antlers, embroider expressive facial features, and assemble a festive Santa hat. You also explored how to create dimensional holly leaves, a decorative red bow, small Christmas berries, and padded hooves to complete the ornament’s charming appearance.
By following the step-by-step instructions and paying attention to the finishing details, you can create a beautiful DIY felt Christmas ornament inspired by the reference image. The combination of colorful felt, neat blanket stitching, soft padding, and carefully arranged appliqué elements makes this project a wonderful addition to handmade holiday decorations. Whether displayed on a Christmas tree, incorporated into a wreath, or given as a thoughtful seasonal gift, your finished reindeer can become a treasured part of your Christmas traditions.
EASILY FIND THE FREE PDF FOR THIS PATTERN HERE!
The most enjoyable aspect of handmade crafting is the opportunity to make every creation personal. Feel free to experiment with different felt colors, embroidery styles, ribbon details, and decorative arrangements while maintaining the recognizable features of this adorable Christmas reindeer. We would love to hear your sincere opinion about this Felt Reindeer Christmas Ornament Pattern! Did you enjoy the design and the sewing instructions? Which part of the project was your favorite? Share your honest feedback, creative ideas, and suggestions for future handmade Christmas tutorials in the comments. Your experiences and recommendations can inspire other craft enthusiasts to discover the joy of creating beautiful felt decorations by hand.