
Crochet patterns have taken the world by storm, allowing crafters to express their creativity in countless ways. One trendy and versatile project that continues to capture attention is the zigzag bag.
Known for its striking design and functional appeal, the Zigzag Bag Free Crochet Pattern is the perfect way to combine form and function. In this post, we’ll guide you through the process of creating this fabulous bag, ensuring that even beginners can follow along.
With clear instructions and specific stitch counts, you’ll have your stylish zigzag bag ready in no time.
Materials You’ll Need for Your Zigzag Bag
When starting any crochet project, gathering the right materials is key to achieving the best results. For this Zigzag Bag Free Crochet Pattern, you’ll need specific tools and yarns to make sure your final piece looks perfect.
For this bag, you’ll need around 200-250 grams of medium-weight yarn in two contrasting colors. Cotton yarn is a great choice for its durability and structure, making it ideal for a bag that will carry everyday items. Be sure to pick colors that complement each other to enhance the zigzag pattern.
In addition to the yarn, you’ll need a 5mm crochet hook, scissors, a yarn needle for weaving in ends, and a stitch marker to help keep track of your rounds. With all these tools in hand, you’re ready to begin your crochet journey.
Basic Crochet Stitches to Master
Before diving into the actual pattern, it’s crucial to ensure you are familiar with the basic crochet stitches that form the backbone of the Zigzag Bag Free Crochet Pattern. These stitches will be repeated throughout the project, so having a solid grasp of them is essential.
- Chain (ch): This is one of the simplest and most foundational stitches in crochet patterns. To chain, yarn over and pull through the loop on your hook. This will form the base of your zigzag bag.
- Single Crochet (sc): The single crochet stitch is what gives the bag its dense texture. Insert your hook into the stitch, yarn over, pull through, yarn over again, and pull through both loops on your hook.
- Double Crochet (dc): The double crochet stitch is taller than the single crochet, creating the zigzag peaks in the pattern. Yarn over, insert the hook into the stitch, yarn over again, pull through, yarn over again, pull through two loops, then yarn over once more and pull through the remaining two loops.
Creating the Zigzag Base
To begin your Zigzag Bag Free Crochet Pattern, start by crocheting the base of the bag. The base will be worked in a flat rectangle that sets the foundation for the zigzag pattern.
- Start by chaining 50 stitches. This will form the foundation of your bag’s width. Make sure to add an additional chain stitch to turn your work.
- For the first row, work a single crochet into each chain stitch, starting in the second chain from the hook. At the end of the row, chain one and turn your work. You should now have 50 single crochet stitches.
- Continue working single crochet stitches across each row for a total of five rows. This solid base will give your bag structure and durability, ensuring it holds its shape well.
Building the Zigzag Pattern
Now that you have your base, it’s time to start working on the iconic zigzag pattern, which gives the bag its stylish and eye-catching design. The Zigzag Bag Free Crochet Pattern uses alternating double crochet stitches to form peaks and valleys.
- Begin your next row by working three double crochet stitches into the first stitch, forming the first peak of the zigzag. Continue by working double crochet stitches across the next five stitches.
- To create the valley, skip two stitches and work double crochet stitches into the next five stitches. Repeat this alternating pattern of peaks (three double crochets into one stitch) and valleys (skipping two stitches) across the entire row.
- As you continue building rows, be mindful of aligning your peaks and valleys with the previous rows to maintain the zigzag pattern. Alternate between your two yarn colors every few rows for a dynamic and visually striking look.
Shaping the Body of the Bag
After establishing the zigzag pattern, it’s time to focus on shaping the body of your Zigzag Bag Free Crochet Pattern. The body will be built up in rounds, creating a seamless finish.
- Once your zigzag row is complete, slip stitch into the first stitch of the next row to begin working in rounds. From here, you will no longer turn your work but continue working in a continuous spiral.
- Continue working double crochet stitches around the bag, following the peaks and valleys of the established zigzag pattern. You should now have a tube forming the body of the bag.
- Work for approximately 20 rounds, depending on your desired bag height. The number of rounds can be adjusted depending on how deep you want your bag to be, but 20 rounds should give you a nice, medium-sized tote bag.
Adding the Bag Handles
No Zigzag Bag Free Crochet Pattern is complete without sturdy handles to make the bag functional. The handles will be added in the final steps of the pattern.
- To create the handles, first, mark the points on the bag where you want your handles to attach. Using stitch markers, place two markers on each side of the bag, spaced evenly.
- Begin by chaining 50 stitches at the first marked point, then slip stitch into the second marker to form the first handle. Repeat this process on the other side of the bag to create the second handle.
- For added strength, work a row of single crochet stitches into the handle chains. This will make your handles more durable and able to carry heavier loads without stretching out of shape.
Finishing Touches and Final Assembly
After completing the main body and handles of your Zigzag Bag Free Crochet Pattern, it’s time to add some finishing touches to ensure your bag looks polished and professional.
- First, weave in all loose ends using a yarn needle. Be sure to secure them tightly to prevent unraveling over time.
- For added durability, you can line the inside of your bag with fabric. Simply cut a piece of fabric to match the dimensions of the bag and sew it inside using a needle and thread. This will help the bag maintain its shape and prevent stretching.
- Finally, block your bag by lightly steaming it with an iron or laying it flat to dry after dampening it with water. Blocking helps the stitches settle into place and gives your bag a crisp, neat finish.
Personalizing Your Zigzag Bag
One of the joys of following a Zigzag Bag Free Crochet Pattern is the opportunity for personalization. Whether you want to add decorative touches or change up the size and colors, there are endless ways to make your zigzag bag unique.
- Try adding tassels or pom-poms to the sides of your bag for a fun, bohemian look. These can be made with leftover yarn from your project and easily attached to the handle loops.
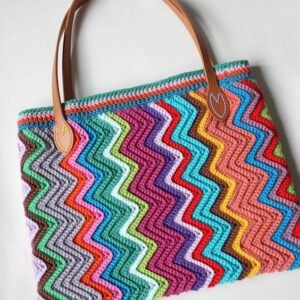
- Experiment with different color combinations. Instead of sticking with just two colors, try incorporating multiple hues for a more vibrant, multicolored zigzag effect. You can also use variegated yarns for a more organic color transition.
- If you want a larger or smaller bag, simply adjust the number of stitches in your foundation chain. Just be sure to keep your stitch counts divisible by the same multiple when creating the zigzag pattern.
The Zigzag Bag Free Crochet Pattern is not only a fantastic project for crafters of all skill levels but also a stylish accessory that you can use every day. By mastering basic crochet stitches and following the step-by-step instructions, you can create a functional and fashionable zigzag bag in no time.
Whether you’re making one for yourself or as a gift, this crochet pattern offers a fun and rewarding experience. So, gather your yarn and hooks, and start crafting your own zigzag bag today!