
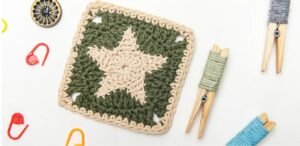
The Star Granny Square is a beautiful and timeless crochet design that adds a unique twist to traditional granny squares.
Its intricate star motif brings depth and elegance to any crochet project, making it a popular choice among crafters. In this article, we’ll delve into everything you need to know about the Star Granny Square Pattern, from its history to a step-by-step guide on how to create one.
This crochet pattern is perfect for those looking to expand their skills and create something special.
What is the Star Granny Square Pattern?
The Star Granny Square Pattern is a crochet pattern that creates a star motif within the framework of a classic granny square. The design is both visually stunning and versatile, making it a favorite for a variety of projects, from blankets to garments. The pattern typically uses basic crochet stitches, making it accessible for crocheters of all skill levels.
This pattern stands out from other granny squares due to its distinct star shape at the center, which gives it a modern twist. The star is usually created by combining a series of double crochet and chain stitches, forming a beautiful geometric design. As with most granny squares, the Star Granny Square can be customized with different colors and yarn types to suit your project.
By using the Star Granny Square Pattern, you can incorporate a blend of traditional and contemporary crochet techniques. Whether you’re a beginner looking to try something new or an experienced crocheter wanting to challenge yourself, this pattern is a great option. With the right yarn and tools, you can create stunning pieces that are sure to impress.
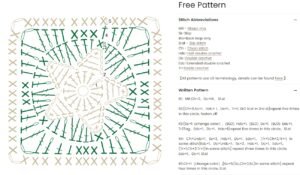
Choosing the Right Yarn and Tools for Your Star Granny Square
Selecting the appropriate yarn and tools is crucial for achieving the desired result in your Star Granny Square Pattern. For this project, you will need medium-weight yarn (such as worsted weight) and a crochet hook size H/8 (5 mm). Choosing the right yarn is essential because it affects both the texture and appearance of your final project.
For a bold, colorful design, consider using multiple shades of yarn to create a striking star contrast within the square. Alternatively, you can opt for a single color to maintain a more subtle and uniform look. Keep in mind that the yarn should have a consistent thickness to ensure the stitches are even and the pattern is clearly defined.
In addition to yarn and a crochet hook, you’ll need a pair of scissors, a yarn needle for weaving in ends, and a stitch marker if desired. These tools will help you create a clean and professional-looking Star Granny Square. Once you have your supplies ready, you’re all set to start crocheting your star!
Step-by-Step Guide to Crocheting a Star Granny Square
Round 1: Creating the Center Star
Start by making a magic ring and chaining 3 (counts as your first double crochet). Crochet 11 more double crochets into the magic ring, making a total of 12 double crochets. Pull the ring closed and slip stitch into the top of the first chain-3 to join the round.
This forms the center of the star. The magic ring method is excellent for creating a tight center with no hole, which is ideal for the star motif. Make sure to pull the ring tightly to close the gap, as this will help the star stand out more.
After completing the first round, you’ll notice the round shape that will form the foundation of your Star Granny Square. Keep your stitches even and tight for a polished look.
Round 2: Forming the Star Points
Chain 3 (counts as your first double crochet), then double crochet into the same stitch. Chain 2, skip the next stitch, and crochet 2 double crochets into the following stitch. Repeat this pattern (2 double crochets, chain 2, skip 1 stitch) around the circle. You should have six chain spaces forming the points of the star. Slip stitch into the top of the first chain-3 to join.
This round creates the six star points, giving the square its distinctive shape. The key to this round is maintaining the pattern and ensuring that each star point is evenly spaced. Don’t forget to skip a stitch between each point to create the necessary gaps.
As you complete this round, the star shape will start to become more visible. The use of double crochet stitches creates a textured, raised look that helps the star pop against the background of the square.
Round 3: Building the Granny Square Framework
Chain 3 (counts as your first double crochet). In the first chain-2 space, crochet 3 double crochets, chain 3, and crochet 3 more double crochets. This creates the first corner of your granny square. In each of the next chain-2 spaces, crochet 3 double crochets, chain 1, and repeat this process until you’ve worked all the way around the square. Slip stitch into the top of the first chain-3 to join.
Now that the star is complete, you’ll begin forming the granny square around it. The granny square structure is created by working in the chain-2 spaces from the previous round. This gives the square its traditional grid-like appearance, while the star remains the focal point at the center.
As you continue working, you’ll see the square take shape around the star. Each corner is formed by crocheting into the chain spaces, while the sides are created with groups of double crochet stitches.
Round 4: Completing the Granny Square
Chain 3 (counts as your first double crochet), and double crochet into each stitch across the side of the square. When you reach a corner, crochet 3 double crochets, chain 3, and crochet 3 more double crochets into the corner space. Continue this pattern for each side and corner of the square. Slip stitch to join and fasten off.
This final round completes the square, solidifying the star motif within the granny square. The use of double crochet stitches throughout gives the square a textured and sturdy feel, perfect for assembling larger projects like blankets or pillows.
Once you’ve finished this round, your Star Granny Square is ready to be used. You can make multiple squares and join them together for a larger project, or simply enjoy the beauty of a single star motif.
Tips for Customizing Your Star Granny Square Pattern
Customizing your Star Granny Square allows you to add your personal touch to the design. One way to customize is by experimenting with different color combinations. For example, you could crochet the center star in a bright color and use a neutral shade for the outer granny square. This creates a beautiful contrast that highlights the star motif.
Another way to customize is by changing the size of your square. By using thicker yarn and a larger hook, you can create a larger, chunkier square, which can be ideal for making cozy blankets. On the other hand, using finer yarn and a smaller hook will result in a more delicate and intricate square, perfect for smaller projects like scarves or bags.
Finally, consider adding embellishments such as beads or sequins to your Star Granny Square. These additions can make your square even more eye-catching and unique. Whether you’re making a single square or multiple squares for a bigger project, customization is key to making your Star Granny Square truly yours.
Conclusion: The Beauty of Crochet Patterns in the Star Granny Square
The Star Granny Square Pattern is a versatile and beautiful crochet pattern that blends tradition with modern design. By mastering this pattern, you can create stunning crochet pieces that showcase your skills and creativity. Whether you’re making a blanket, a pillow, or a simple decorative piece, the Star Granny Square is sure to impress.
With detailed instructions and the right tools, crocheting this pattern is both fun and rewarding. So, gather your yarn, pick up your crochet hook, and start creating your very own Star Granny Square today!