
Crochet enthusiasts are always on the lookout for beautiful and versatile stitch patterns that can be used in various projects. The shell stitch pattern is one of the most popular choices, known for its elegant and lacy appearance. Whether you are making blankets, scarves, or even garments, this stitch offers a charming and textured finish.
The shell stitch pattern is beginner-friendly while still providing an intricate look that impresses. By mastering this technique, you can create stunning crochet projects that stand out. In this guide, we will walk you through the exact stitch counts and steps needed to perfect your shell stitch.
With proper understanding and the right materials, the shell stitch pattern can be a game-changer in your crochet journey. Read on to discover its history, variations, and a detailed step-by-step tutorial that will help you master this beloved crochet pattern.
What is the Shell Stitch Pattern?
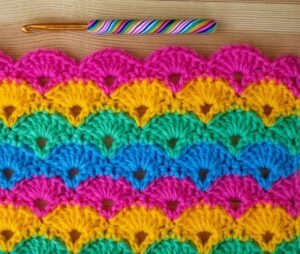
The shell stitch pattern is a crochet technique that creates a series of fan-like shapes resembling seashells. It is achieved by grouping multiple stitches together within the same stitch or space, forming a delicate and decorative texture.
This pattern is often used in blankets, shawls, and table runners due to its lacy and elegant appearance. Depending on the type of yarn and hook size you use, the shell stitch can appear more open and airy or dense and warm.
One of the best things about the shell stitch is its adaptability. You can modify the number of stitches in each shell to create different effects, making it a versatile option for crochet projects of all kinds.
Materials Needed for the Shell Stitch Pattern
Before starting, gather the necessary materials to ensure a smooth crocheting experience. The right tools can make a big difference in achieving the desired texture and appearance.
- Yarn – Choose a yarn weight that suits your project. Lighter yarns create a delicate lace-like effect, while heavier yarns produce a more textured look.
- Crochet Hook – The hook size depends on your yarn choice. Refer to the yarn label for recommended hook sizes.
- Scissors and Tapestry Needle – These will help in finishing and weaving in the ends neatly.
Having these materials ready before you start ensures a seamless process, allowing you to focus on perfecting your shell stitch pattern.
Step-by-Step Guide to Crochet the Shell Stitch Pattern
Step 1: Creating the Foundation Chain
To begin your shell stitch pattern, you need to start with a foundation chain. The chain should be a multiple of 6 plus 2 additional chains for the turning chain.
- Chain a multiple of 6 + 2 (e.g., 38 chains for a small swatch).
- Turn your work and begin in the second chain from the hook.
- Work a row of single crochet stitches to provide a firm base.
This foundation is crucial as it sets the groundwork for the rest of your shell stitch pattern.
Step 2: Creating the First Row of Shell Stitches
Now that you have your foundation row, it’s time to start forming the shell stitches.
- Chain 3 (counts as a double crochet), then make 2 double crochets in the same stitch.
- Skip 2 stitches, single crochet in the next stitch.
- Skip 2 stitches, make 5 double crochets in the next stitch to form a shell.
Repeat this sequence across the row and end with a half-shell (3 double crochets in the last stitch) to maintain balance.
Step 3: Building Additional Rows
Once your first row is complete, it’s time to build upon it to create the full shell stitch pattern.
- Chain 1, turn, single crochet in the first double crochet.
- Skip 2 stitches, make 5 double crochets in the single crochet of the previous row.
- Repeat the pattern across the row and end with a single crochet in the turning chain.
By continuing this sequence, you will create a beautifully textured shell stitch pattern that grows with each row.
 Variations and Uses of the Shell Stitch Pattern
The shell stitch is highly versatile, and minor modifications can produce different effects. Experimenting with variations allows for customization based on project needs.
- Lacy Shell Stitch – Using larger spaces between shells creates an openwork effect, perfect for summer projects.
- Compact Shell Stitch – Reducing the stitch count per shell results in a denser texture, ideal for blankets and warm garments.
- Multicolor Shell Stitch – Alternating yarn colors between rows can create a stunning striped shell effect.
Whether you prefer a traditional approach or enjoy experimenting with variations, the shell stitch pattern offers endless creative possibilities.
Tips for Mastering the Shell Stitch Pattern
Like any crochet technique, practice makes perfect. Here are some essential tips to help you master the shell stitch pattern.
- Maintain Consistent Tension – Even stitches result in a more polished and uniform look.
- Use Stitch Markers – Placing markers at the beginning of each row helps keep your shells aligned.
- Block Your Work – Gently blocking your finished piece enhances stitch definition and overall shape.
Following these tips ensures a smoother crocheting process and a beautiful final product.
VIDEO TUTORIAL
The shell stitch pattern is a timeless crochet technique that adds elegance and texture to any project. Its simple yet intricate design makes it suitable for both beginners and experienced crocheters looking to enhance their skills.
With this step-by-step guide, you now have all the information needed to start your shell stitch project. By practicing the stitch counts and exploring variations, you can create stunning crochet pieces that showcase your craftsmanship.
So, grab your hook and yarn, and start crocheting the beautiful shell stitch pattern today. Happy crocheting!