
The Pumpkin Wind Spinner – Crochet Pattern is one of the most charming and creative fall crochet projects that combines seasonal spirit with fun, movement, and color. Designed to sway and spin in the breeze, this crochet creation captures the beauty of autumn while giving your home or garden a cozy handmade touch. Whether you’re an experienced crocheter or just learning, making a pumpkin wind spinner allows you to explore textures, patterns, and colors that reflect the warmth of the harvest season.
This delightful craft is not only decorative but also therapeutic. Working on a Pumpkin Wind Spinner – Crochet Pattern gives you the satisfaction of creating something unique while relaxing your mind. As the yarn twists into spirals and takes the shape of a pumpkin, you’ll find joy in each loop and stitch. Plus, this project can be completed in a single weekend, making it perfect for quick seasonal gifts or décor updates.
In addition to its creative appeal, the Pumpkin Wind Spinner – Crochet Pattern serves a practical purpose. It’s an excellent way to use up leftover yarn from other fall projects, helping you reduce waste while still crafting something beautiful. The rhythmic motion of the spinner as it catches the breeze adds movement and whimsy to porches, gardens, or even indoor spaces. The best part? It’s completely customizable — you can adjust the size, color scheme, or texture to suit your personal aesthetic or match your fall decorations.
1. Materials and Tools Needed for a Pumpkin Wind Spinner – Crochet Pattern
Before starting your Pumpkin Wind Spinner – Crochet Pattern, it’s important to gather all the essential materials. Using the right yarn, hook, and accessories ensures that your spinner will hold its shape, resist fraying, and spin beautifully in the wind.
For this project, medium-weight yarn (also known as worsted-weight yarn) works best because it provides enough structure without being too stiff. Acrylic yarn is particularly popular since it’s durable and weather-resistant — ideal for outdoor displays. Opt for shades of orange, green, and brown to evoke that perfect pumpkin look.
You’ll also need a crochet hook suited to your chosen yarn weight, typically size H/8 (5 mm). It’s crucial to maintain consistent tension throughout your work to achieve the spiral effect that makes the wind spinner move smoothly. A pair of scissors and a yarn needle are also essential for trimming and weaving in the ends.
Some crocheters like to add embellishments, such as small leaves, vines, or even tiny crochet pumpkins along the spiral. These can be stitched or glued onto the main piece for extra texture. You may also want to attach a metal ring or swivel hook at the top so the spinner can rotate freely when hung.
Finally, ensure you have a measuring tape to maintain consistent spiral lengths and widths. Precision is key when creating a balanced wind spinner that hangs evenly. Remember, each component plays an important role in ensuring that your Pumpkin Wind Spinner – Crochet Pattern turns out beautifully and functions well outdoors.
Before beginning, take a moment to prepare your workspace. Good lighting, comfortable seating, and organized materials make the process more enjoyable and efficient. Crocheting should be as relaxing as it is creative, and this project perfectly embodies both.
2. Step-by-Step Instructions for Crocheting the Pumpkin Wind Spinner
The beauty of the Pumpkin Wind Spinner – Crochet Pattern lies in its simplicity and versatility. Even beginners can achieve impressive results by following these clear steps. Start by creating the spiral base, which forms the central motion of the spinner.
First, begin with a magic ring or a simple chain loop to serve as your foundation. Work several single crochet stitches around the ring to form a sturdy center. Then, gradually increase stitches in each round to build the spiral’s thickness. The key to creating the twisting motion is adding more stitches on one side of each round while keeping the other side tighter.
Once you establish the basic spiral, continue crocheting outward in alternating rows of orange and brown to mimic the natural tones of a pumpkin. Adjust the tension slightly with each row so the spiral begins to twist naturally as it grows longer.
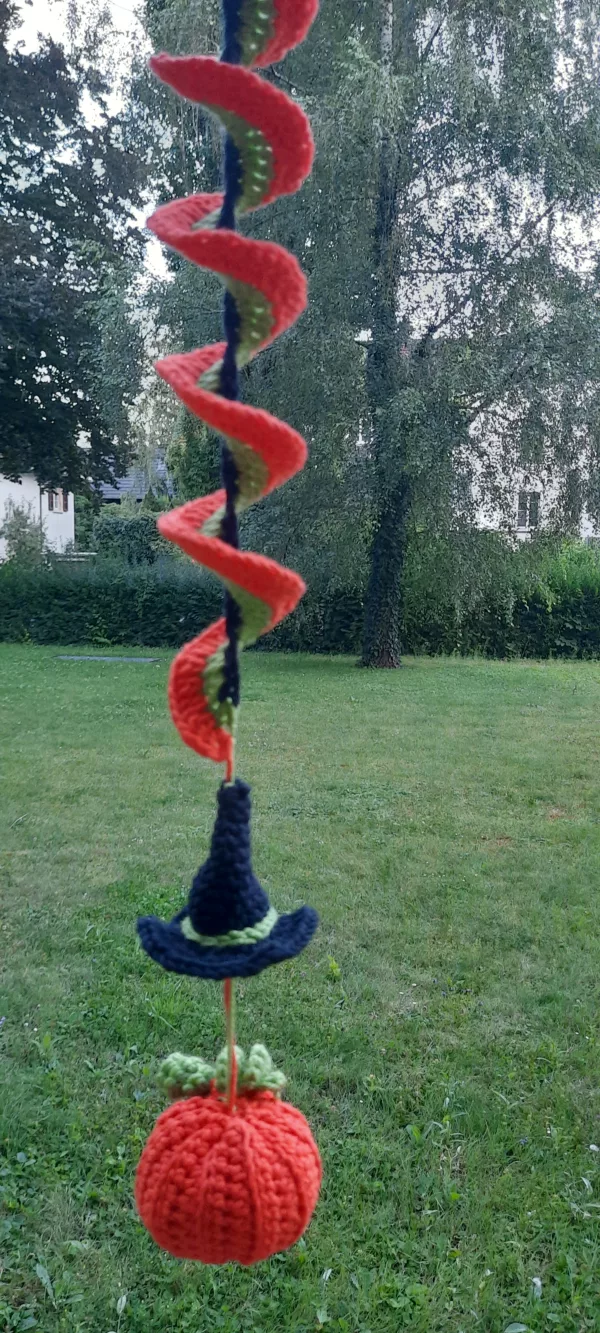
When your spinner reaches the desired length, crochet a few green leaves at the top using chain stitches and slip stitches. This adds a realistic and festive touch to your Pumpkin Wind Spinner – Crochet Pattern.
To finish, secure your yarn ends neatly and attach a swivel hook or string loop to the top for hanging. Some crocheters choose to lightly block their spinner to help it maintain its twist and drape gracefully. If you prefer a firmer shape, consider adding a thin wire along the edge for support.
As you complete your project, admire how the yarn spirals into a soft, elegant motion when suspended. Every small variation in stitch or tension creates a unique flow, ensuring that no two Pumpkin Wind Spinner – Crochet Pattern projects are exactly alike.
3. Creative Variations and Design Ideas
One of the most exciting aspects of the Pumpkin Wind Spinner – Crochet Pattern is its adaptability. You can modify the design to suit any style or season simply by changing colors, materials, or decorative elements.
For a classic fall look, stick with shades of pumpkin orange, deep brown, and moss green. However, if you prefer something more whimsical, try mixing cream and gold yarn for a rustic farmhouse aesthetic. You could even experiment with metallic or sparkly yarns to create a festive holiday spinner.
Add personality by incorporating texture. Try alternating between single crochet and half-double crochet rows, or use a puff stitch for a fuller, three-dimensional look. These small adjustments can make your spinner stand out as a work of art rather than just a simple craft.
Another idea is to turn your Pumpkin Wind Spinner – Crochet Pattern into a garland or mobile. Connect several smaller spinners with a string of twine and hang them along your porch or fireplace mantel. This not only enhances your autumn décor but also gives your space a dynamic and inviting atmosphere.
You can even personalize your spinner with small embellishments like buttons, beads, or miniature leaves. If you’re gifting your creation, adding a small tag or label with your name or a short message makes it feel even more special.
Ultimately, creativity knows no bounds when working with crochet. The Pumpkin Wind Spinner – Crochet Pattern can evolve with every project, reflecting your personality, style, and imagination. Each version tells its own handmade story, spun from yarn and creativity.
4. Tips for Maintenance and Display
Once your Pumpkin Wind Spinner – Crochet Pattern is complete, proper care ensures it remains vibrant and beautiful for years to come. Displaying your handmade spinner in the right location can make all the difference in both longevity and appearance.
If you’re placing it outdoors, choose a shaded or semi-protected area to prevent color fading from direct sunlight. Although acrylic yarn is relatively resistant to the elements, prolonged UV exposure can cause colors to dull over time.
To keep your spinner clean, gently shake off dust or lightly hand wash it in cold water with mild detergent. Avoid wringing or stretching the yarn; instead, pat it dry with a towel and allow it to air dry naturally. This preserves the fiber’s elasticity and shape.
When storing your spinner for the off-season, place it in a cool, dry container away from moisture and pests. You can even use a sachet of lavender or cedar to maintain freshness and prevent moth damage.
For display, experiment with different hanging heights and angles. Wind spinners look best when they have space to move freely. Hanging them near a doorway, window, or porch beam ensures that even the slightest breeze sets them spinning beautifully.
Lastly, take pride in your handmade creation! The Pumpkin Wind Spinner – Crochet Pattern not only enhances your space but also reflects your skill and creativity. Every spin is a gentle reminder of the time and love you put into your craft.
FAQ – Pumpkin Wind Spinner Crochet Pattern
1. Is the Pumpkin Wind Spinner – Crochet Pattern suitable for beginners?
Yes! This pattern is beginner-friendly, requiring only basic stitches like single crochet and chain. Even if you’re new to crochet, you can follow step-by-step tutorials to master it quickly.
2. What type of yarn works best for outdoor use?
Acrylic yarn is ideal for outdoor displays because it’s durable, weather-resistant, and retains color longer than natural fibers.
3. Can I adjust the size of my wind spinner?
Absolutely. You can lengthen or shorten the spiral by adding or removing rounds, and you can make larger pumpkins by using thicker yarn and a bigger hook.
4. How can I make my spinner more rigid?
For added structure, you can crochet with two strands of yarn together or insert a thin wire along the edge. Blocking the finished piece also helps maintain shape.
5. How do I attach my spinner for hanging?
Use a metal swivel hook, ring, or string loop at the top of your spinner. This allows it to rotate freely in the breeze.
6. Can I make other seasonal versions of this pattern?
Yes! Simply change the colors — for example, use red and green for Christmas or pastels for spring. The basic pattern works beautifully year-round.
Conclusion
The Pumpkin Wind Spinner – Crochet Pattern is a delightful and rewarding project that combines artistry, relaxation, and functionality. With just a few materials and basic stitches, you can create a stunning decorative piece that celebrates the charm of autumn. From gathering your supplies to watching your spinner twirl gracefully in the wind, each step brings joy and satisfaction.
We hope this guide inspires you to pick up your hook and try this creative project. Share your experiences, thoughts, and any variations you’ve tried — your feedback helps others discover new ideas and keeps the crochet community vibrant. Leave your honest opinion and suggestions below — we’d love to hear from you!