
Crocheting enthusiasts are always on the lookout for unique and versatile crochet patterns that bring both beauty and functionality to their projects. One such pattern is the Mitered Granny Square. This design offers a modern twist to the classic granny square, with its diagonal symmetry and clean lines.
Mitered Granny Squares provide an excellent way to showcase your crochet skills while exploring new techniques. The diagonal orientation of the stitches adds depth and dimension, making these squares a great option for modern projects.
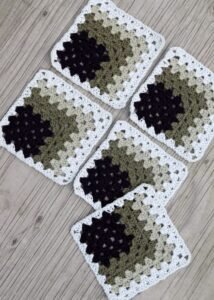
Additionally, their structure allows for creative color combinations, letting you craft truly unique designs. From vibrant multicolor patterns to subtle monochrome squares, the possibilities are endless.
Another appealing aspect of Mitered Granny Squares is their versatility. Whether you want to create a cozy blanket, an elegant pillow cover, or even a fashionable tote bag, these squares can adapt to suit your needs. Their adaptability also makes them ideal for mixing and matching with other crochet motifs, opening up new creative avenues for your projects.
For beginners, the Mitered Granny Square offers an accessible yet rewarding challenge. While the pattern may look intricate, it relies on basic crochet stitches, making it approachable for those new to the craft. With some practice and patience, even novice crocheters can create stunning pieces that showcase this eye-catching design.
What is a Mitered Granny Square?
A Mitered Granny Square is a variant of the traditional granny square, characterized by its distinct diagonal pattern. Unlike the classic version, this square has a dynamic and modern aesthetic, making it a favorite among crocheters.
- Dynamic Design: The diagonal symmetry gives the square a sense of movement, perfect for contemporary projects like throws and shawls.
- Versatility: Use this pattern to create blankets, cushion covers, or even tote bags. It fits seamlessly into any project.
- Beginner-Friendly: While it may look complex, the Mitered Granny Square is surprisingly simple to make with the right guidance.
With its unique look, this square adds a stylish flair to any crochet project.
Materials Needed
Before starting your Mitered Granny Square, gather the following materials to ensure a smooth crafting experience:
- Yarn: Medium-weight yarn works best for this pattern. Choose colors that contrast well to highlight the diagonal design.
- Hook: A 4.5mm crochet hook is ideal, but adjust based on your yarn’s requirements.
- Scissors: A sharp pair for trimming loose ends.
- Tapestry Needle: Useful for weaving in ends and finishing the square neatly.
Having these materials on hand will ensure your project goes smoothly from start to finish.
Step-by-Step Guide to Crafting a Mitered Granny Square
Step 1: Create the Foundation
- Start with a Slip Knot: Begin by making a slip knot and placing it on your hook.
- Chain 4: Make a foundation of 4 chains and join into a ring using a slip stitch.
- First Cluster: Chain 3 (counts as a double crochet), then crochet 2 double crochets into the ring, chain 2, and crochet 3 more double crochets.
This forms the base of your Mitered Granny Square. You now have one corner of your square complete.
Step 2: Begin the Diagonal Build-Up
- Chain 3: Turn your work and chain 3, which acts as your first double crochet.
- Work Along the Edge: Crochet 2 double crochets into the space, chain 2, and make another set of 3 double crochets.
- Maintain the Center: Always chain 2 at the corner to maintain the square’s shape and symmetry.
Continue this process, ensuring the diagonal line forms naturally as you add rows.
Step 3: Expanding the Square
- Add More Rows: Each subsequent row adds to the square’s size. Remember to work 3 double crochets in each chain space.
- Diagonal Line: The mitered effect is achieved by consistently chaining 2 at the center of the square.
- Check Your Work: Pause occasionally to check that the diagonal pattern remains intact.
Repeat this process until the square reaches your desired size.
Tips for Success
Choosing Colors
- Contrast Matters: Use contrasting colors to make the diagonal design stand out.
- Experiment: Try gradient yarn for a seamless color transition.
- Plan Ahead: Map out your color scheme before you begin.
Stitch Consistency
- Even Tension: Keep your stitches consistent to maintain the square’s symmetry.
- Practice: If you’re new to crocheting, practice basic stitches before attempting this pattern.
- Count Stitches: Regularly count your stitches to avoid mistakes.
Finishing Touches
- Weaving in Ends: Use a tapestry needle to weave in loose ends for a clean finish.
- Blocking: Block the square to ensure it’s perfectly shaped.
- Combine Squares: When assembling multiple squares, ensure the diagonal lines align.
Creative Applications
The Mitered Granny Square isn’t just for blankets! Here are some creative ways to use this pattern:
- Pillow Covers: Combine several squares to make a vibrant pillow cover.
- Tote Bags: Use sturdy yarn and create a stylish tote bag.
- Scarves: Arrange squares diagonally for a unique scarf design.
Each project showcases the versatility of this pattern, making it a must-know for every crochet enthusiast.
PATTERN HERE
The Mitered Granny Square is a delightful addition to any crocheter’s repertoire. With its clean lines and contemporary appeal, it’s a pattern that stands out in any project. Whether you’re making a cozy throw or a stylish tote bag, this crochet pattern offers endless possibilities. Grab your hook, pick your favorite yarn, and dive into the world of Mitered Granny Squares today!