
The Crocheted Zippered Case, Decorated with a Rose, Leaves, Pearls, and a Tassel Pattern is a beautiful handmade project that combines practical crochet construction with elegant decorative details. This design features a structured rectangular pouch worked in two complementary purple shades, finished with a zipper along the upper edge. A dimensional crochet rose, textured leaves, a delicate row of pearls, and a long matching tassel transform a simple crochet case into an eye-catching accessory. Although the finished piece looks sophisticated, the project can be completed by following the construction one stage at a time. The pattern is especially enjoyable for crocheters who want to practice creating an even fabric while also learning decorative crochet techniques. Because the dimensions can easily be adjusted, the same idea can become a cosmetic pouch, pencil case, notions bag, travel organizer, or small handmade gift.
An important feature of this crocheted zippered case pattern is the contrast between the lower and upper sections. The lower portion can be made in a lighter lavender yarn using a compact stitch pattern, while the upper section uses a deeper purple and a more pronounced texture. The zipper provides security and gives the pouch a professional appearance, while the embellishments create the handmade character of the design. Pearls placed between the two crochet sections form a graceful transition, and the layered rose becomes the main focal point. Two crochet leaves add shape and balance around the flower, while the tassel attached near the zipper adds movement. These elements can be customized without changing the basic construction, making the project an excellent starting point for creating several coordinated accessories.
Before beginning the Crocheted Zippered Case, Decorated with a Rose, Leaves, Pearls, and a Tassel Pattern, gather medium-weight cotton or cotton-blend yarn in two coordinated shades, an appropriately sized crochet hook, a zipper, sewing needle, strong matching thread, scissors, yarn needle, stitch markers, and decorative craft pearls. For a case similar in proportion to the pictured design, a finished size of approximately 22–24 cm wide and 15–17 cm tall works well, although these measurements are completely adjustable. Crochet tension is more important than matching a specific gauge because the zipper can be selected according to the final width. Keep the stitches relatively firm so the pouch holds its shape, but avoid crocheting so tightly that the fabric becomes difficult to work. If desired, a fabric lining can also be added inside to create a smoother interior and protect small objects.
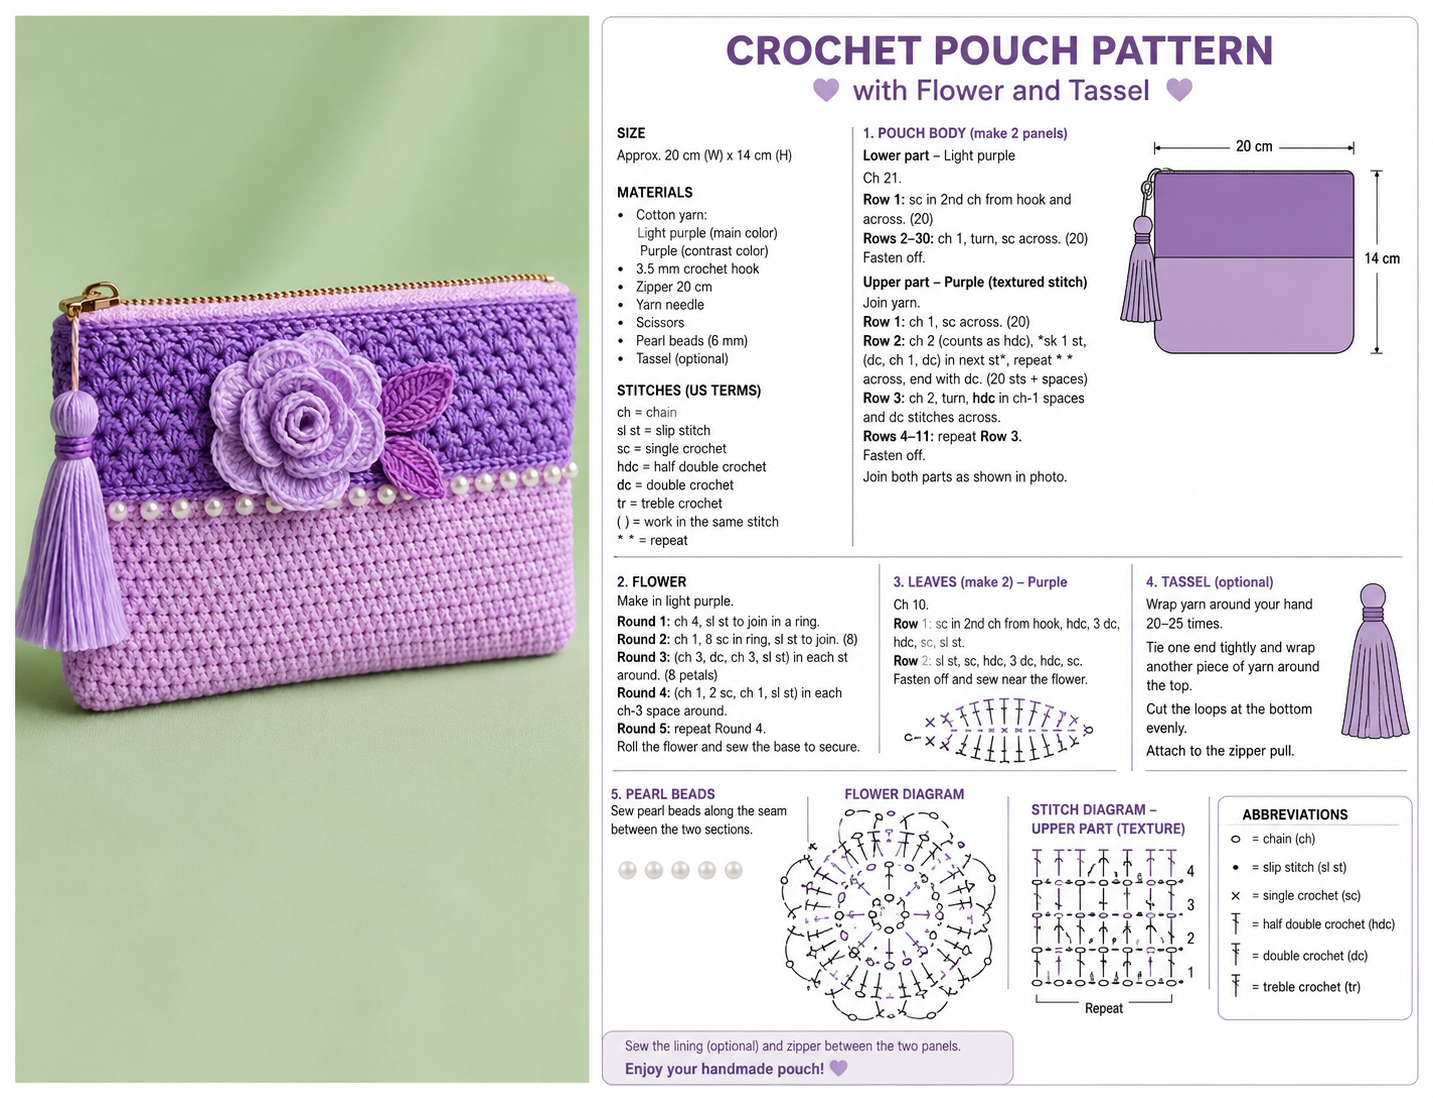
Materials, Crochet Abbreviations, and Preparing the Case
For this crochet zipper pouch, choose yarn with enough structure to maintain a rectangular shape. Mercerized cotton is particularly attractive because its stitch definition highlights the textured upper section and dimensional flower. You will need approximately 100–150 g of yarn depending on the desired dimensions, with slightly more yarn allocated to the main body color. Select a zipper approximately the same width as the finished pouch and enough pearls to decorate the front transition line.
DISCOVER MORE FREE PATTERNS HERE!
The main crochet abbreviations used throughout this pattern are: ch = chain, sl st = slip stitch, sc = single crochet, hdc = half double crochet, dc = double crochet, tr = treble crochet, st = stitch, sts = stitches, sk = skip, yo = yarn over, inc = increase, dec = decrease, and FO = fasten off. Understanding these abbreviations before beginning makes the instructions easier to follow and keeps the pattern concise.
Begin the lower panel by making a foundation chain approximately 22–24 cm long. For a medium-weight yarn, this may be around 45–55 ch, but the exact number depends on the yarn, hook, and personal tension. Row 1: sc in the second ch from the hook and sc across. Ch 1, turn. Count the stitches and write down the number because both the front and back sections should remain identical.
For Row 2, work 1 sc in each st across, ch 1, turn. Repeat this row until the lighter section measures approximately 8–9 cm high. A simple single crochet fabric produces a strong base and creates a subtle visual contrast with the textured upper portion. Check the width occasionally because excessively tight edge stitches can cause the panel to narrow.
Change to the darker purple yarn at the end of the final light-colored row. To make a simple textured stitch, work ch 1, turn, sc in first st, then alternate a slightly raised stitch and sc across. A raised effect can be created with hdc stitches worked around the post of selected stitches or with compact cluster stitches. Keep the texture relatively flat because an overly bulky fabric may make zipper installation difficult.
Continue the upper section for approximately 6–7 cm, keeping the stitch count consistent. Make a second identical panel for the back of the case. Place both pieces together with the right sides facing outward and join the sides and bottom using sc evenly through both layers. Leave the upper edge completely open for the zipper. FO, weave in the yarn ends securely, and gently shape the corners with your fingers.
Adding the Zipper, Pearls, and Decorative Crochet Rose
Installing the zipper in a crochet pouch becomes much easier when it is positioned carefully before sewing. Center the closed zipper along the upper opening and pin or clip it temporarily in place. Make sure equal amounts of zipper tape remain inside both sides of the pouch. Using strong matching thread, sew the zipper tape to the crochet fabric with small, even stitches, checking frequently that the crochet edge does not stretch.
Sew one zipper side completely before beginning the second side. Open and close the zipper several times during installation to ensure that the yarn is not catching in the teeth. If the zipper is slightly longer than the crochet opening, the excess can be tucked neatly toward the interior. Avoid cutting a zipper unless you are familiar with securing zipper stops correctly.
The pearl embellishment should be positioned approximately along the transition between the lighter and darker crochet sections. Arrange the pearls before attaching them so you can evaluate the spacing. Beginning near one side seam, sew each pearl individually with strong thread, leaving approximately 0.5–1 cm between pearls. Individually securing them is helpful because one loose stitch will not cause the entire decorative row to fall away.
To begin the crochet rose pattern, use the lighter flower color and ch 45. Starting in the second ch from the hook, work a base row of sc across. Turn. For the petal row, use repeating combinations such as sl st in next st, 5 dc in next st, sl st in next st. Larger petals can be created toward one end by replacing some groups of 5 dc with 7 dc, producing a naturally layered flower when the strip is rolled.
After completing the petal strip, FO while leaving a long yarn tail. Begin rolling the strip tightly from the end containing the smaller petals. Gradually loosen the roll as the petals become larger. Use the yarn tail and a yarn needle to sew through the bottom layers several times. Shape the petals outward with your fingers until the rose develops a full, dimensional appearance.
Position the finished crochet rose slightly off-center on the front of the pouch, overlapping the pearl line. Sew only through the base of the rose rather than flattening the petals against the pouch. Make several secure passes through different sections of the flower base. The rose should remain firmly attached while its outer petals retain enough freedom to create the attractive three-dimensional effect.
Crocheting the Leaves and Making the Tassel
The leaves surrounding the flower provide contrast and help visually connect the rose with the darker upper section. For the first crochet leaf, ch 10. Beginning in the second ch from the hook, work sl st, sc, hdc, dc, tr, dc, hdc, sc, sl st along one side of the chain. The increasing and decreasing stitch heights naturally create a pointed leaf shape.
Instead of fastening off, rotate the work and crochet along the opposite side of the foundation chain. Repeat the stitch sequence in reverse so the second half mirrors the first. Finish with a sl st near the beginning of the leaf. For additional definition, surface crochet a line of slip stitches through the center to imitate the central vein. FO and leave a long tail for sewing.
Create a second leaf in the same manner. You can make it slightly larger by starting with ch 12 and adding another dc or hdc on each side. Arrange both leaves behind the rose before sewing anything permanently. One leaf can point upward or sideways while the other angles downward toward the pearls, creating a natural floral composition.
For the crochet tassel, cut approximately 25–35 strands of yarn around 20–24 cm long. The number of strands determines the fullness of the finished tassel. Fold all strands evenly in half and tie a strong piece of yarn tightly around the folded center. This creates the hanging point and produces two equal groups of yarn below it.
Wrap another length of yarn several times around the tassel approximately 2–3 cm below the folded top. Pull firmly, tie securely, and hide the knot beneath the wrapped section. Trim the bottom ends evenly with sharp scissors. The completed tassel should hang freely without being so large that it overwhelms the pouch.
Attach the tassel to the zipper pull using a crocheted loop, a small decorative ring, or a strong yarn loop. A simple crochet connector can be made with ch 8–12, sl st into the first ch to form a loop, FO, and then securely sew the loop to the tassel head. Test the zipper several times after attaching the tassel to confirm that the embellishment remains comfortable to hold and does not interfere with opening the case.
Assembly, Finishing Details, and Customizing the Pattern
Once all decorative pieces are prepared, arrange the rose, crochet leaves, pearls, and tassel before completing the final stitching. Small changes in placement can dramatically affect the overall appearance. Keep the large rose as the visual center and allow the leaves to extend beyond it. The pearls should remain visible on both sides of the flower rather than disappearing completely behind the petals.
Sew the leaves onto the pouch first because portions of their bases will be concealed beneath the rose. Use matching yarn and make small stitches around the lower and central sections of each leaf. Avoid sewing every outer edge completely flat. Allowing the tips and edges to remain slightly raised creates a more realistic texture.
After the leaves are secure, sew the rose into position and inspect the pearl row. Add or reposition pearls if necessary to maintain balanced spacing. When working with decorative pearls, attachment strength matters more than using a large number of beads. Each pearl should be securely anchored, especially if the pouch will be used regularly rather than displayed decoratively.
A lining is optional but highly recommended for a polished handmade crochet zipper case. Cut two fabric rectangles approximately the same size as the interior, adding about 1 cm around the sides and bottom for seam allowances. Sew the fabric pieces together along three sides, fold the upper raw edges inward, insert the lining into the crochet case, and hand-sew it carefully below the zipper tape.
The colors can easily be customized. Instead of lavender and purple, try cream and sage, dusty pink and burgundy, beige and terracotta, or pale blue and navy. The Crocheted Zippered Case, Decorated with a Rose, Leaves, Pearls, and a Tassel Pattern can also be adapted for seasonal color combinations. Changing only the flower and tassel colors is enough to create a noticeably different finished design.
Before considering the project complete, inspect every seam and weave in all yarn ends. Check the zipper, gently pull on the tassel, and verify that every pearl is firmly attached. Lightly shape the crochet fabric by hand. If your yarn permits blocking, use gentle blocking rather than excessive heat so the textured stitches and dimensional rose maintain their shape.
FAQ About the Crocheted Zippered Case Pattern
What skill level is recommended for this crochet zipper pouch?
This project is suitable for confident beginners and intermediate crocheters. The pouch itself primarily uses basic chains, single crochet, half double crochet, double crochet, treble crochet, and slip stitches. The flower, leaves, zipper installation, and pearl decoration require additional patience but do not depend on highly advanced crochet techniques.
What yarn works best for a crocheted zippered case?
Cotton and cotton-blend yarns are excellent choices because they generally create defined stitches and a reasonably structured fabric. Medium-weight yarn is convenient for this project, although lighter yarn can be used for a more delicate pouch. Whatever yarn you choose, maintain a firm and consistent tension.
How can I make the pouch larger or smaller?
Adjust the foundation chain to establish your preferred width, then crochet more or fewer rows to determine the height. The important point is to make the front and back panels identical. Choose the zipper only after confirming the finished width if you want the easiest possible fit.
Can I crochet the pouch in one piece instead of making two panels?
Yes. You can create one long rectangle, fold it in half, and seam the sides. Another option is crocheting continuously in rounds from an oval foundation. However, two separate rectangular panels are straightforward and make it easier to control the placement of the textured sections and embellishments.
How do I keep the zipper from becoming wavy?
Do not stretch the crochet fabric while sewing the zipper. Position the zipper against the relaxed upper edge, temporarily secure it with clips or pins, and sew using small stitches. Check alignment after every few centimeters. A stable cotton crochet fabric usually makes zipper installation easier.
Are the pearls necessary for the pattern?
No. The pearls are decorative and can be omitted. You could also replace them with embroidered French knots, small crochet bobbles, wooden beads, or another lightweight decoration. If the pouch is intended for a child, consider avoiding detachable small embellishments that could present a choking hazard.
How can I make the crochet rose more dimensional?
Use smaller petals at the beginning of the strip and progressively larger stitch groups toward the opposite end. Roll the small end tightly to form the center and allow the outer layers to become progressively looser. Sew mainly through the base so the upper petal edges remain free.
Why is my crochet rose becoming too flat?
The strip may be rolled too tightly from beginning to end, or the petals may have been stitched directly against the pouch. Keep the center compact but gradually loosen the outer layers. When attaching the flower, sew through its underside rather than through the visible edges of every petal.
Can I add more than two crochet leaves?
Absolutely. Three leaves can create a fuller botanical arrangement, while one leaf gives the design a minimalist appearance. You can also vary their sizes by changing the foundation-chain length and adjusting the stitch sequence accordingly.
Should I line a crochet zipper pouch?
A lining is optional, but it offers several benefits. It prevents small items from catching in crochet stitches, reduces stretching, hides the zipper tape and internal stitching, and can help the finished case maintain its shape. A simple cotton fabric is usually sufficient.
How do I prevent the pouch from stretching?
Use firm crochet tension, choose a relatively structured yarn, and consider adding a fabric lining. Avoid using a hook that produces very loose stitches. A dense single crochet base is particularly helpful when the pouch will hold cosmetics, craft supplies, or other moderately heavy objects.
Can the tassel be removed?
Yes. Make the tassel detachable by connecting it to a small ring or removable loop attached to the zipper pull. This allows you to replace the tassel later or use the pouch without it whenever you prefer a simpler appearance.
How long does this crochet project take?
The time depends on experience, size, stitch choice, and the amount of decoration. The rectangular panels are usually the most repetitive portion, while the rose, leaves, zipper, pearls, and tassel involve more detailed handwork. Working carefully during assembly generally produces better results than rushing the finishing stage.
Can this pattern be used to make handmade gifts?
Yes. The combination of practical storage and decorative crochet makes this case particularly suitable as a handmade gift. Colors and embellishments can be personalized for the recipient, and the interior can be lined for an especially polished finish.
What can I store inside the finished crocheted case?
Depending on its size, the pouch can hold crochet hooks, sewing notions, pencils, cosmetics, small travel accessories, cables, stationery, or other lightweight personal items. If you plan to carry very small objects, adding a tightly woven fabric lining is recommended.
How should a decorated crochet pouch be cleaned?
Because the project contains a zipper, pearls, a dimensional rose, and a tassel, gentle cleaning is preferable. Follow the care recommendations for the specific yarn used. Avoid aggressive rubbing or twisting around the flower and pearl decorations, and reshape the pouch carefully while drying.
Can beginners simplify the design?
Yes. Beginners can crochet the entire pouch in single crochet, use only one yarn color, and add the decorative elements gradually. Start with the zipper case, then make the leaves and rose separately. The pearls and tassel can be added only after you feel satisfied with the main construction.
What makes the Crocheted Zippered Case, Decorated with a Rose, Leaves, Pearls, and a Tassel Pattern special?
Its appeal comes from combining several familiar techniques in one coordinated design. A functional crochet zipper pouch becomes more distinctive through layered crochet petals, shaped leaves, pearls, contrasting colors, and a handmade tassel. Each element can also be customized, making every finished case slightly different.
Conclusion
The Crocheted Zippered Case, Decorated with a Rose, Leaves, Pearls, and a Tassel Pattern demonstrates how basic crochet construction can become an elegant handmade accessory through thoughtful finishing. Starting with two structured crochet sections, the project develops into a practical pouch with a secure zipper, dimensional flower, shaped leaves, pearl embellishments, and a coordinating tassel.
Throughout this pattern, you learned how to establish the pouch dimensions, crochet the front and back sections, join the edges, install a zipper, create a layered crochet rose, shape decorative crochet leaves, attach pearls, and make a simple yarn tassel. These techniques can also be reused individually in many future crochet projects.
Remember that the suggested stitch counts and measurements can be adapted to your yarn and preferred finished size. Maintaining consistent tension and checking measurements throughout the project are more important than reproducing an exact number of stitches. This flexibility is one of the advantages of making a handmade crocheted zippered case.
You can also use this pattern as a foundation for your own creative variations. Experiment with different flower colors, contrasting leaves, smaller pearls, alternative textured stitches, or a different tassel length. A few carefully chosen changes can give the same basic pattern an entirely new personality.
EASILY FIND THE PDF FOR THIS PATTERN HERE!
Most importantly, take time with the finishing details. Straight seams, a smoothly installed zipper, securely attached decorations, and carefully hidden yarn ends can significantly improve the final appearance. These small details help transform a simple crochet project into a polished accessory that is both decorative and functional. If you make your own Crocheted Zippered Case, Decorated with a Rose, Leaves, Pearls, and a Tassel Pattern, leave your sincere opinion about the pattern and share your suggestions. Tell us which colors you would choose, how you would customize the flower and embellishments, and what other variations you would like to see in future crochet patterns.