
Crocheted Reindeer Christmas Ornament – Tutorial – Quilt Pattern is a festive and creative project that brings warmth, charm, and handmade beauty to your holiday décor. Whether you enjoy crochet, quilting, or DIY crafts in general, learning how to make a Crocheted Reindeer Christmas Ornament – Tutorial – Quilt Pattern is a rewarding experience that combines traditional techniques with modern creativity. This ornament can be used to decorate your Christmas tree, embellish gift boxes, or add a personalized touch to festive displays around your home. The goal of this guide is to explain each step clearly, ensuring beginners and experienced crafters can follow along comfortably.
Handmade ornaments have become increasingly popular because they carry sentimental value and offer a unique touch compared to store-bought decorations. A Crocheted Reindeer Christmas Ornament – Tutorial – Quilt Pattern project is not only fun but also teaches valuable skills such as shaping crochet pieces, adding quilt-inspired textures, and assembling small details that give character to the reindeer. Crafting your own ornament allows you to choose colors, materials, and textures that reflect your personal style and holiday traditions. It is also a thoughtful and heartwarming gift for friends and family who appreciate handmade items.
This guide will walk you through the essential materials, foundational techniques, assembly methods, and customization options to help you create a charming ornament with ease. By understanding the structure of a Crocheted Reindeer Christmas Ornament – Tutorial – Quilt Pattern, you will learn how to bring together crochet stitches, quilt-inspired designs, and carefully crafted features like eyes, antlers, and decorative accessories. Before diving into the steps, it is important to gather the right materials and prepare yourself for an enjoyable crafting experience filled with creativity and festive spirit.
Materials You Need to Create the Ornament
To begin your Crocheted Reindeer Christmas Ornament – Tutorial – Quilt Pattern, start by selecting the right yarn. Cotton or acrylic yarn works perfectly for small decorative pieces because they offer structure and clarity to the stitches. Brown, beige, red, and white are classic colors for a reindeer design, but you can customize the palette to match your holiday décor. Choosing high-quality yarn ensures your ornament looks polished and remains durable throughout the holiday season.
A small crochet hook is essential for maintaining tight, even stitches. Most ornament-sized projects use hook sizes between 2.5 mm and 4 mm. A smaller hook helps keep the fabric dense, preventing stuffing from showing through. This gives your Crocheted Reindeer Christmas Ornament – Tutorial – Quilt Pattern a clean and professional appearance.
You will also need stuffing material to help your reindeer maintain its shape. Polyester fiberfill is the most common option because it is lightweight, easy to work with, and maintains volume over time. Use small amounts of stuffing at a time to ensure smooth and even shaping throughout the ornament.
Other important materials include safety eyes or small black beads, a tapestry needle for sewing parts together, and a small amount of felt or fabric scraps for quilt-inspired embellishments. These details help create contrast and visual interest in your design, especially if you want your ornament to reflect the charm of a quilt pattern.
Adding quilt-like elements to your ornament can be done by attaching fabric patches or embroidered patterns to the body of the reindeer. This brings a handmade, textured look that enriches the overall design. Combining crochet and quilting is an excellent way to elevate the ornament and make it more unique.
Lastly, consider adding optional decorations such as ribbons, mini bells, or crochet flowers. These small touches bring personality and festive detail to your Crocheted Reindeer Christmas Ornament – Tutorial – Quilt Pattern, making it even more eye-catching on the Christmas tree.
Creating the Crocheted Base
To begin crocheting the base of your ornament, start by making the reindeer’s head, which is the central piece of the Crocheted Reindeer Christmas Ornament – Tutorial – Quilt Pattern. Most designs begin with a magic ring, followed by rounds of single crochet increases that shape the head into a sphere. The key is to maintain even tension to create a symmetrical shape. This is the foundation of the ornament, so taking your time is essential.
After forming the basic shape, continue crocheting in rounds until the head reaches the desired size. You can adjust the number of rows to make your reindeer smaller or larger, depending on your style preference. Once you reach the widest part of the sphere, begin decreasing stitches evenly to close the shape. Before sealing the final row, add stuffing to create a firm but soft texture.
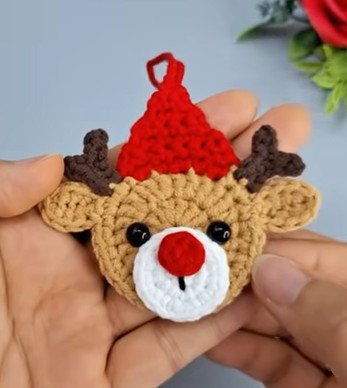
Next, crochet the ears and antlers. These components help define the character of the Crocheted Reindeer Christmas Ornament – Tutorial – Quilt Pattern. Ears are typically made using small oval shapes, while antlers can be made with branched chains and single crochet stitches. You can experiment with different antler shapes, from simple straight ones to more detailed multi-branch versions.
After creating these elements, attach them carefully to the top of the head. Use a tapestry needle and matching yarn to sew them securely in place. Proper placement ensures the reindeer has a cute and friendly appearance. If you want the ornament to be extra sturdy, reinforce your sewing with small backstitches.
Crochet the reindeer’s nose next, which is one of the most iconic features. A red nose is perfect for a Rudolph-inspired design, while brown or black fits a classic reindeer look. Make a small sphere or oval and sew it onto the center of the face. This simple step brings your ornament to life and adds festive character.
Finally, attach safety eyes or sew small beads onto the face. If you prefer an embroidered look, you can stitch simple eyes using black yarn. How you design the face will influence the personality of your Crocheted Reindeer Christmas Ornament – Tutorial – Quilt Pattern, so feel free to experiment with different expressions.
Adding Quilt-Inspired Details
To incorporate quilt-inspired patterns, begin by preparing small fabric patches that complement your ornament’s color theme. These patches can be sewn or glued onto the body of the Crocheted Reindeer Christmas Ornament – Tutorial – Quilt Pattern to create decorative elements that resemble traditional quilt blocks. Stars, triangles, and patchwork squares are excellent choices that add charm and warmth.
Embroidery is another beautiful way to imitate quilt patterns. You can use simple stitches like running stitch or cross stitch to create geometric designs on the reindeer’s head or body. This method allows you to bring the softness and artistry of quilting into your crocheted piece without overpowering it.
If you prefer to crochet quilt-style patterns directly into the ornament, consider using color changes in your rounds. Alternating colors in specific sequences can create a patchwork effect that mimics quilting. This technique adds depth and visual interest to your Crocheted Reindeer Christmas Ornament – Tutorial – Quilt Pattern.
Using felt is another creative option. Cut small shapes such as hearts, trees, or stars and attach them to your ornament. Felt edges do not fray, making it easy to achieve clean lines and precise designs. This method is perfect for beginners who want to add quilt-inspired details without complex sewing techniques.
Decorative stitching can also be added along the edges of your felt pieces. Using contrasting thread enhances the quilt effect and adds delicate texture to your ornament. These small details bring a cozy handmade feel that pairs beautifully with crochet.
Finally, consider applying tiny buttons or beads in a quilt-like arrangement on the reindeer’s body. While subtle, these elements enhance the ornament’s overall aesthetic and reinforce the handmade charm associated with the Crocheted Reindeer Christmas Ornament – Tutorial – Quilt Pattern.
Assembling and Finishing the Ornament
Once all the individual pieces are complete, it’s time to assemble your Crocheted Reindeer Christmas Ornament – Tutorial – Quilt Pattern. Begin by attaching the ears, antlers, and facial features securely. Double-check the placement to ensure a balanced and symmetrical look. Taking a few extra moments during this step helps create a polished final result.
After the head is fully decorated, attach a hanging loop to the top. This can be made from yarn, ribbon, or a crochet chain. Make sure the loop is strong enough to support the weight of the ornament. A secure loop ensures your reindeer hangs properly on the Christmas tree without tilting or slipping.
Next, add any final quilt-inspired embellishments. This might include sewing tiny patches, embroidering small patterns, or attaching decorative beads. These details enhance the overall personality of your ornament and highlight the mixed-craft beauty of combining crochet with quilting elements.
If your ornament includes a small body or additional parts, assemble them now. Some crafters like to add a tiny scarf, a crocheted sweater, or a quilted saddle to the reindeer for extra charm. Each addition gives your Crocheted Reindeer Christmas Ornament – Tutorial – Quilt Pattern more individuality and festive character.
After all pieces are attached, inspect the ornament for loose threads, uneven stitches, or missing details. Making small adjustments at this stage ensures a high-quality final result. Trim excess yarn and gently shape the ornament with your hands for a smooth appearance.
Your crocheted reindeer is now complete, ready to bring holiday cheer to your home. Enjoy hanging it on your tree or gifting it to someone special. The blend of crochet and quilt-inspired design makes this ornament a meaningful handmade treasure.
FAQ – Frequently Asked Questions
1. Is this project suitable for beginners?
Yes, beginners can make this ornament by following simple crochet stitches and practicing basic assembly techniques.
2. What yarn is best for a crocheted Christmas ornament?
Cotton or acrylic yarn works best because they hold shape well and give clear stitch definition.
3. Can I skip the quilt-inspired details?
Yes, the quilt elements are optional, but they add a unique and charming touch to the ornament.
4. Do I need special tools for this tutorial?
You only need basic crochet tools like a hook, yarn needle, scissors, stuffing, and optional felt or fabric patches.
5. How long does it take to complete the ornament?
Most people can finish it in one to two hours, depending on experience and added decorative details.
6. Can I make the ornament larger?
Yes, simply use thicker yarn and a larger hook to scale up the project.
7. How can I personalize the reindeer?
You can change colors, add accessories, embroider details, or attach unique quilt-pattern patches.
8. Is this ornament safe for children?
If you use safety eyes and secure all parts well, it can be safe. Avoid small detachable pieces for very young children.
9. Can I sell the ornaments I make?
Certainly. Handmade ornaments are popular at craft fairs and during the holiday season.
10. Can I use leftover yarn scraps?
Yes, this project is perfect for using small amounts of leftover yarn.
Conclusion
Creating a Crocheted Reindeer Christmas Ornament – Tutorial – Quilt Pattern is a delightful way to celebrate the holiday season with creativity and joy. Throughout this article, you learned how to choose the right materials, crochet and assemble the main parts, add quilt-inspired details, and customize your ornament with personal touches. This festive project is fun, meaningful, and suitable for all skill levels.
If you enjoyed this tutorial, please leave your sincere opinion and share suggestions for future articles. Your feedback helps inspire new ideas and improve upcoming guides!